This section is going to show how to create daily, weekly and monthly reports through CoreInteract.
Accessing Reports
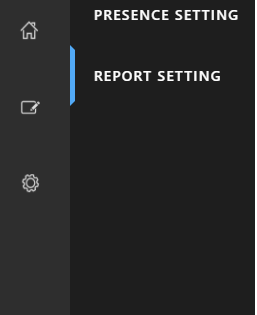
First access reports by clicking on settings icon then report settings.
This will open a view of reports.
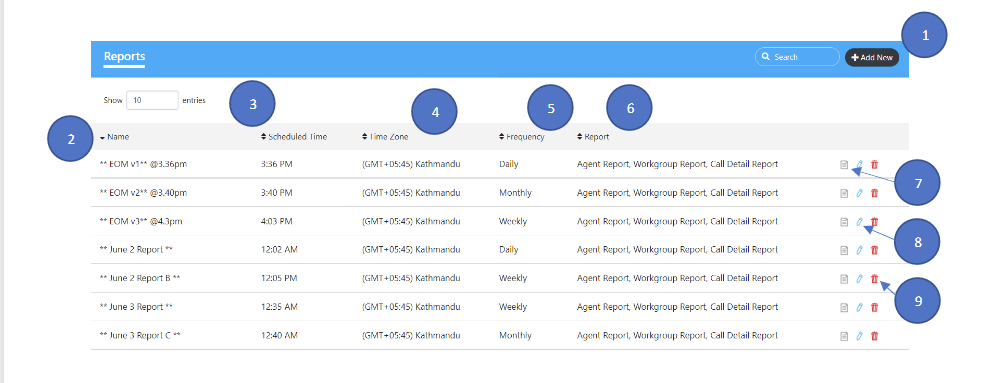
| 1 – Add New | Click This Button To Create A New Report |
| 2 – Name | This Will Show You All Your Configured Reports |
| 3 – Scheduled Time | This Shows When That Report Will Be Sent To The Email Address(s) |
| 4 – Time Zone | What Time Zone The Report Is Scheduled For |
| 5 – Frequency | How Often The Report Will Generate |
| 6 – Report | What Type Of Reports Will Be Generated |
| 7 – View | Click This Button To View The Report Setting |
| 8 – Edit | Click This Button To Edit The Report Setting |
| 9 – Delete | Click This Button To Remove The Specific Report Setting |
How to setup a schedule Report
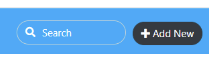
Click ‘Add New’.
A pop-up window should appear.
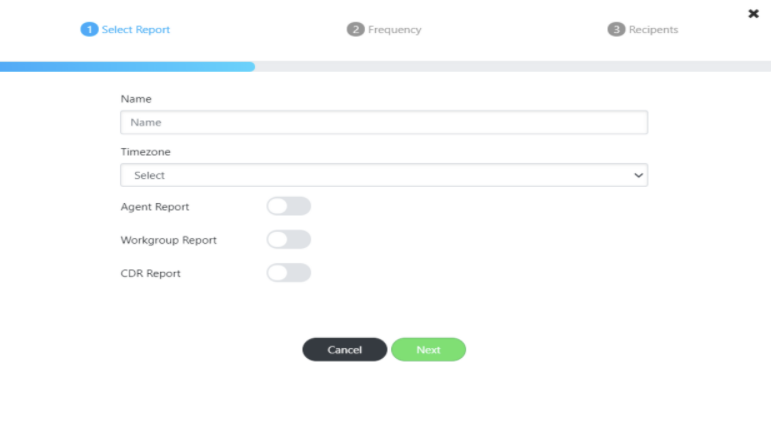
Select Report – The first step will be to name and specify which reports you wish to generate.
Name – Give the report a suitable name.
Time Zone – Specify which time zone you are in.
You must then select at least one of the following reports to generate:
- Agent Report
- Workgroup Report
- CDR (Call Detail Report) Report
All 3 options can be selected.
Now click on ‘Next’
(NOTE) As you toggle each of the reports another option will be added to the top bar.

Agent Reporting
In the select Agent report settings you can generate a report based on one or more Agents within your CoreInteract system.
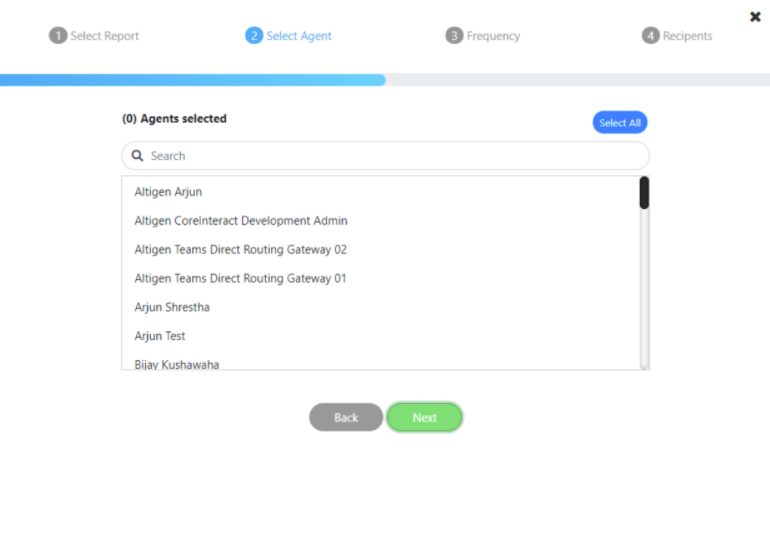
To select an Agent, Highlight them by clicking on their name and confirming by clicking next.
You also have the option to search for Agents by using the search bar.
To deselect an Agent, simply click on the Agents name again to unhighlight.
Workgroup Reporting
In the Workgroup report settings, you can generate a report based on one or more Workgroups within your CoreInteract system.
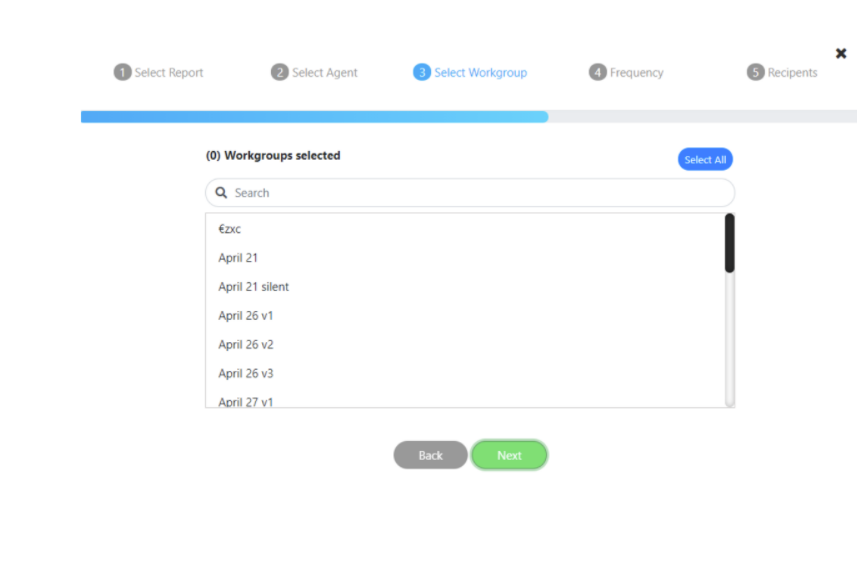
To select a Workgroup, Highlight it by Clicking on the Workgroup and confirming by clicking next.
You also have the option to search for Workgroups by using the search bar.
To deselect a workgroup, simply click on the workgroup name again to unhighlight.
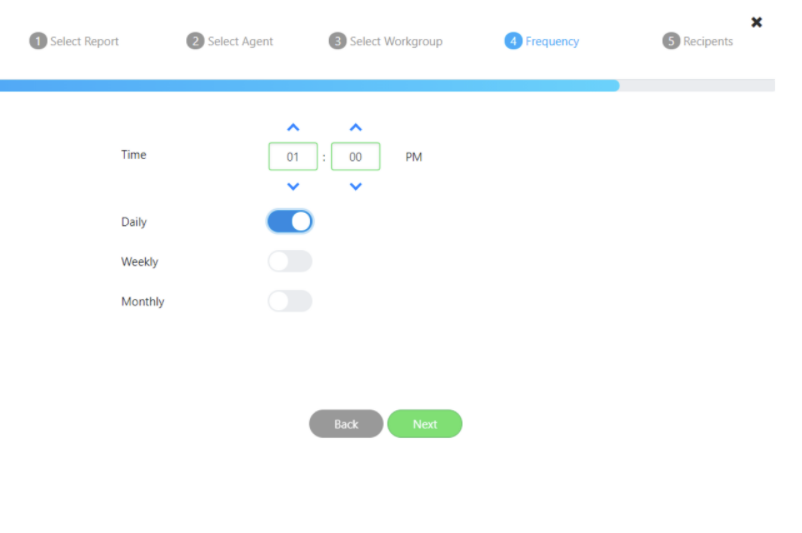
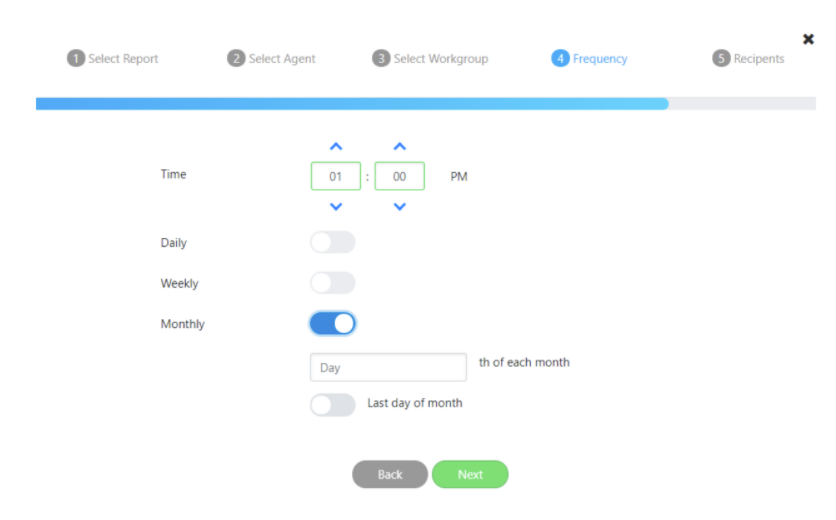
Setting the Frequency of your Reports
You can set the frequency of your reports by specifying what time of day you wish to receive the reports and whether you want them daily, weekly or monthly.
To set the Time of the report, type in the number using a 12-hour clock and then specify if it is AM or PM by clicking on the AM/PM wording.
Toggle the daily button to receive the report every day at the time specified.
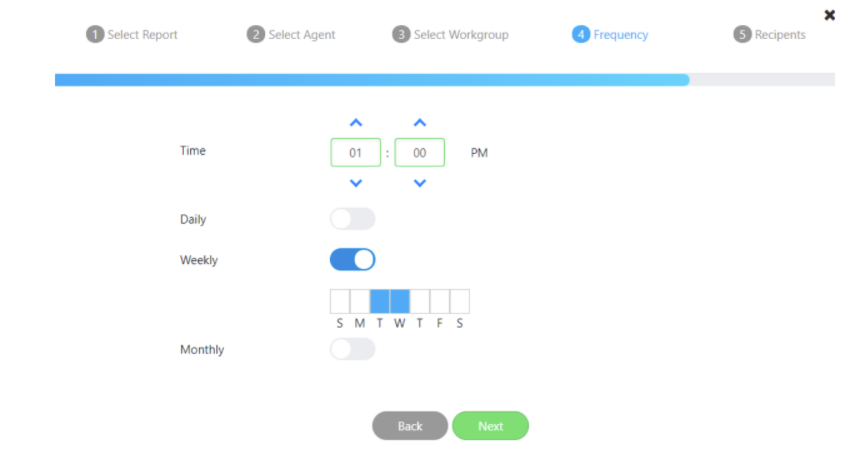
Alternatively, you can set the reports to be generated on a weekly basis. When you toggle the weekly button, another option to specify which day of the week you want the report generated will be given. You must select at least one and you can select all seven days of the week.
You can also select your report to be generated monthly, when you toggle this option you will be asked what day of the month you want the report generated or you can specify the last day of the month.
Setting up Recipients
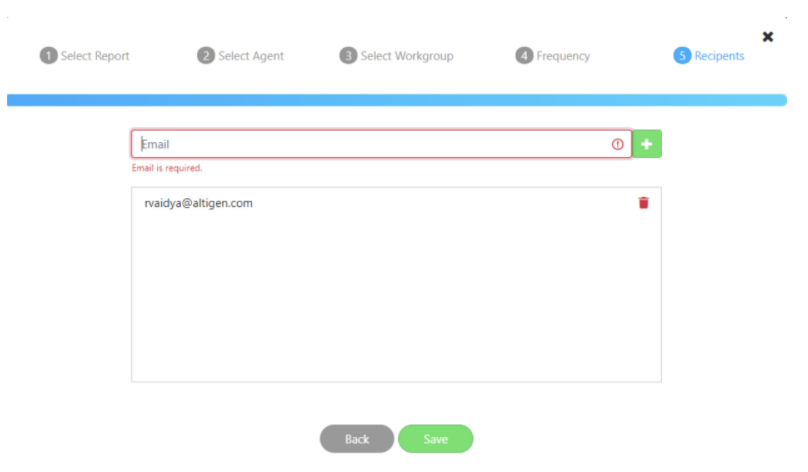
Now that you have the Reporting setup you must specify an email address for CoreInteract to send the report.
This email address can be external and does not have to be part of the users within CoreInteract.
You can add as many emails as you like.
Type the email address in the email bar and click the plus icon to add it to the list. CoreInteract will be able to spot if the email entered is not formatted correctly.
Once you have added an email address to the report settings click save and your report will be setup.
Report Detail – Field Descriptions
There are three different reports available in CoreInteract, the below tables show the field used and the description.
Workgroup Report
| Field | Description |
|---|---|
| Date | Date Of Call When Reaching The Workgroup Queue |
| Workgroup | Name Of Workgroup |
| Total Calls Offered | Total Calls Per Day (Total count of conversation in workgroup queue per day, unique by conversation) |
| Total Answered Calls | Total Calls Received By An Agent In A Day (Total count of conversations with conversation type Active in agent queue, unique by conversation |
| Total Call Handle Time | Total Time Engaged In A Call (Total of the tome difference between start date of workgroup queue with ConversationQueue type Ringing or Active |
| Calls Abandoned In Queue | Total Number Of Calls That Did Not Reach The Agent Per Day (Total number of calls that ended in Workgroup Queue) |
| Average Talk Time | Average Of Customer Engaged With The Agent Per Day (AverageTalkTime->TotalTalkTime/TotalAnsweredCall | TotalTalkTime) |
| Calls Abandoned During RNA | Total Number Of Calls With Ring No Answer By Agent |
| Calls To Voicemail | Total Number Of Calls That Went To Voicemail (Total number of calls in workgroup queue with Conversation Queue Type Voicemail) |
| Average Call Answered Time | Average Time Taken In A Day To Answer A Call ( Average of time difference in workgroup queue between Conversation Queue Type Ringing to Activate in Queue) AverageCallAnswerTime->Average of WorkgroupCallAnswerTime – WorkgroupCallStartTime |
| Average Time In Queue | Total Time Spent By An Agent In Queue Waiting. (Average of time difference between waiting conversation queue type to active queue type in workgroup queue) *average of (CallAnswerTime – WorkgroupQueueStartTime) – If call is answered by an agent. *Average of (WorkgroupQueueEndTime – WorkgroupQueueStartTime) – If call is not answered by any agent. Peak Wait Time – Time when queue is busiest |
| Abandoned Percent | Total Percentage Of Abandoned Calls By Call Total |
Agent Report
| Field | Description |
|---|---|
| Date | Date Of Call In Reaching Agent Queue |
| Workgroup | Name Of The Agent Associated Workgroup |
| Agent | Name Of The Agent |
| Total Calls | Total Number Of Calls Redirected To An Agent (Total conversation In Agent Queue group by agent and unique conversation) |
| Total Answered Calls | Total Number Of Conversations With User Conversation Queue Status Active In Agent Queue. |
| Total Abandoned Calls | Total Number Of Conversations With User Conversation Queue Status Rejected |
| Total Talk Time | Total Time Difference Between Agent Queue With Status Active To Call End |
| Average Talk Time | Total Talk Time / Total Answered Calls |
| Average Call Answer Time | Average Time Taken By An Agent To Answer A Call (Average Time between Agent queue with conversation queue status Ringing to Call answered by agent) AverageCallAnswerTime->Average of (AgentCallAnswerTime – AgentQueueStartTime) |
Call Detail Report
| Field | Description |
|---|---|
| Conversation ID | Unique ID Of The Conversation |
| Call Start Date | This Is The Start Date When The Call Reached CoreInteract System |
| Call Start Time | This Is The Start Time When The Call Reaches The CoreInteract System |
| In Coming Caller ID | Phone Number Of The Caller Who Calls To The CoreInteract Starting Point |
| Starting Point | This Is The Phone Number Attached To The Workflow In CoreInteract |
| Workflow | This Is The Name Of The Workflow Which The Caller Calls |
| Workgroup | This Is The Name Of The Workgroup To Which The Call Will Be Transferred |
| Conversation Route Type | This Is The Route Type To Which The Call Will Be Transferred |
| Workgroup Queue Start Time | This Is The Time When The Call Reaches The Workgroup Queue Activity |
| Workgroup Queue End Time | The Time When The Call Leaves The Workflow Queue |
| Busy Handling | When The Busy Handling Of The Workgroup Setting Is Triggered, Then The Field Value Is True Else It’s False |
| Busy Handling Forward Voicemail | When Busy Handling Is True, Then If The Call Goes To The Voicemail Then This Field Will Have The Voicemail Box Name |
| No Answer | When The No Answer Of The Workgroup Setting Is Triggered, Then The Field Value is True Else It’s False |
| No Answer Forward To Voicemail Box | When No Answer Is True, Then The Call Goes |
| Group RNA | When The Group RNA Of The Workgroup Setting Is Triggered, Then The Field Value Is True Else It’s False |
| Group RNA Forward To Voicemail Box | When The Group RNA Is True, Then If The Call Goes To The Voicemail Then This Field Will Have The Voicemail Box Name |
| Queue Timeout | When The Queue Timeout Of The Workgroup Setting Is Triggered, Then The Field Value Is True Else It’s False |
| Queue Timeout Forward To Voicemail Box | When Queue Timeout Is True, Then If The Call Goes To Voicemail Then This Field Will Have The Voicemail Box Name |
| Queue Overflow | When The Queue Overflow Of The Workgroup Setting Is Triggered, Then The Field Value Is True Else It’s False |
| Queue Overflow Forward Voicemail Box | When Queue Overflow Is True, Then If The Call Goes To The Voicemail Then This Field Will Have The Voicemail Box Name |
| Agent Name | The Name Of The Agent To Whom The Call Was Transferred Or Who Answers Or Rejects The Call |
| Agent Queue Start Time | Time When The Call Is Redirected To Agent |
| Agent Queue Answer Time | Time When The Call Is Answered By The Agent |
| Call End Time | Time When The Call Was Ended |
| Workgroup Transfer | If The Workgroup Setting Is Set To Workgroup Transfer From Any Of The Workgroup Settings Like Busy Handling, Group RNA, Queue Overflow, Queue Timeout Or No Answer Then This Field Is Set As True |
| Workgroup | The Name Of The Workgroup Which The Call Was Transferred From The Workgroup Transfer Method |
| Agent Transfer | If The Workgroup Setting Is Set To Agent Transfer From Any Of The Workgroup Setting Like Busy Handling, Group RNA, Queue Overflow, Queue Timeout Or No Answer Then This Field Is Set As True |
| Transferred Agent | This Field Is The Name Of The Agent To Whom The Call Is Transferred From The Agent Transfer Method |
Date Range
This is the newly added functionality in CoreInteract Reporting. In this other than daily, weekly and monthly frequency, user can select date range (from date and to date) of the report data that one wants to view.
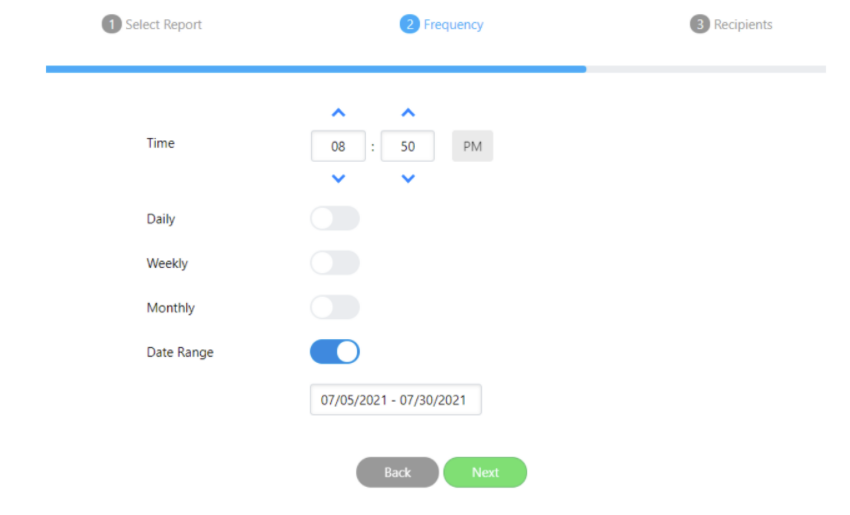
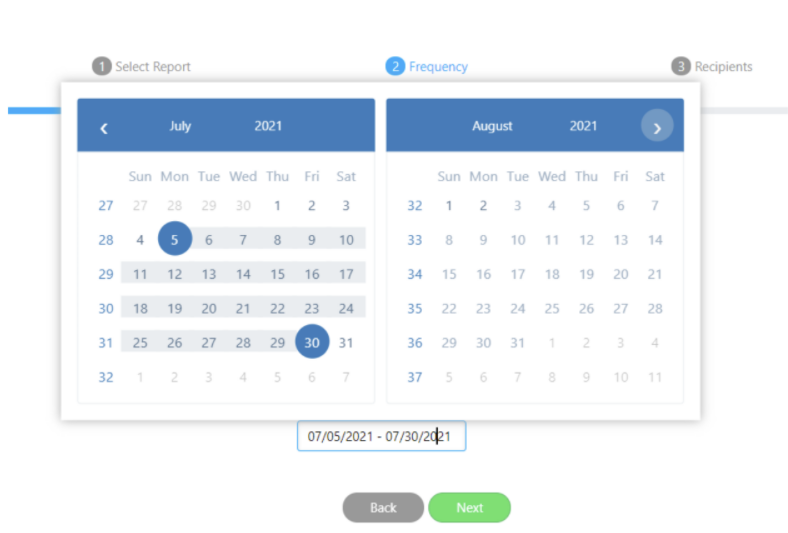
On clicking the date range radio button, a text box will appear, and you will see the date range picker. So, the call details within this date range will be seen in the report. Unlike the other daily, weekly and monthly, the date range frequency is a onetime report i.e., this will not be triggered as the other three frequency. The report will be emailed to the selected email address in the scheduled time selected by the user. Also the report can be viewed from the download icon after the scheduled time is triggered.