- Home Page View
- Workflows
- Users
- Check Category
- Workgroups
- Roles
- Check Organization Management
- Audio Files
- Tenant Level Voicemails
- Hours of Operation
- Holidays
- Goals
- Check meaning Workgroup Level Goals
- Source management
- Settings menu
- Setting
- Report Setting
- Power BI Report
- Resource Management
- CHECK Organizational Management
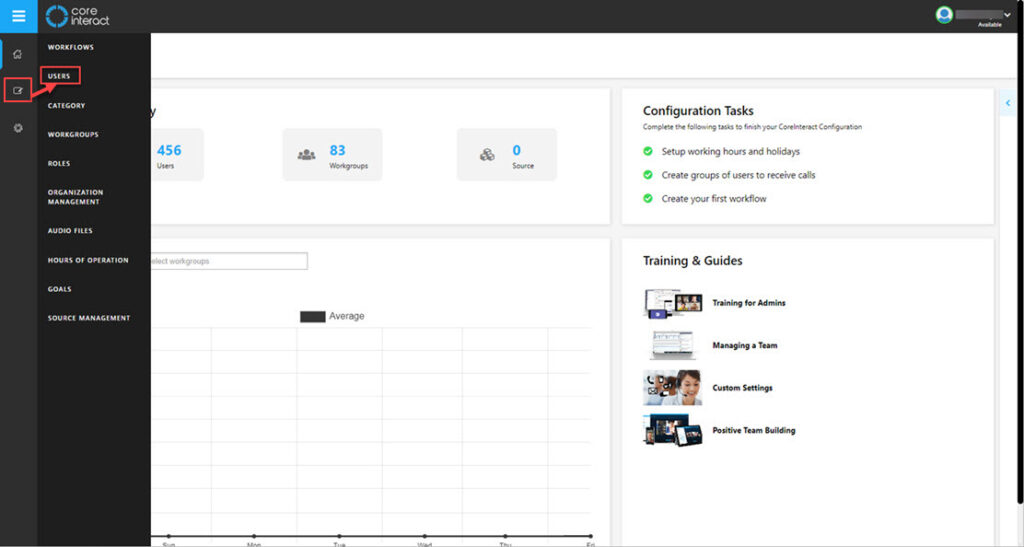
Home Page View
CoreInteract home page includes a dashboard for quick view and easy access to information.
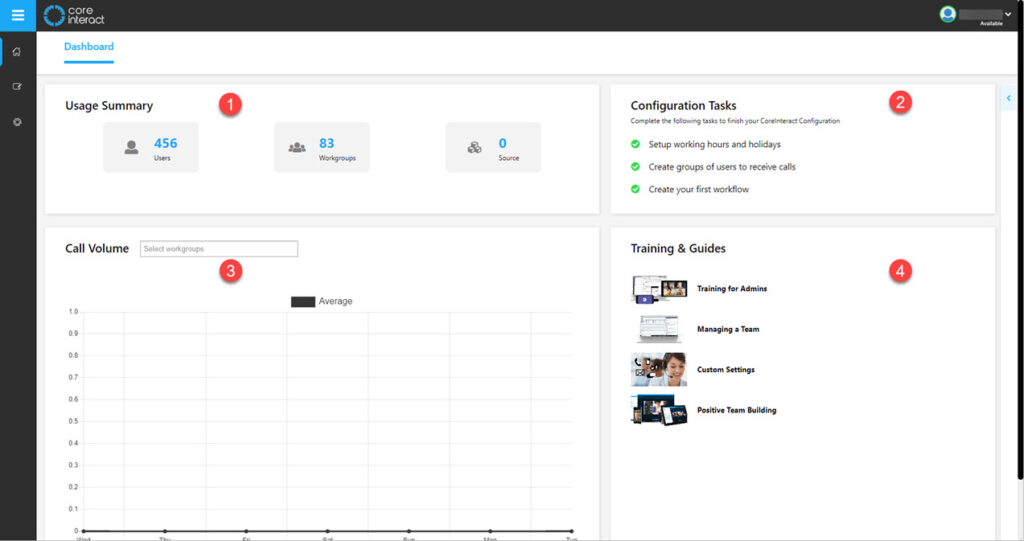
- Usage Summary – Shows number of users available, number of workgroups set up and external data sources connected.
- Configuration Tasks – Outstanding tasks to configure with ability to click to go to page.
- Call Volume – Snapshot of number of calls received from the past week. Allows for specification of workgroups or users.
- Training & Guides – Access to product training and information guides.
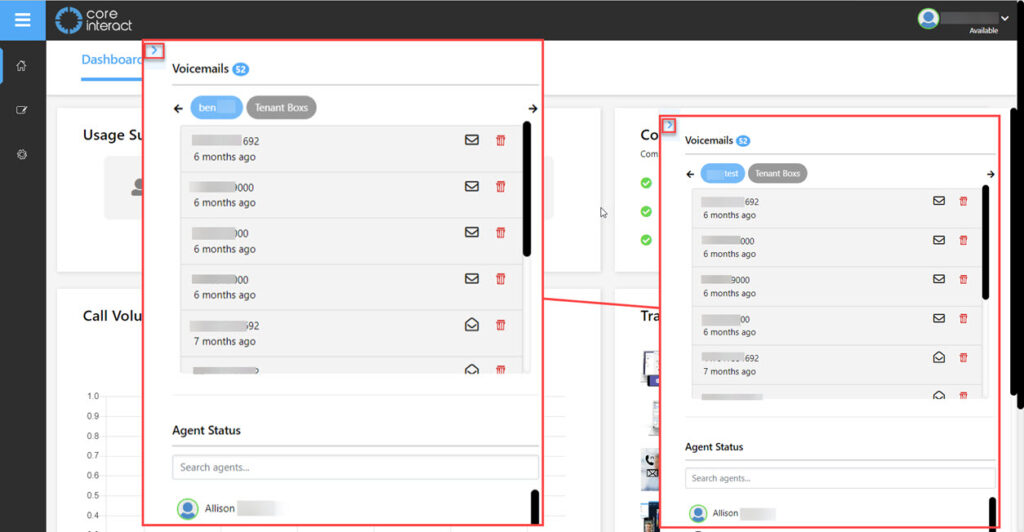
A clickable arrow at right of screen, opens a pull out view of voicemails and agent Teams status.
There are three icons in the left tool bar:
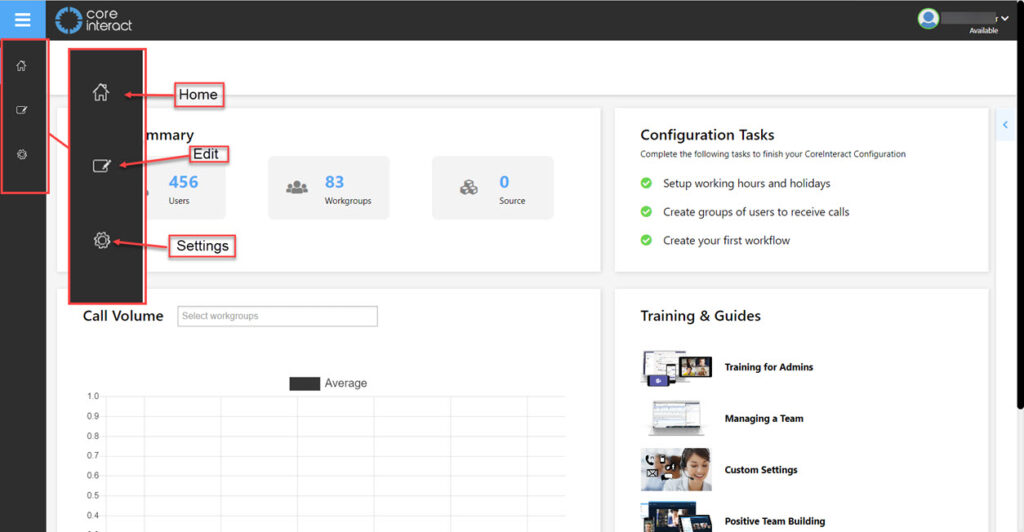
- Home – Navigate to home page.
- Edit – Conduct various configuration and setup actions.
- Settings – Manage reports and resources.
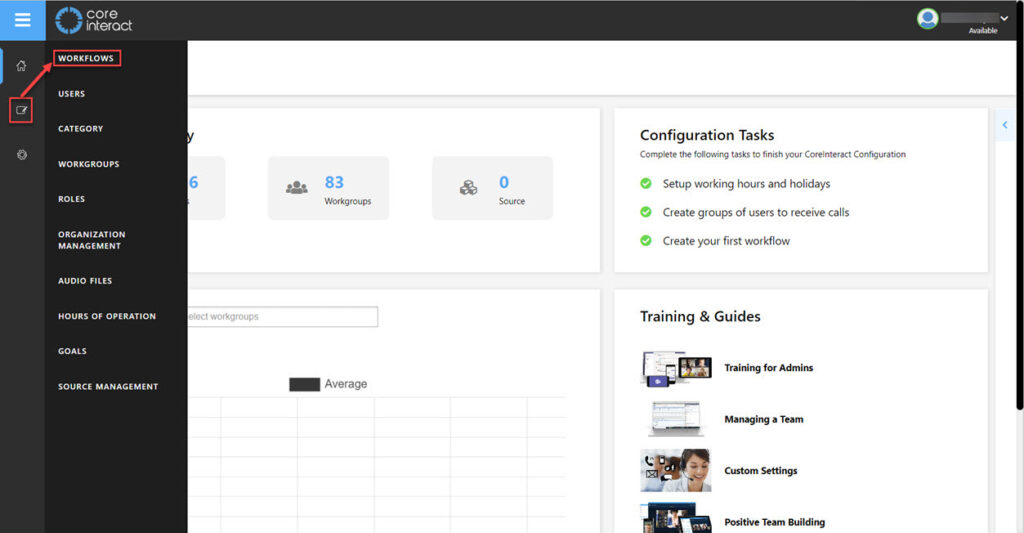
Edit Menu – Click Paper/Pencil Icon
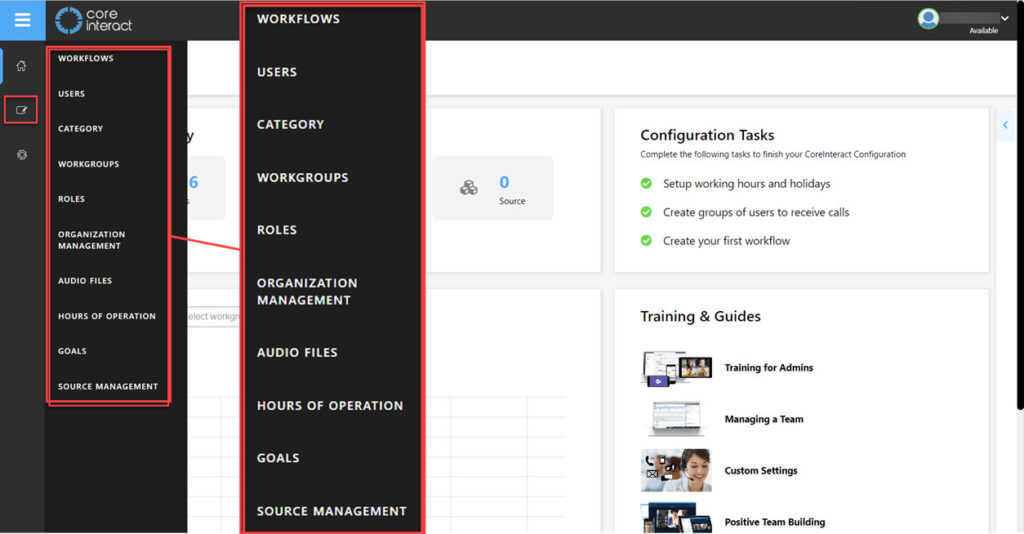
- Workflows – Description of purpose
- Users – Description of purpose
- Category – Description
- Workgroups – Description
- Roles – Description
- Organization Management – Description
- Audio Files – Description
- Hours of Operation – Description
- Goals – Manage Queue Goals for both Tenants and Workgroup
- Source Management – Description
Settings Menu – Click Gear Icon
- Setting – Description
- Report Setting – Description
- Power BI Report – Description
- Resource Management – Description
Workflows
Workgroups are created to easily designate a group of individuals whose expertise can easily manage specific calls. CoreInteract allows you to easily manage your Workgroups and assign the users in the same window.
Workflows are a unique feature in CoreInteract where you can visually and easily configure how a call is routed, queued and managed.
CoreInteract’s Workflows allow you to use our unique click and drop interface.
Click on Edit in the left-hand menu bar and open Workflows.
A list of available workflows will appear when you have clicked on the Workflows menu above. Here you have the option to, View, Edit or Delete an already created workflow or you can add a new:
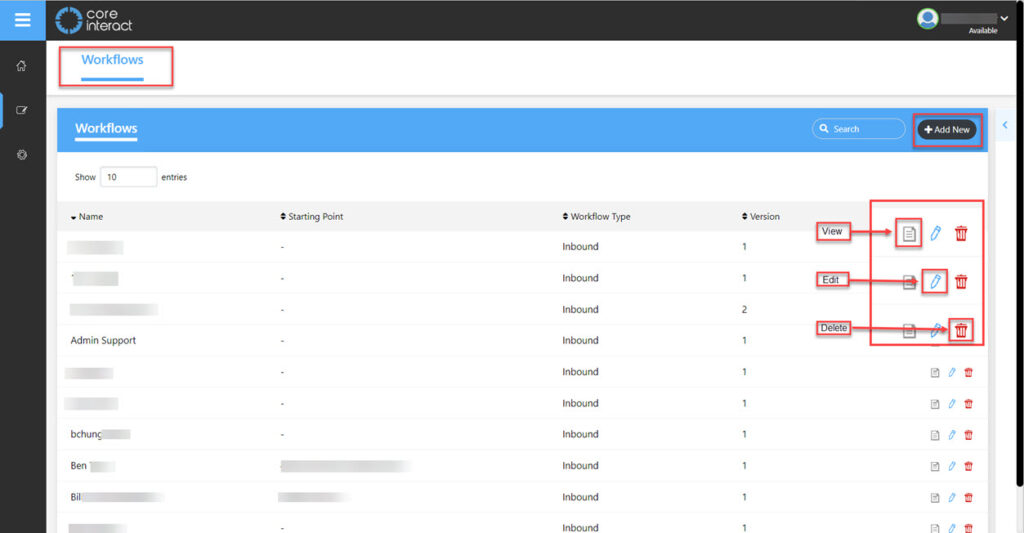
Click on +Add new in the blue menu bar at the top right of the screen. This will open the workflow builder:
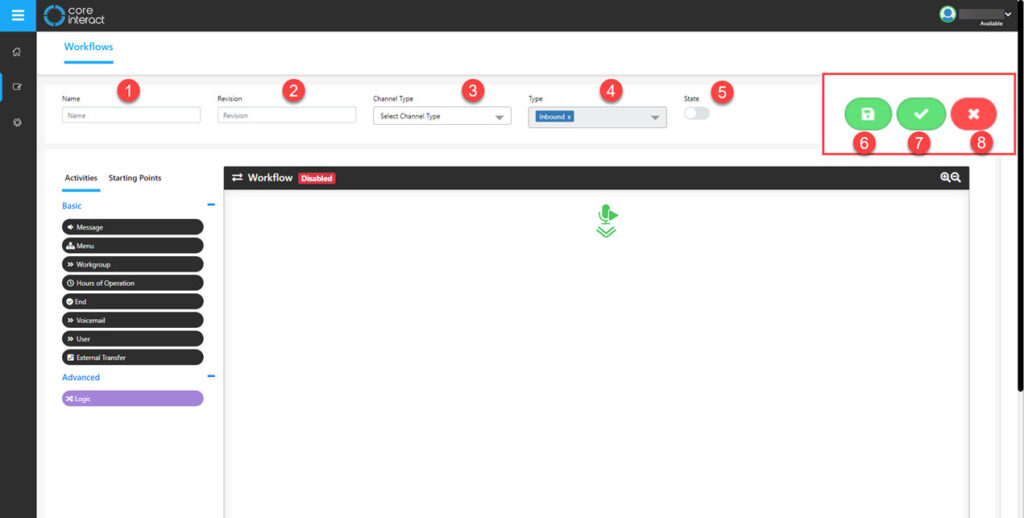
Across the top are the following fields and options:
- Name – This is where you need to name your workgroup for example ‘support’
- Revision – You can create revisions of a workflow and this can be indicated here using the dropdown box or you can type a number in the field.
- Channel Type – Select the channel type from the drop down selection.
- Type – This is set to Inbound.
- State – This shows if the workflow is active or inactive. (Active is indicated by the toggle being placed on the right, this is changed by clicking on the toggle)
- Submit – Creates the workflow as you have it set.
- Apply – As above.
- Delete – Deletes the workflow you are working on.
The next section to look at is the menu down the left hand side of the screen:
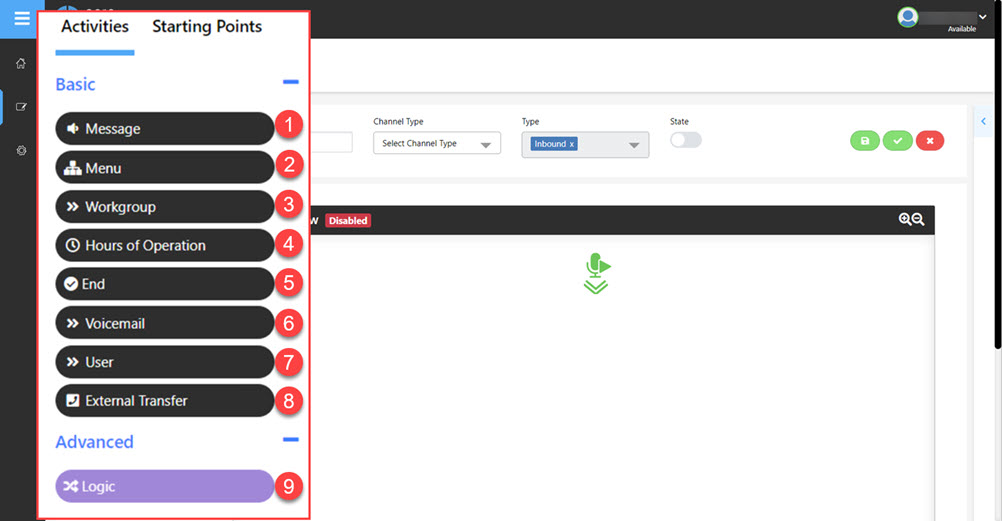
- Message – This allows you to add a message for your call flow. You can either type it and use text to speech or you can choose a recording that is already uploaded to the Audio files section.
- Menu – Allows you to set a menu for a call; for example press 1 to speak to an operator.
- Workgroup – Here you can choose the workgroup that a call will be sent to. A workgroup is a team of agents who share similar skills and expertise and are assigned to handle specific types of customer inquiries and issues.
- Hours of operation – Select the hours of operation from the drop down list then choose what you would like the system to do for the times when the business is Open, Closed or on Holiday.
- End – This is used to end a call. For example if someone calls a menu but inputs nothing even after the menu has replayed you can set the system to end the call.
- Voicemail – Will direct a call to a voicemail as chosen from the dropdown box.
- User – Used to send a call straight to a specific user rather than a group. The user can be selected from the drop down list.
- External Transfer – You can choose a number for calls to be transferred to externally (outside of the system) by typing the number in here.
- Logic – Used for external sources, for example if your connected to a CRM system you can run calls based on that system. So if the CRM system picks up a number it knows you can have this routed to go to a specific destination
Starting points
To use the External transfer option you will have to firstly enable the feature in the Settings > Resource Management > Resource Accounts.
It must have a number in the External Transfer box, and it will need to include the country code
Click Starting Points:
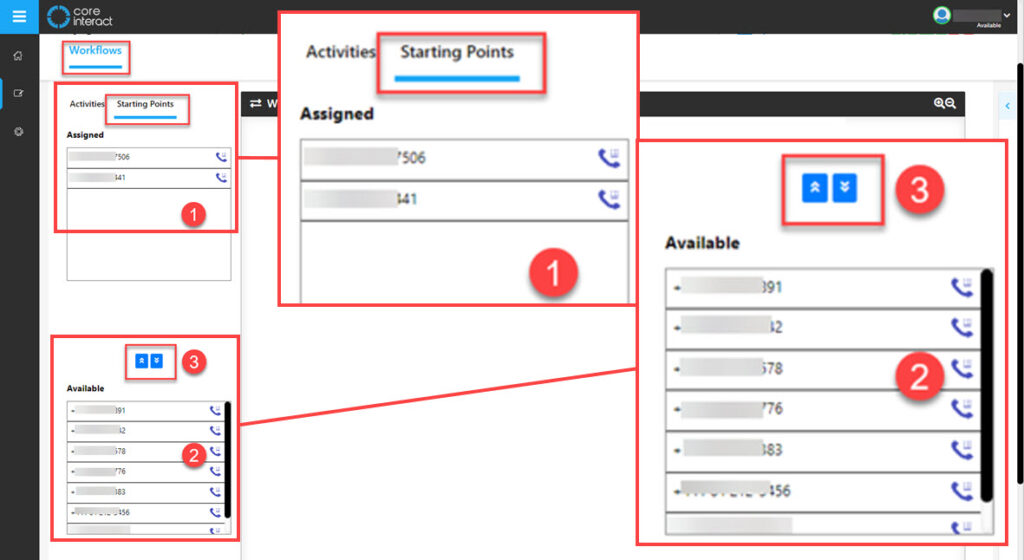
- Assigned – List of numbers assigned to the workflow.
- Available – List of available numbers.
- Arrows – Use these to move a number from one list to another. Do this by clicking on the number then either the up or down arrow.
In the available section, all the numbers that have been assigned through the Teams Portal will be displayed.
Select the number(s) and click the up arrows to move the number to the assigned box.
That number will now be associated with this Workflow.
You have the option to add more than one number to the Workflow and a number can be used more than once if creating multiple Workflows.
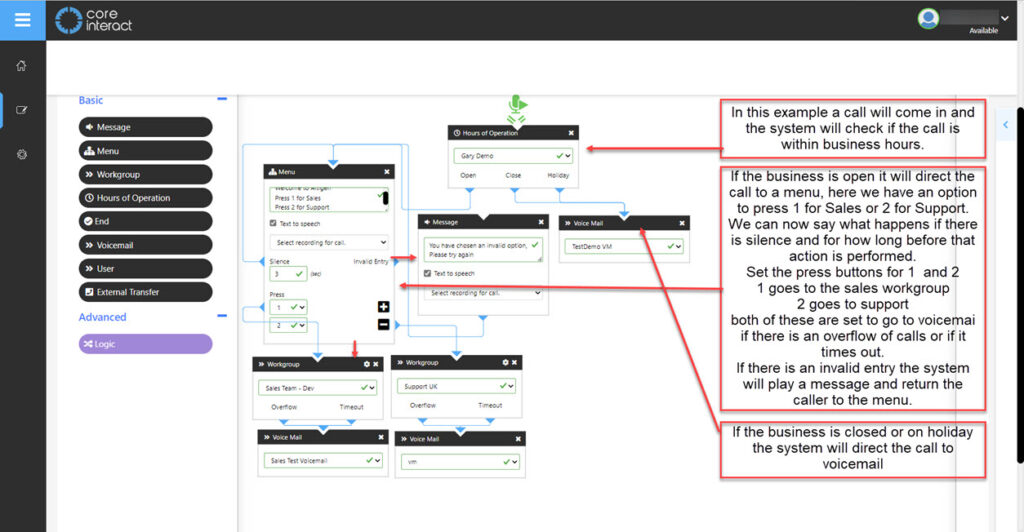
Setting up a basic workflow
When creating a workflow you can use the + or – magnifier buttons located in the top right of the workflow, zooming out will give you more room on the canvas to create your flow. Remember to link the flow by clicking and dragging the blue arrows to the next action.
As an example a basic workflow set up is shown below:
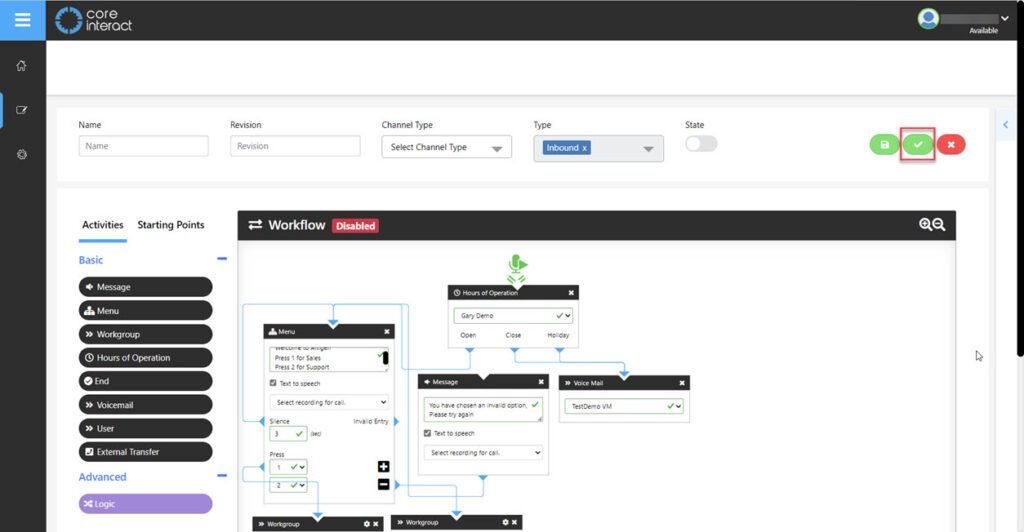
Once you are happy with the workflow you can click the green tick to the top right of the screen this will save your workflow:
Users
You can review all of your users that have been assigned to CoreInteract by navigating to the User Management tab.
Here you can also assign users to workgroups and assign them to Roles.
Note: You will not be able to add users to this menu.
To access the Users section click on the Edit icon then on Users:
Here you will see a list of all users on the system:
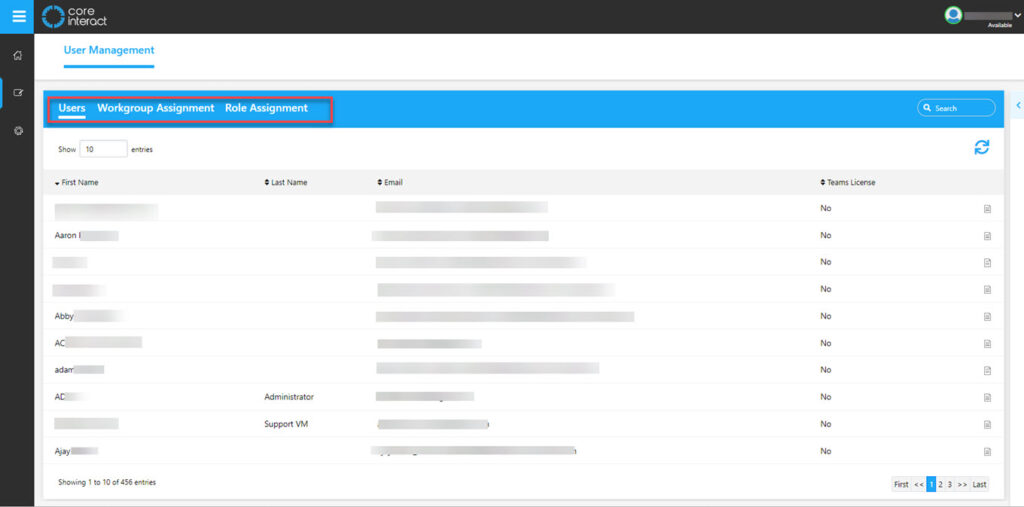
Along the top is a menu containing the following:
- Users – This section shows the users that are in the system these are taken from your Azure Active Directory.
- Workgroup Assignment – This section allows assignment of users to a workgroup, this is the same as detailed in the Workgroups section.
- Role Assignment – Here is where you can assign roles to users.
User Workgroup Assignment
This is where you can add users to an already created workgroup:
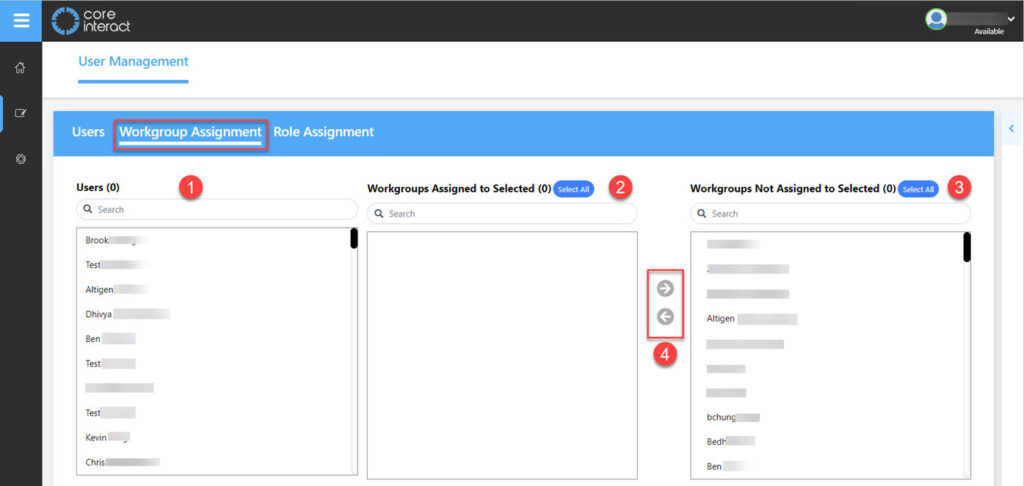
- Users – List of all available users.
- Workgroup Assigned to Selected – The workgroup will be shown here is selected.
- Workgroups Not Assigned to Selected – List of workgroups that are not assigned to the selected user.
- Arrows – Use these to move the not assigned workgroup to the centre box or a workgroup from the centre to Not assigned.
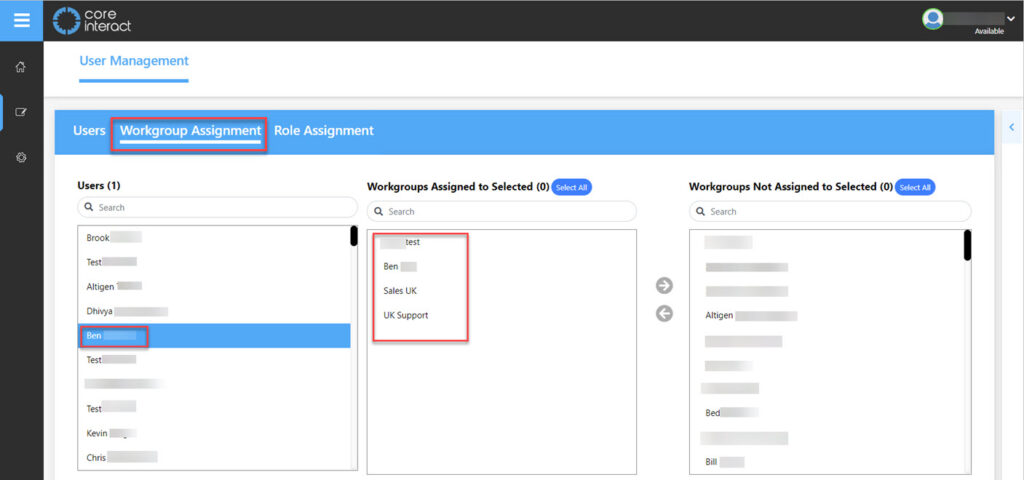
Assigning Users
To assign a user to a workgroup click on the user from the first box.
The centre box will now show any workgroups there are currently associated to.
Now you can click on any of the Not Assigned in the right hand box and select the workgroup you would like to add the user to then use the arrow pointing Left to add it to the centre box.
Alternatively, if you wish to assign all the roles, click on Select All.
Note: You can select as many roles to assign as you like at one time or add them individually.
Once you have added the permissions a green box will flash up and the permission will now be shown in the middle box.
Role Assignment
This section is used to add roles to users:
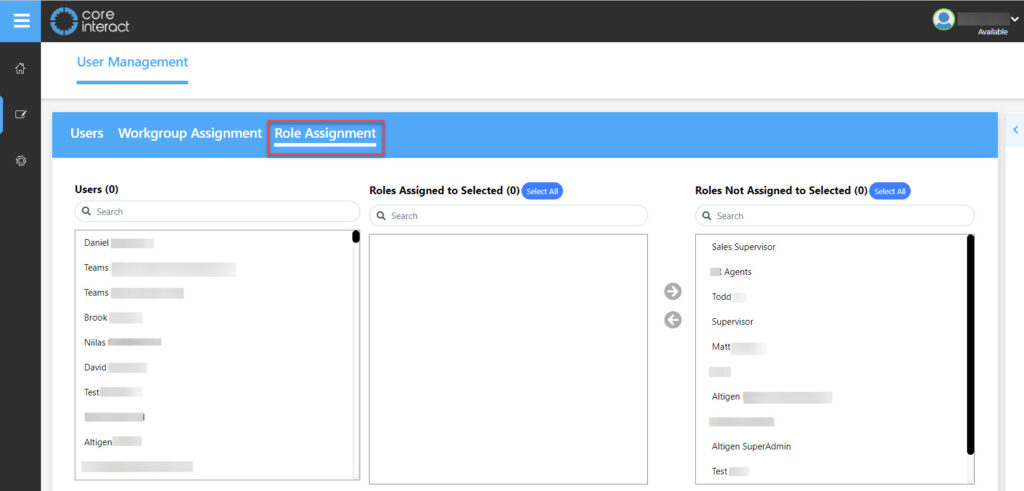
Here, again you have three boxes. As above you can click on a user then assign them a role.
Note: The roles are set up in another section.
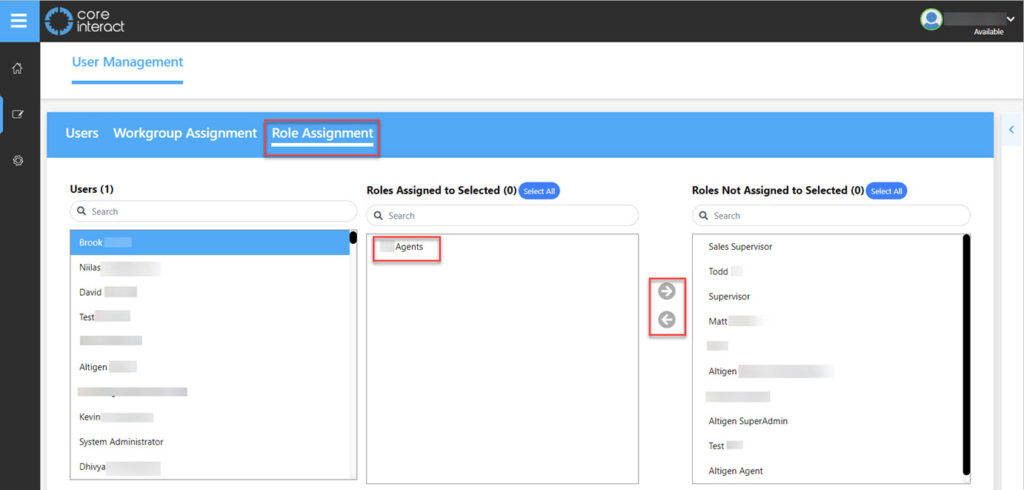
In the above you can see the blue highlight over the selected user. The Role they have assigned in the centre box and the Roles not assigned in the right hand box.
As before you can click on any of the Roles in the right hand box and add them to the user by moving them to the centre box using the arrows.
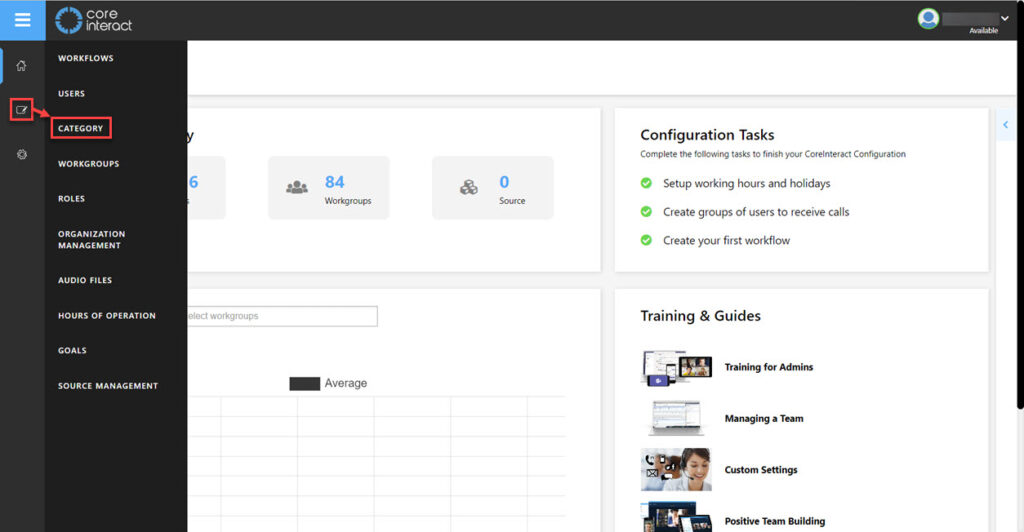
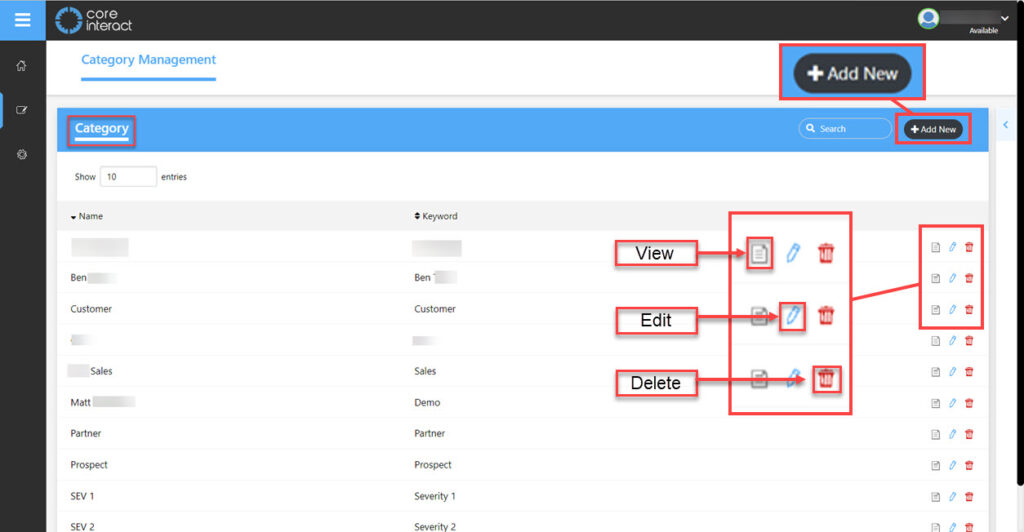
Check Category
Access to this section is via the edit menu to the left of the screen. Click Edit then Category:
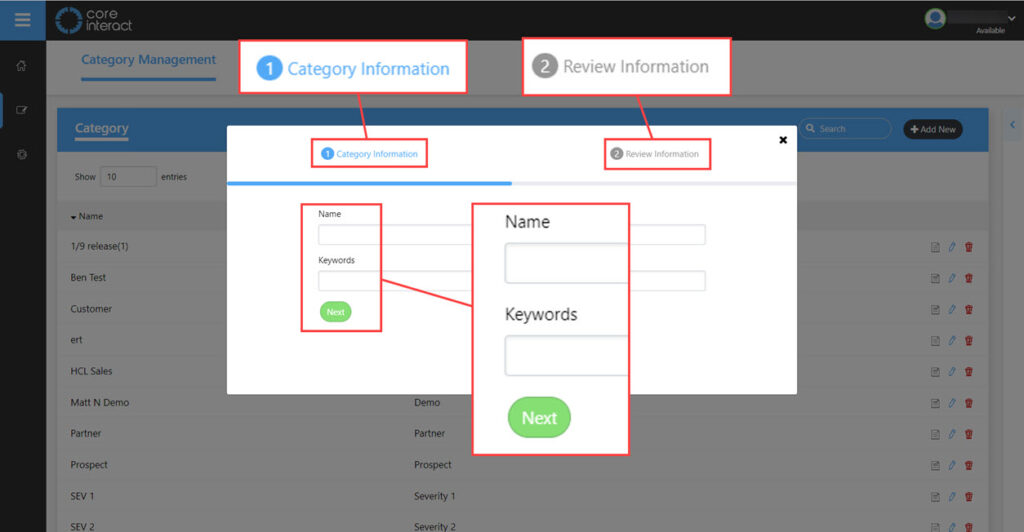
This will take the user to the following screen, here you can see any categories that have already been added. The option to view, edit or delete these categories is to the right of the existing. You also have an option to add a new category. To create a new category click on +Add New to the top right of the screen.
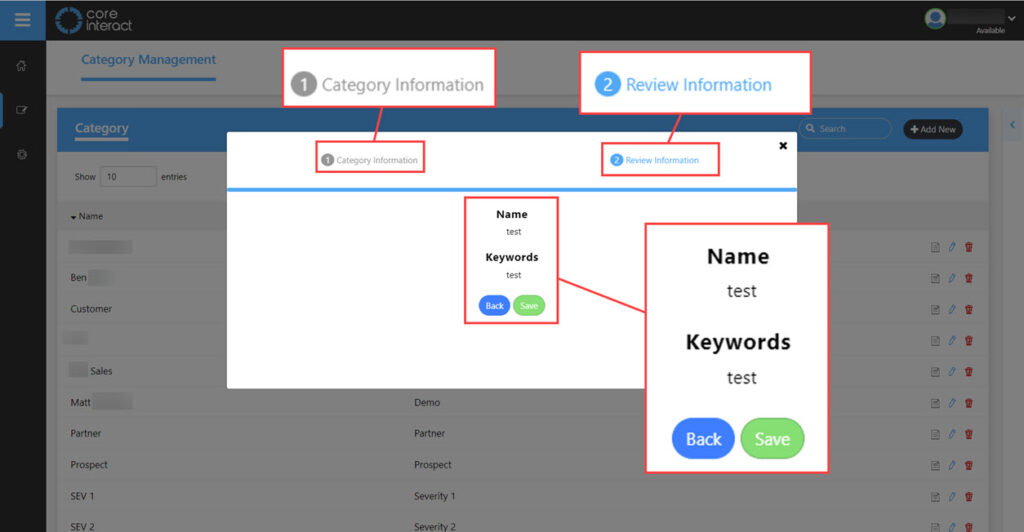
When you have cliked on new you will have a form to fill in, this asks for a name for the category and a Keyword.
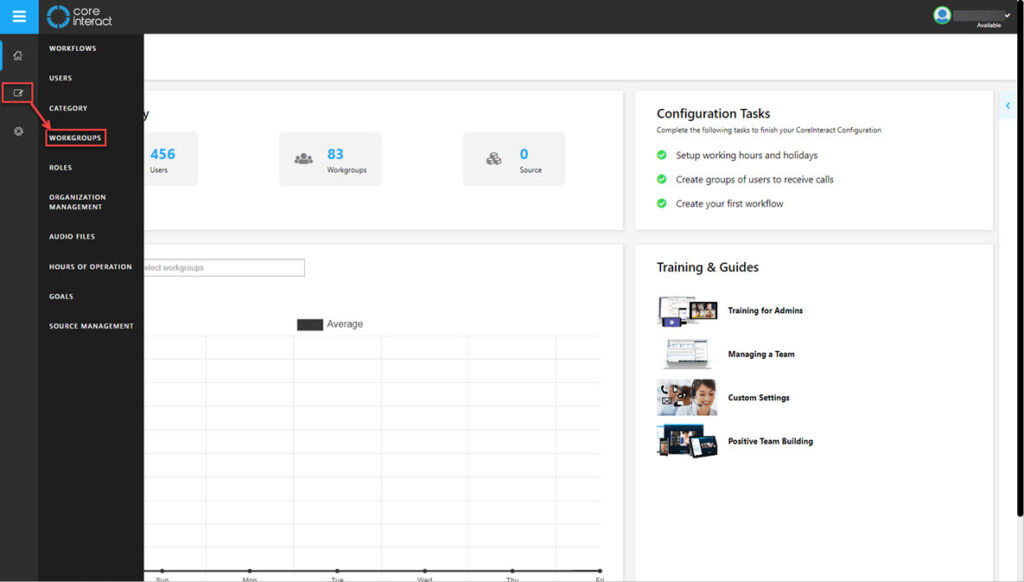
Workgroups
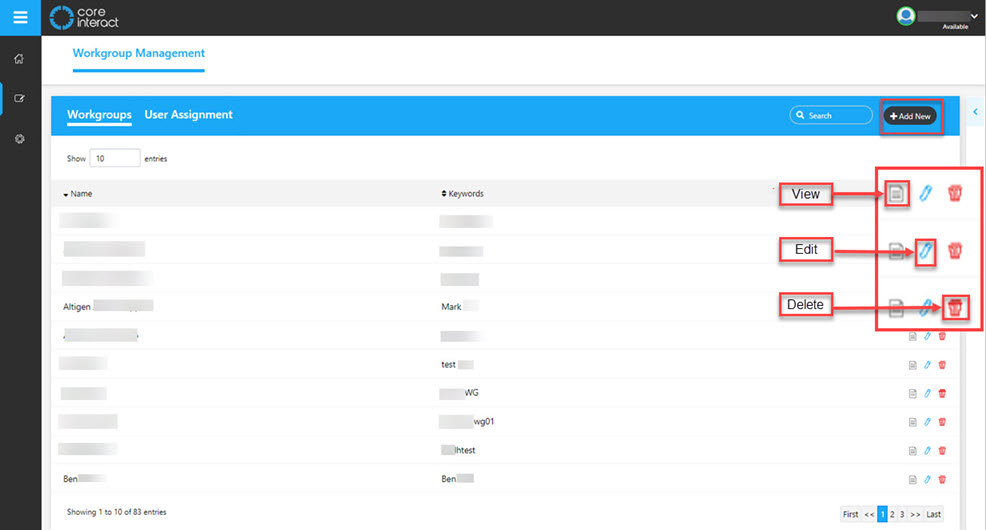
To access the workgroups click on the Edit button in the menu then choose Workgroups:
Click on Workgroups, this will open a list of workgroups that are available. You can view, Edit or Delete these Workgroups. There is also an option to click on Add New at the top right:
The below example shows a new set up of a workgroup, start by clicking on the Add New as indicated in the above picture. Then a set up box will appear :
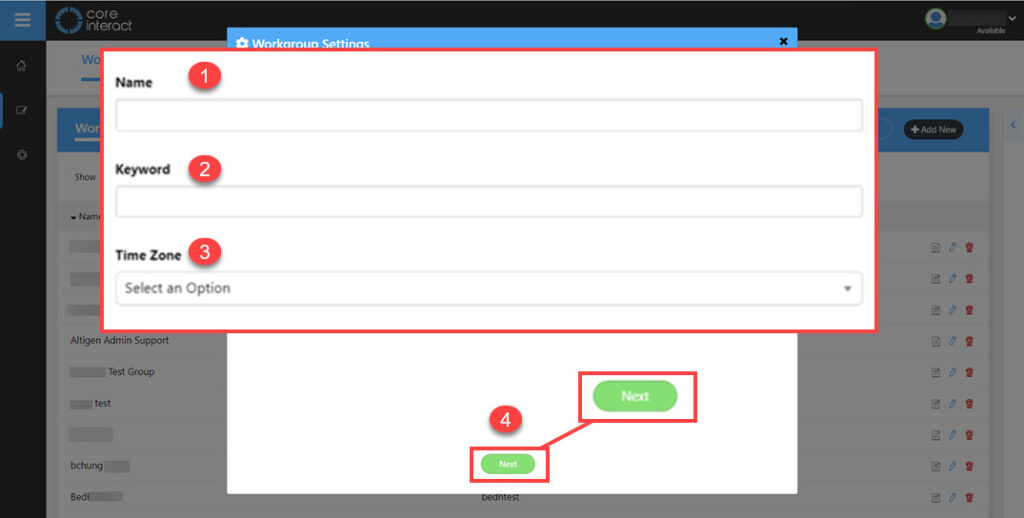
- Name – Give your workgroup a relevant name so you can easily identify the group. For Example, if you have a sales and a support group give them a name such as <Company Name> Sales or <Customer Name> Support. That way if you have to edit anything you will find them with ease.
- Keyword – This will help define the workgroup and is set at initial set up.
- Time Zone – Set the time zone based on your business location.
- Next – When information have been added and you are happy click next.
The following screen needs you to input some detail of how you would like the calls handled:
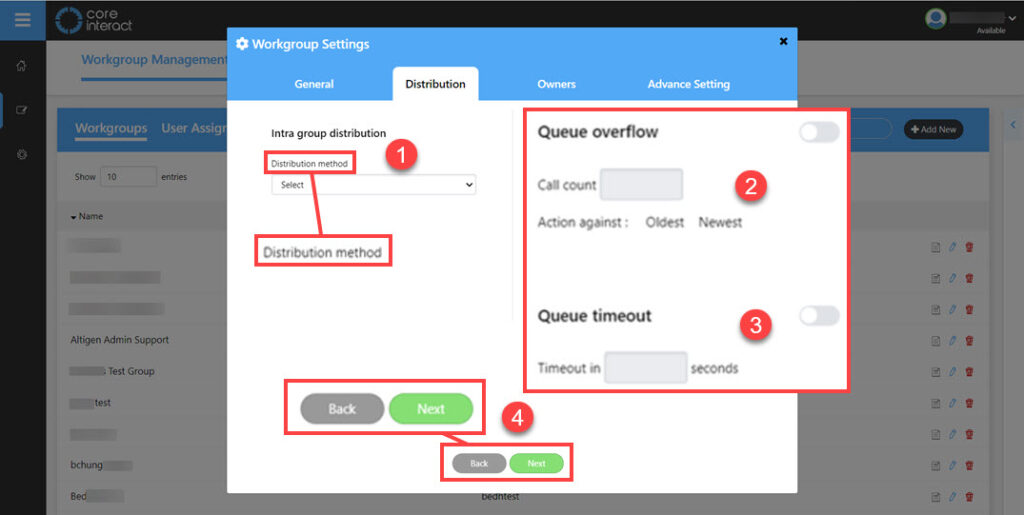
- Distribution Method – There is a drop down box for options here. These are:
- First Available – First operator in group will always be routed the call when available.
- Next Available – The next available operator will be routed the call in the order listed in the group. This mode will skip over those who already have taken a call even in available status.
- Longest Idle – The operator in the group who has had the longest idle time will be routed the call.
- Queue Overflow – Option to toggle on/off. Enter a number in the field for call count, so if you have 5 in queue any new/old calls can be sent to voicemail or overflow. Select the Option of Oldest/Newest for the action to be applied to.
- Queue Timeout – Option to toggle this setting on/off. If using select a time in seconds that you would like the queue to time out.
Once finished click on Next.
Now you will be asked to select an owner, there is a drop down list for you to choose from:
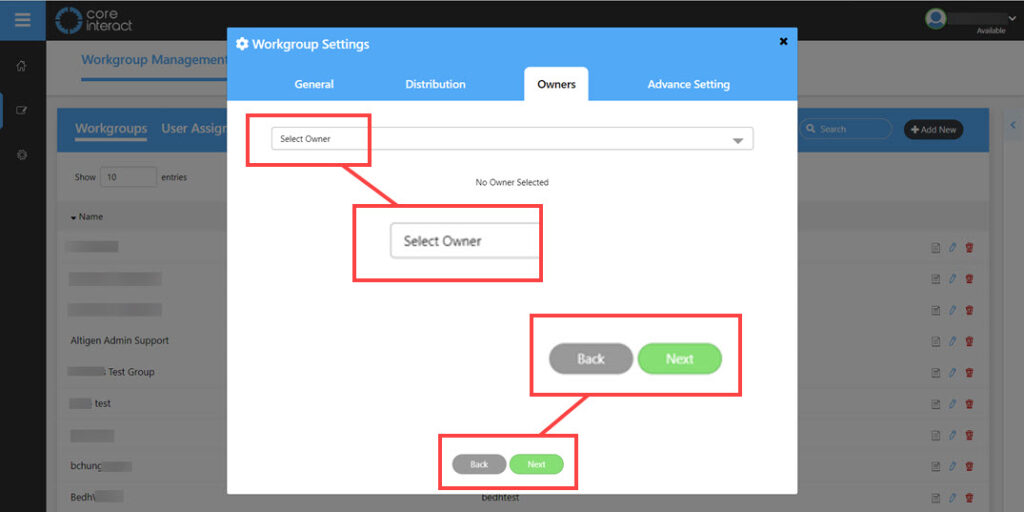
Select the owner then click on Next.
The next screen is the Advance setting screen, this is where you will see a URL if you have a custom connection to Power Apps, this is an extra and requires licenses and custom deployment work. There is also a monthly charge for this. If you are interested please speak with your sales advisor.
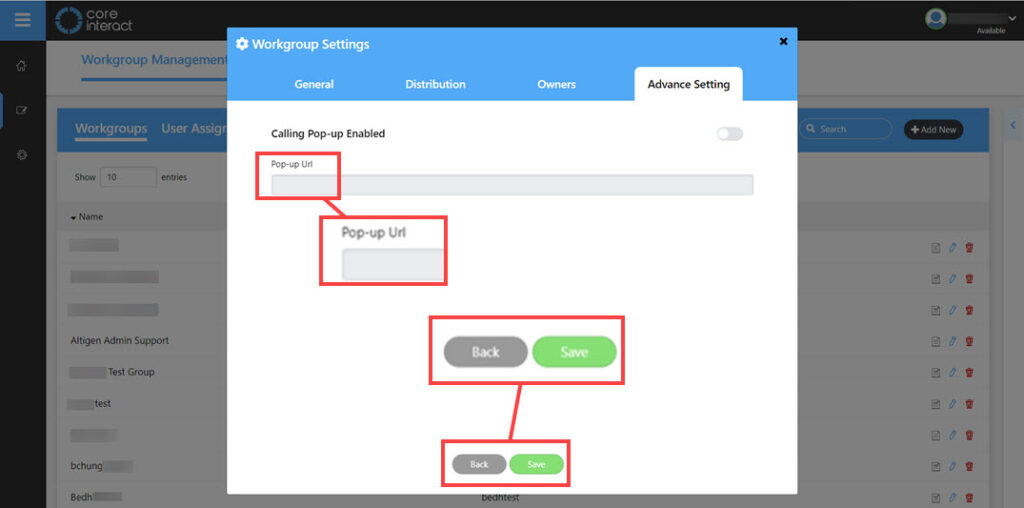
Lastly on this part click on Save at the bottom.
User Assignment
Next to the Workgroups is a tab for User Assignment. Click on here and you will see three boxes:
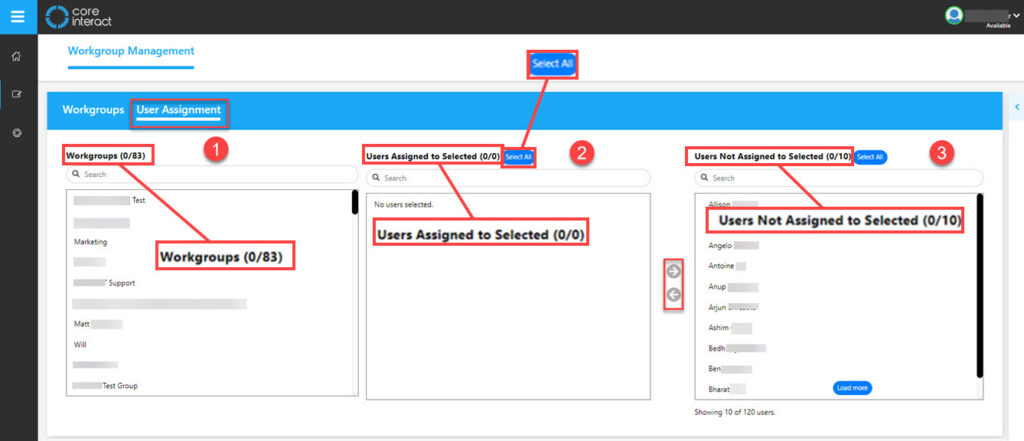
- Workgroups – Choose the workgroup that you wish to assign users to from the list.
- Users Assigned – List of users that you have assigned to this workgroup.
- Users Not Assigned – List of users that are not in the workgroup.
It is very easy to move these around by clicking on a user then using the arrows as shown below between the user boxes.
This can be reversed by following the same but from the middle box to the right box. It is also possible to add the user directly by double clicking on the user.
Roles
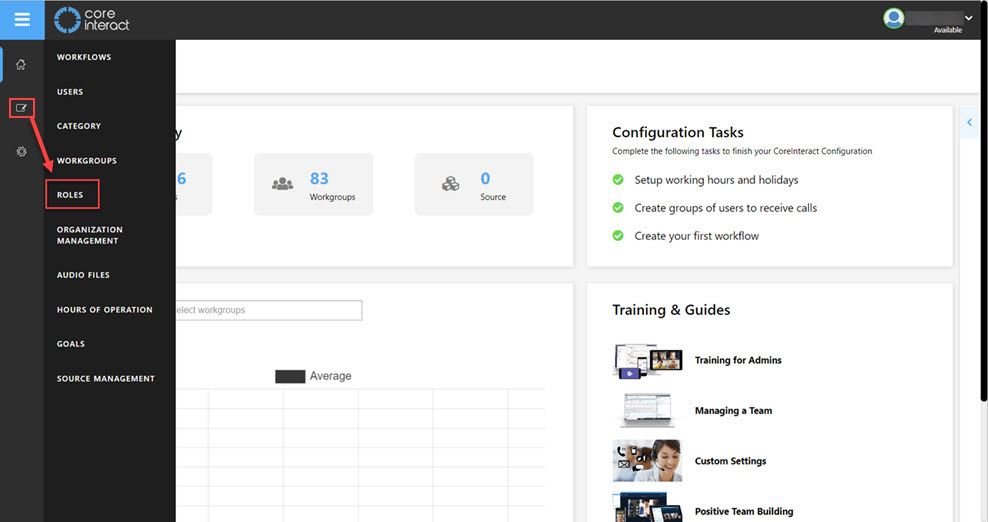
To access roles use the left hand menu and under Edit choose Roles:
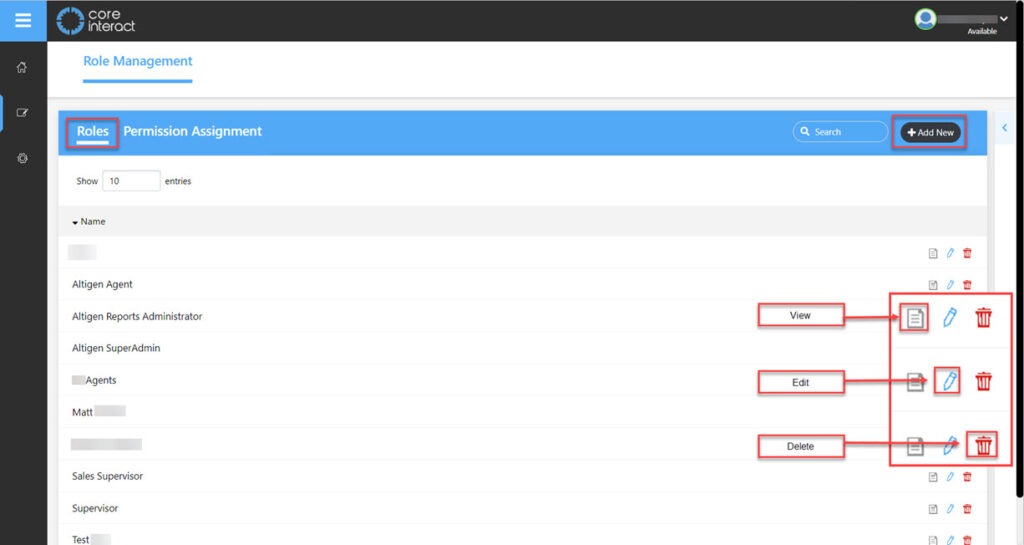
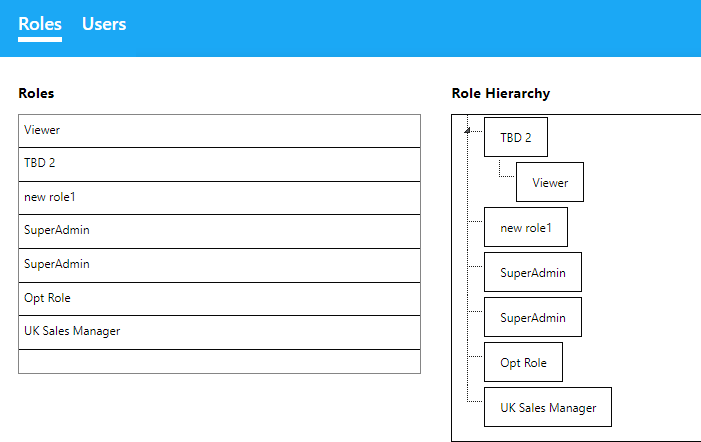
This will open a view containing all of the currently available roles. Each of these roles has an option for you to View, Edit or Delete them. There is also an option to add new.
Adding a New Role
To add a new role click the +Add New located in the blue bar at the top on the right hand side. This will open a pop up in the middle of the screen:
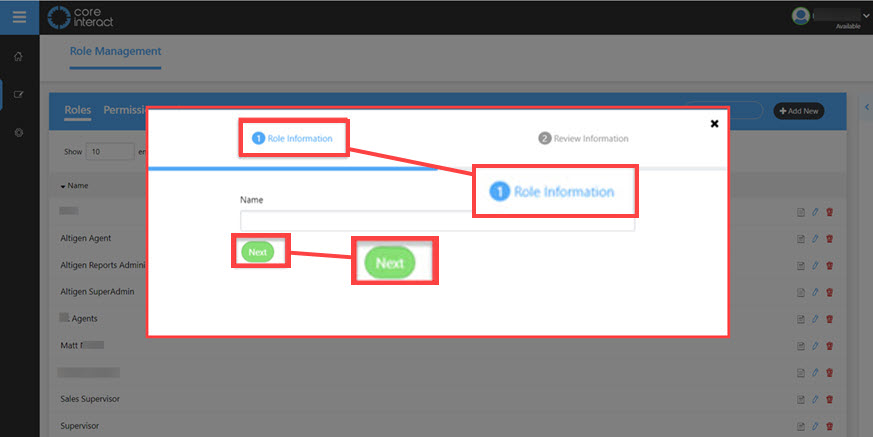
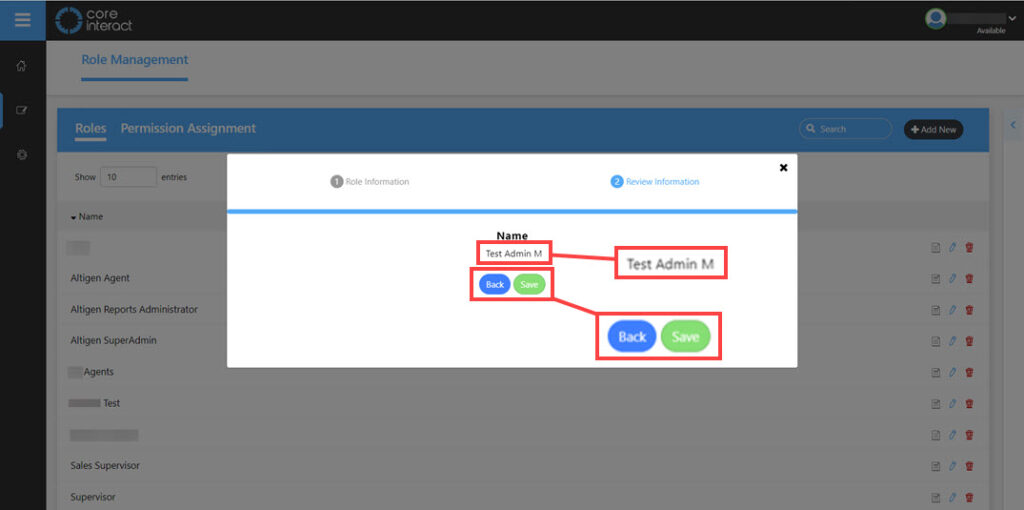
Here a name need to be given to the Role, it is best to name it in a way that you will remember what it is for once you have added your permissions. when filled in click Next. This will now ask you to review the information with an option of Back or Save. Click Save.
Adding Permission Assignment to a Role
Click on Permission Assignment on the blue menu bar at the top next to Roles. Here you will see three boxes again, one for available Roles, Permissions Assigned to Selected and Permissions Not Assigned:

As before it is a simple task of highlighting the role by clicking on it and assigning the permissions by clicking and moving with the arrows:
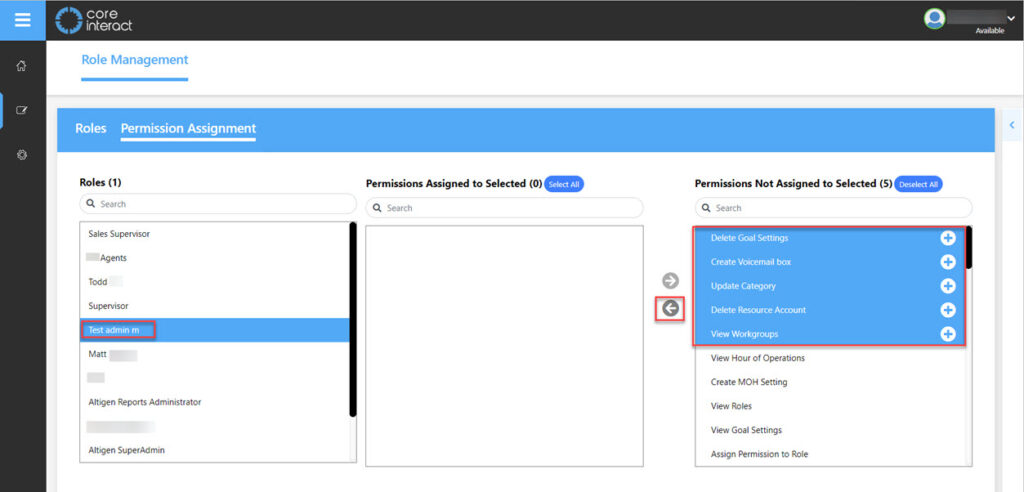
The above show some Permissions highlighted we will move these across by clicking on the arrow pointing left:
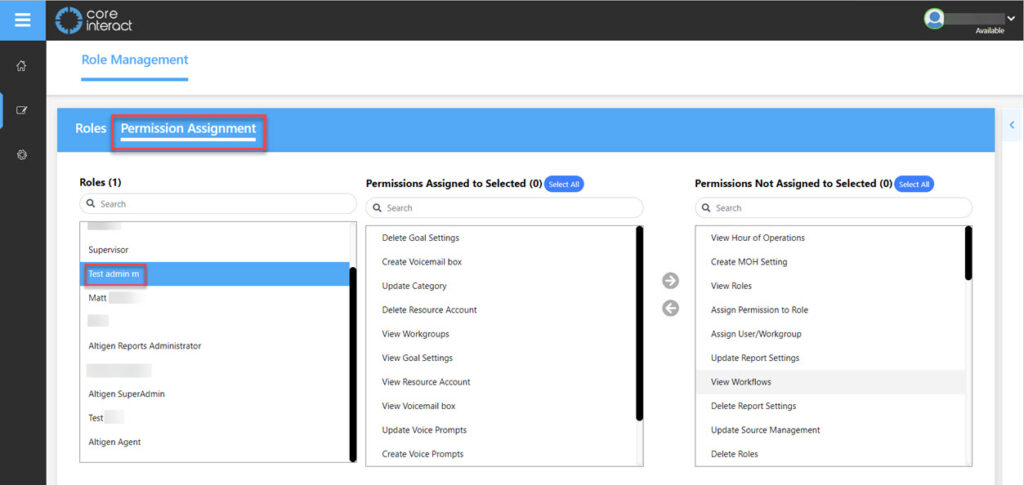
You can see that these Permissions and their corresponding permissions have been assigned to the role. As before a green box will show at the bottom right of the screen to show that the changes have been saved:

Check Organization Management
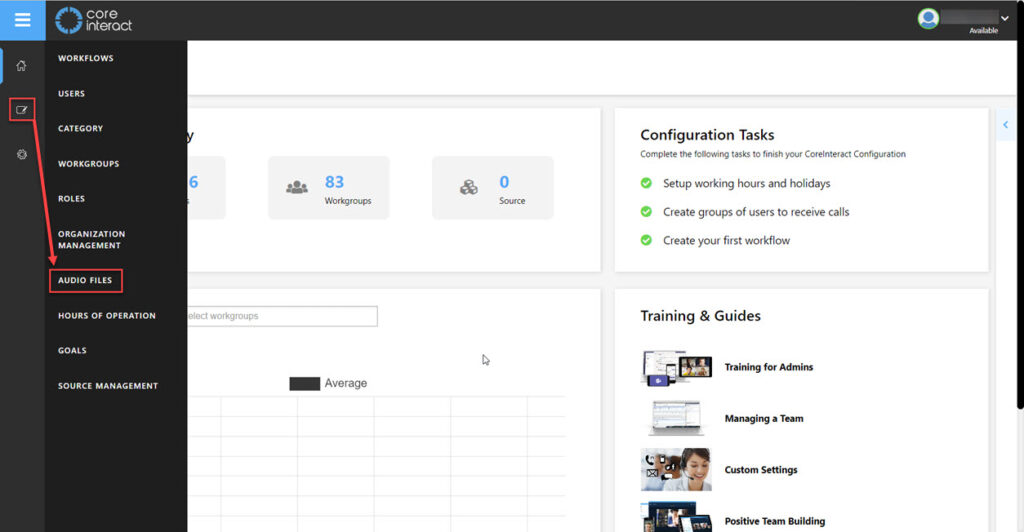
Audio Files
Access the audio files menu by clicking the edit menu then Audio Files:
This will take you to the audio files screen:
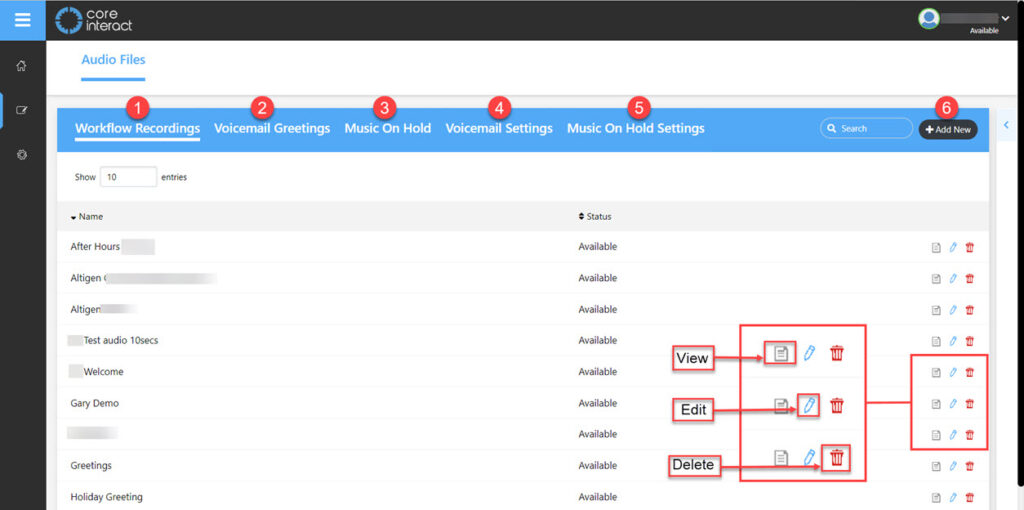
- Workflow Recordings – Shows the list of files associated to workflows.
- Voicemail Greetings – Shows the available files for voicemails.
- Music On Hold – Shows the available files for music on hold.
- Voicemail Settings – Here is where you will find the voicemail boxes that are set up.
- Music On Hold Settings – The settings for Tenant and Workgroup level music on hold.
- Add New – Click here to add a new audio file. make sure you are in the correct menu to add a file. The add new is shown on the following screens:
- Workflow recordings
- Voicemail Greetings
- Music On Hold
Adding Audio Files
If we wanted to add a new workflow recording we would click the +Add New button with Workflow recordings chosen:
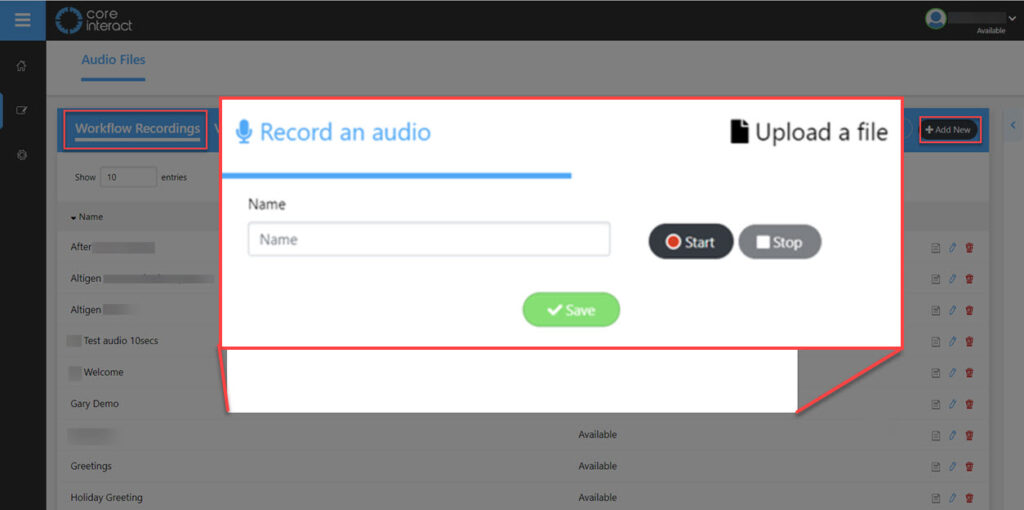
A pop up will appear with a choice of uploading a file or recording a message. Before you choose or record a file give your audio file a name such as Welcome.
To record a message click the start button then stop when finished. If you are happy with the recording you can save it.
To add an audio file click the Upload file in the top right of the box:
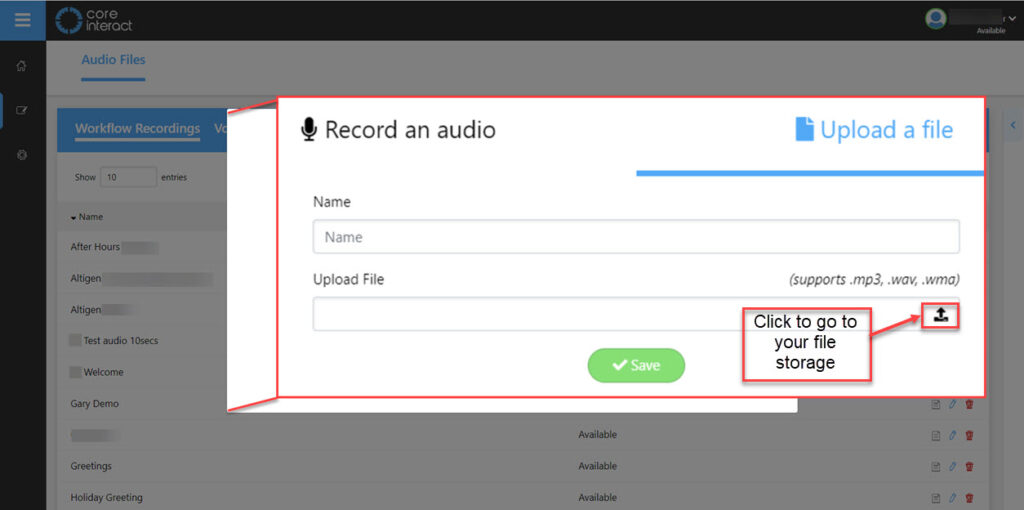
Give the file a name then click the icon as shown above to open your file storage. The file will need to be in either of the following formats:
- .mp3
- .wav
- .wma
This process can be used to add files to the other two options.
Voicemail Settings
The voicemail settings are found under the Audio Files menu.
Voicemail settings are where you can assign your audio files to your main voicemail and to your workgroups voicemail.
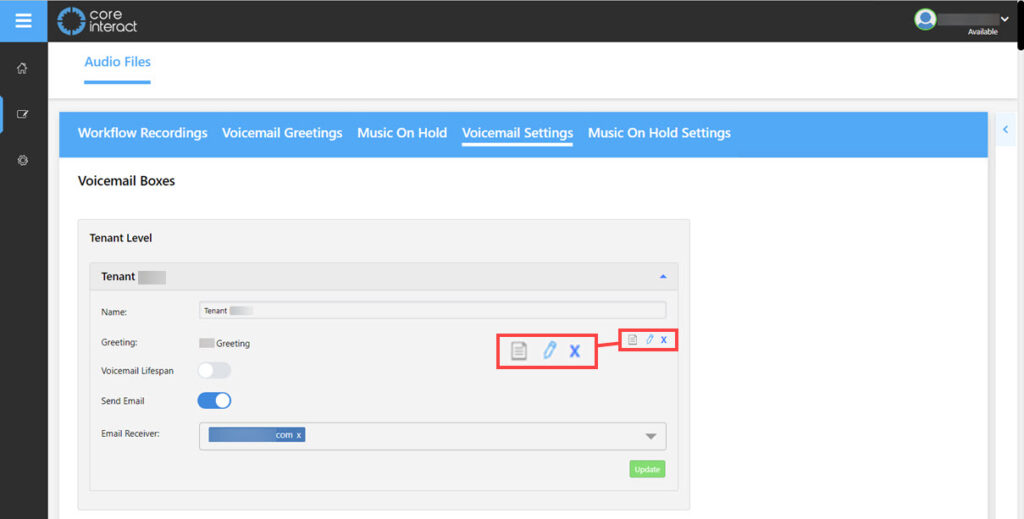
Tenant Level Voicemails
These can be used by all workgroups.
- Click on the Edit button. (This is the pencil icon shown magnified in the above screen)
A pop-up box will appear:
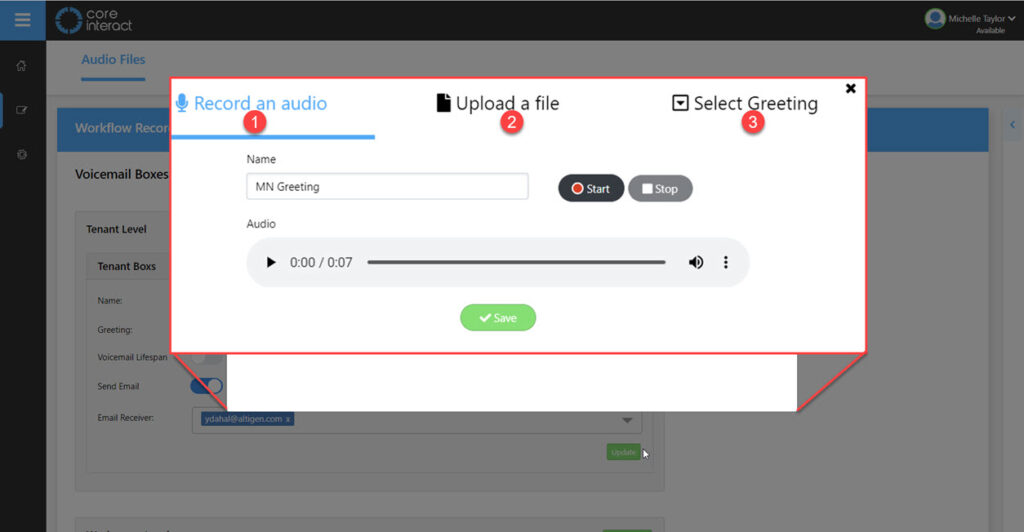
You have several options to add your audio recording.
- Record an Audio – See adding an audio file above for details.
- Upload a File – See adding an audio file above for details.
- Select Greeting – If you have already recorded an audio from the above steps, then you can click on select greeting and choose the greeting from the drop-sown menu.
Click on save when you are finished adding a file.
Workgroup level Voicemails
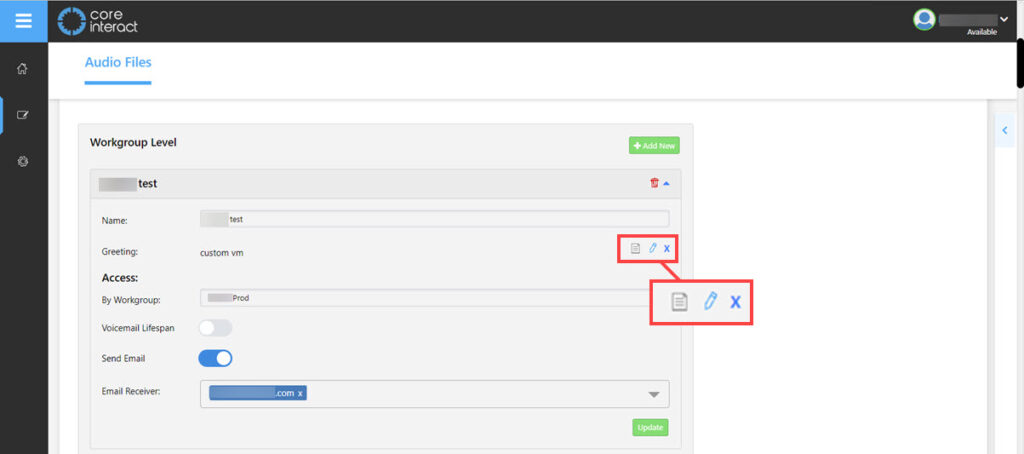
You can edit a voice mail on an already created Workgroup in the same way as you edit the Tenant level detailed above.
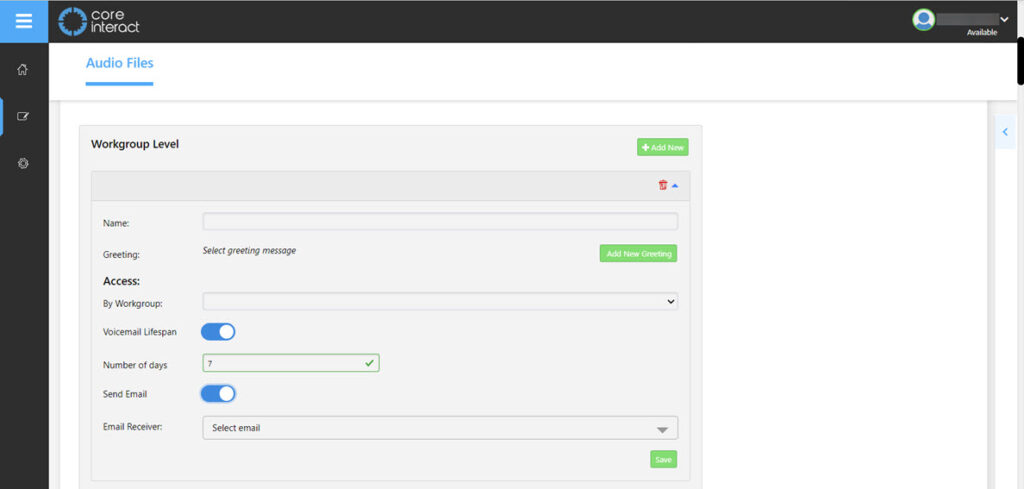
Adding A New Workgroup Level Voicemail
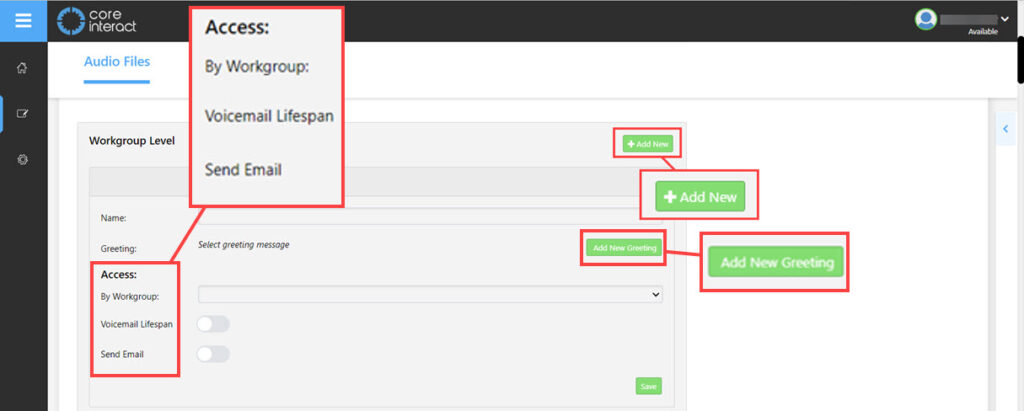
Now you need to give the workflow a name and select a greeting, then choose a workgroup from the drop down list.
Next choose the lifespan from 0-364.
Then choose who will receive the email notification, this could be a user or a team mailbox. A drop down list will show available options.
Music On Hold Settings
Here you can set the music on hold at either a tenant level or a workgroup level.
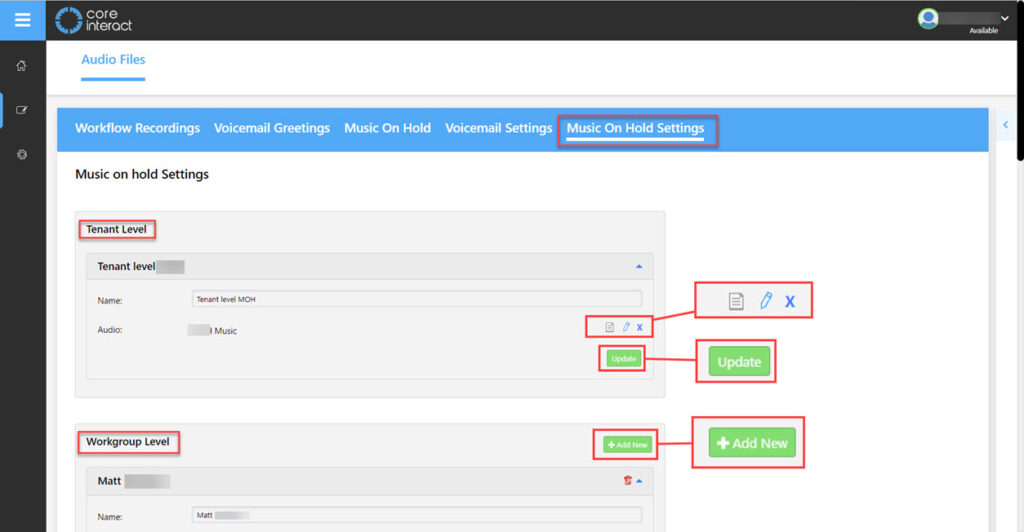
As on the voicemail settings you can view the tenant level Music on hold file using the pencil icon. The update button will update the setting.
The tenant level can be used by all workgroups.
The workgroup level music on hold will only be used by the workgroups selected in the settings.
To add a new workgroup level music on hold click on +Add New.
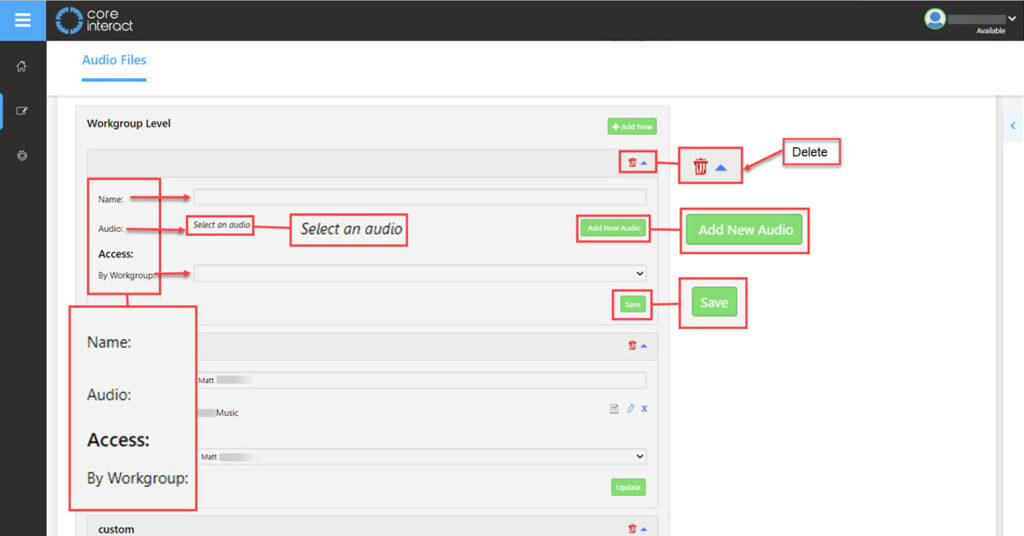
Now fill in the name of the Music on hold to be used by the workgroup.
Select an audio file for the music. Clicking on Add New Audio file button will open a pop up showing the options:

Again you have the option to start a recording, Upload a file or Select an audio file already in the Music on hold page. Once set click Save.
Choose a workgroup to add this music on hold to, a drop down list of all available workgroups will appear when you click the box. You can begin typing in the field to make the search quicker if you have a long list.
There is also a trash can icon that you can click at any point to remove this music on hold setting.
Hours of Operation
CoreInteract gives you the ability to create multiple hours of operation to suit your business needs. This is an important step in the initial setup of your system. This section will teach you how to set up your hours of operation.
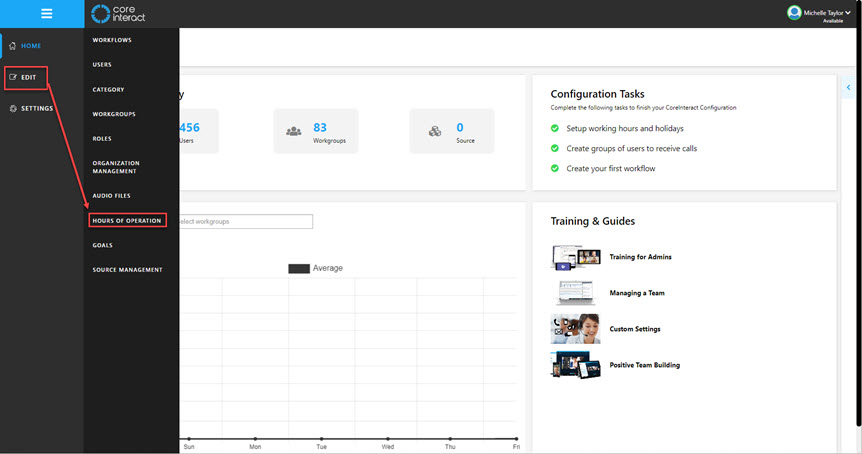
Go to the Edit menu to the left of the screen then click on Hours of Operation:
The screen will change as you are taken to the Hours of operation screen:
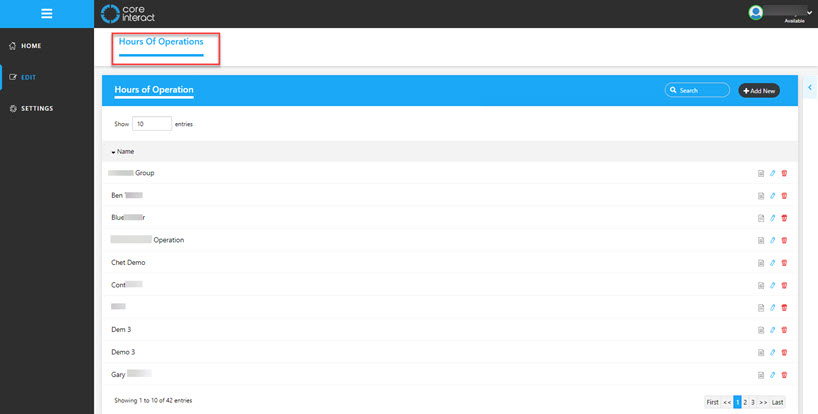
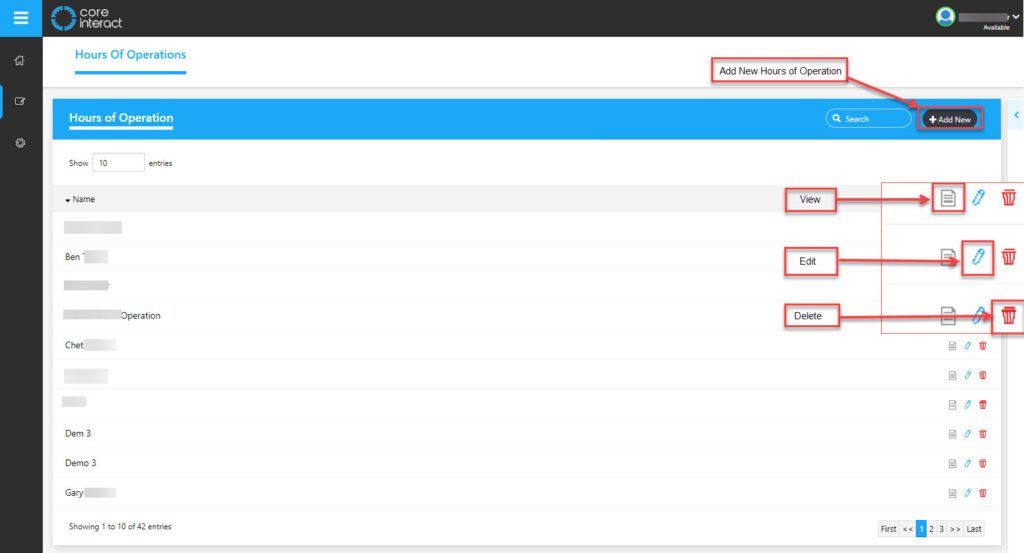
Here you can see the hours of operation that are set for each group, there is an option to View, Edit or Delete these. To the right at the top there is a button to add new:
Creating Hours of Operation
In this example we will create new hours of operation. Once you click on add new the screen to select hours will open:
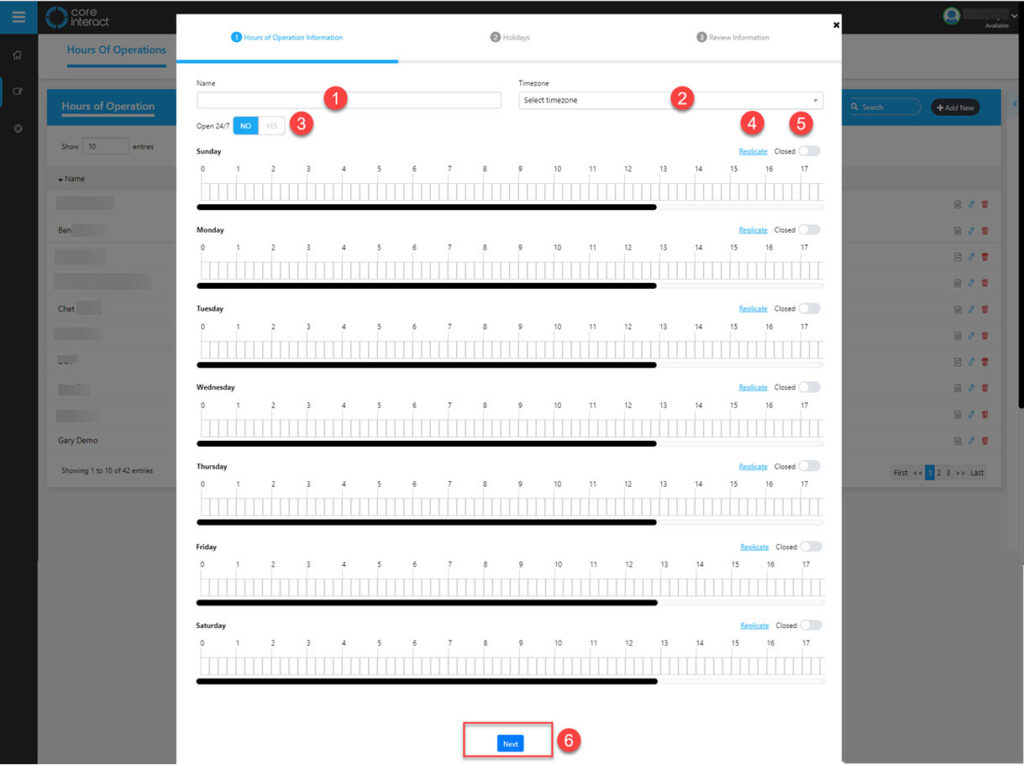
In this view you have fields to complete then you can set the hours of business. Lets look at the fields and toggles here:
- Name – Enter a name for your hours of operation.
- Time zone – Select the time zone that applies to your company.
- Open 24/7 – If your business is open 24/7 you can toggle this button to set the opening hours in one easy step.
- Replicate – This option runs down the page if clicked it will copy the information for that day to the following.
- Closed – Use this toggle to show days that the business is closed this option also runs down the page for each day.
- Next – Once completed click on next to go to the next step.
Here is an example of operating hours, these are set for Monday to Friday 9-5: (The below image is cropped from the above once the times had been input.)
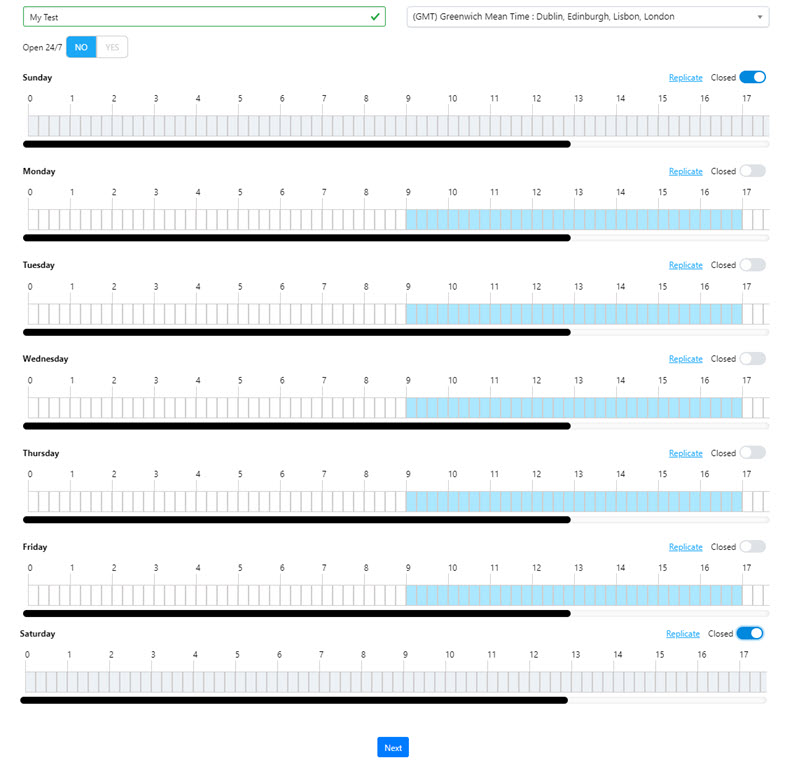
There are two ways to select the hours your business is open.
- Click and Drag – Click on the square when your business is open and drag to the close time.
- Click Separately – Alternatively, you can select each square individually.
Once you have added your hours of operation click on the next button.
Holidays
Example for Setting Business Holidays
This next screen is for setting holidays, you can also change operational hours in here for any special days. A calendar will be available for you to navigate through.
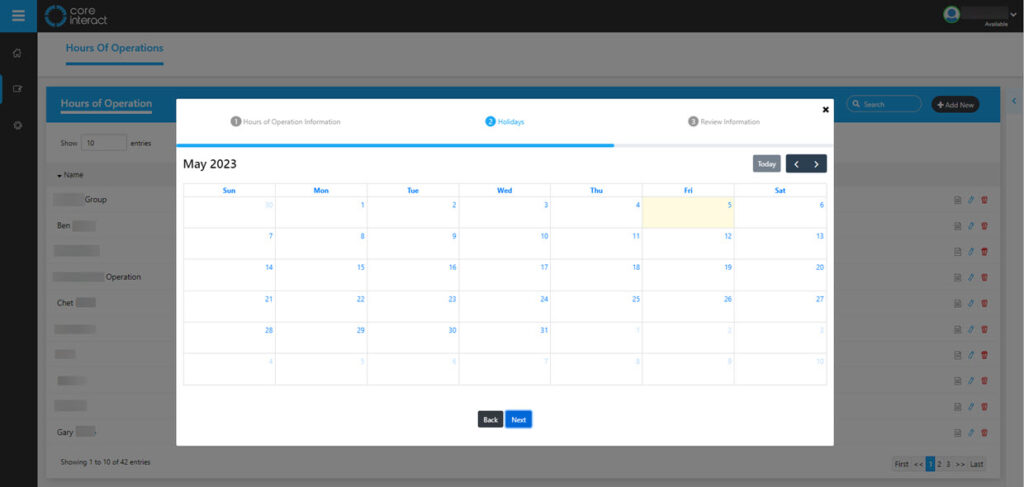
In the below we are going to add a holiday to May 12:
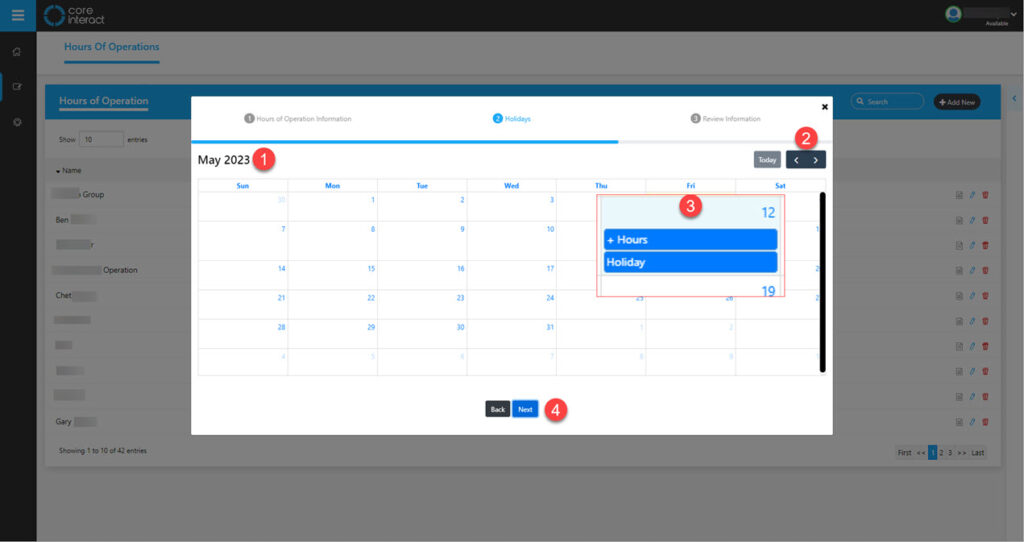
- Month – shows the current month and year.
- Left and Right Arrows – Use to scroll through the months.
- The day we will add the holiday to (this is magnified out for ease of viewing)
- Next – Once you have completed setting the holidays you can click on Next.
Now the view will change to the day and a time line for the hours of business:
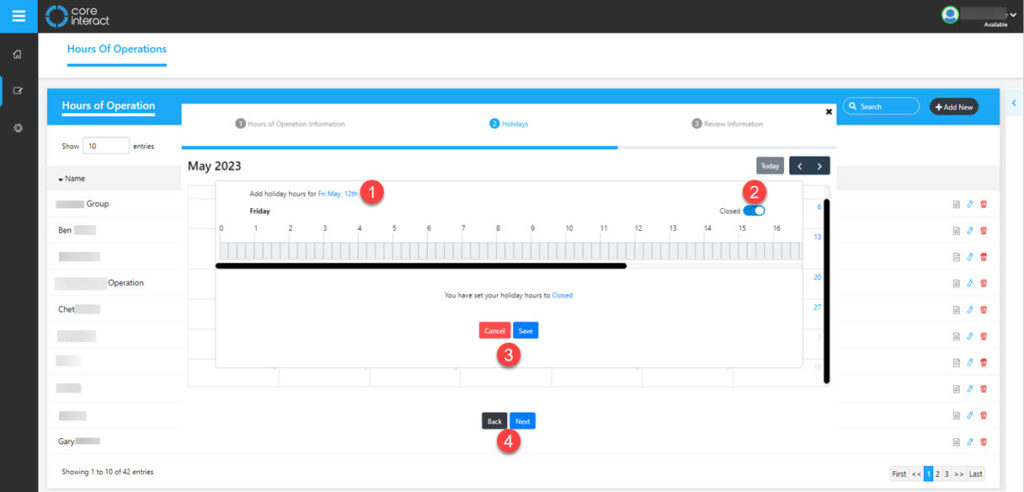
- Date you have chosen – The date of the box you clicked on will show here.
- Closed – There is a toggle for you to click if the business is to be closed on this day.
- Save/Cancel – Once the hours are set you can choose to save them or cancel the holiday.
- Back/Next – Back will take you to the calendar view again and Next will move to the next section.
If the business will only be closed for a short time or a half day then toggle the closed to the left, it will grey out and now you can click the individual boxes to set the hours as required. Remember to click Save.
Once you click next you will have the chance to review all the holidays you have input. The below example only contains one but you can set as many as you need:

- Name of operational hours – This will show the name that you gave this hours of operation at the start of this process.
- Hours of Operation – An overview of the operational hours that you have set for your business.
- Holiday Hours – List of the holiday hours you have set for the business.
- Back/Save Option – If all information is correct then click save but if something needs to be edited your can click on back.
Goals
To access the Goals settings go to the edit menu then click on Goals:
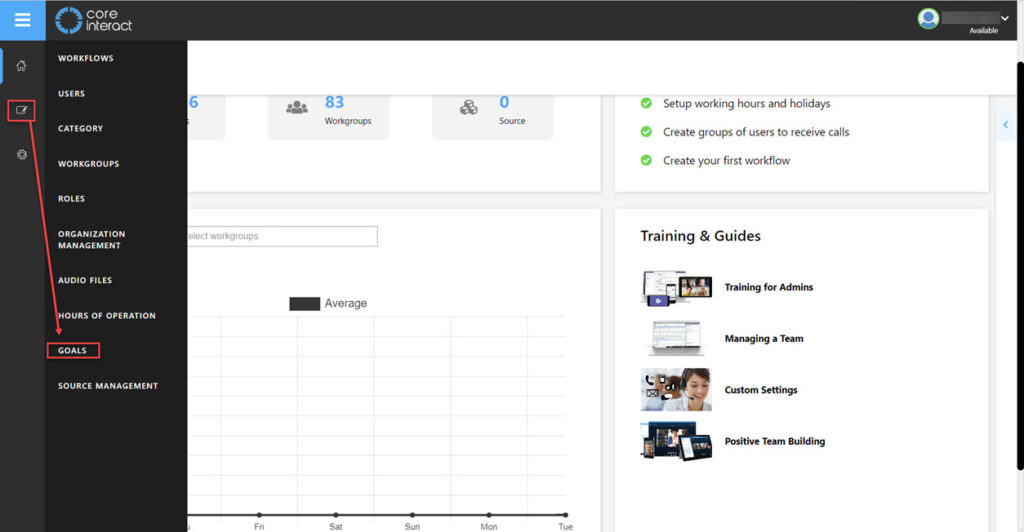
Now you will see the goals screen:
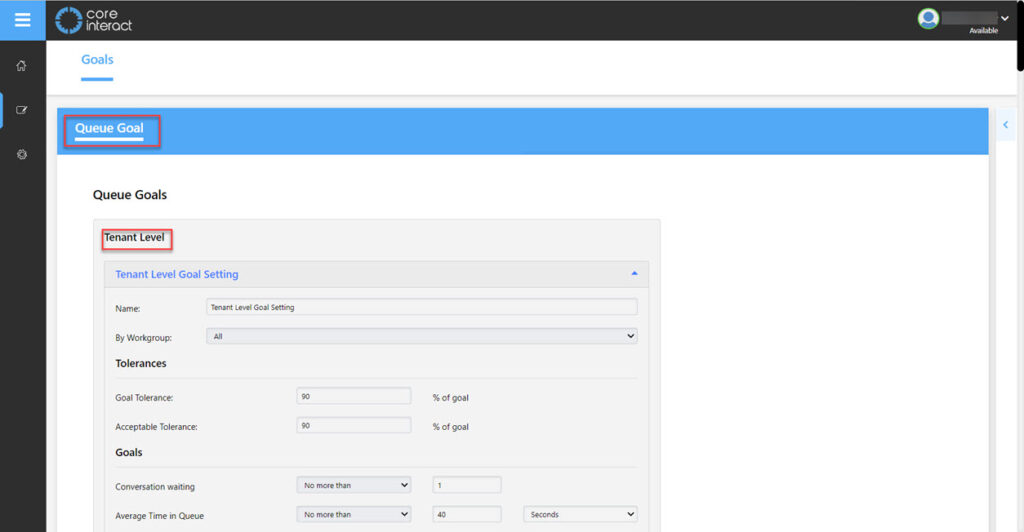
Goals can be set on a Tenant and workgroup level. Tenant level options are at the top of the list, scroll down for the workgroup level.
Tenant level Goals
These are goals for the Queues, a tenant level can be used by all workgroups or they can have their own.
Below are some screen shots of the tenant level settings, magnified for ease of viewing:
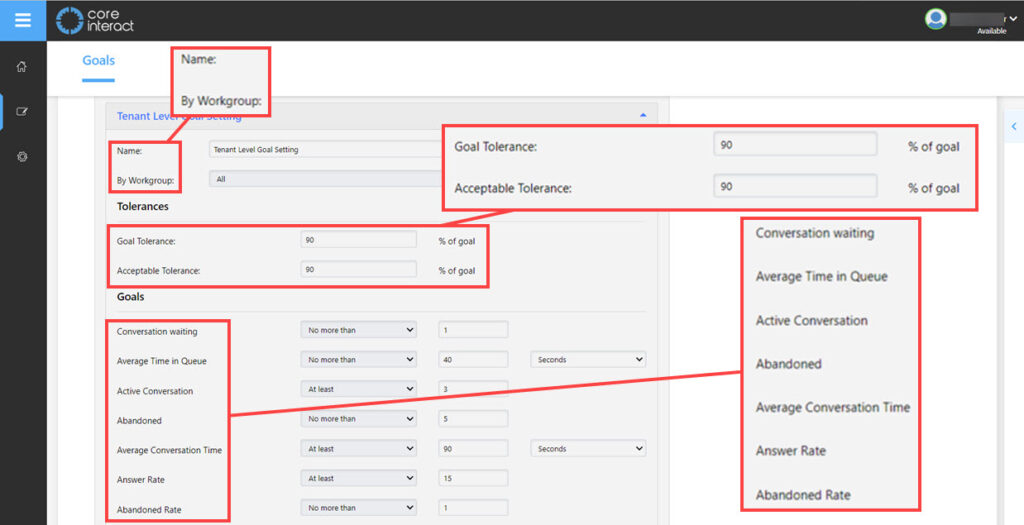
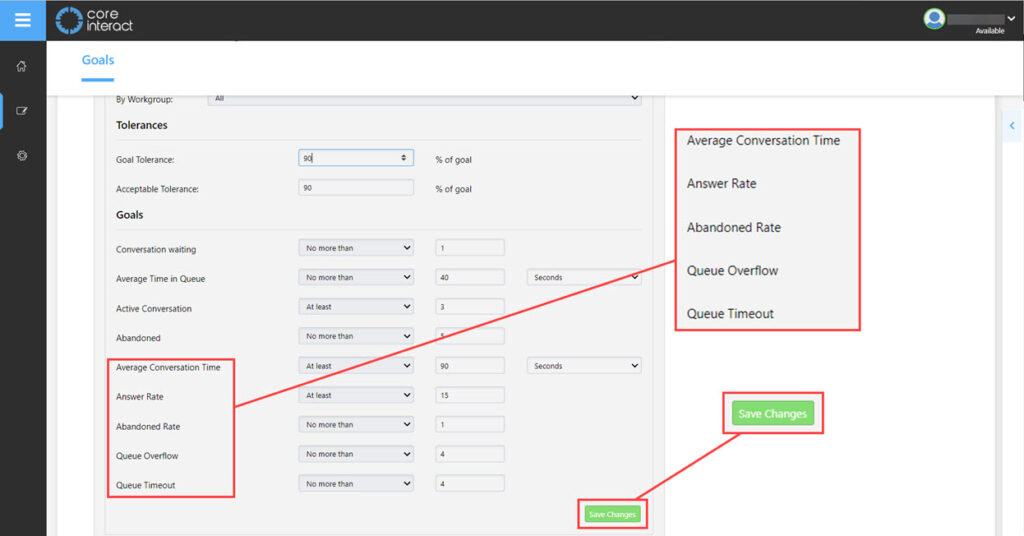
The Goal tolerance percentage rate can be changed. After any changes click on Save changes at the bottom of the page.
The goals available for tenants are described below:
- Conversation Waiting: The maximum possible number of waiting calls in conversation (while having other active calls.
- Average Time in Queue: The total time spent by an agent or tenant in Queue Waiting (Average Time difference between waiting for conversation queue type to active queue type in queue).
- Active Conversation: The possible number of ongoing conversations.
- Abandoned: The maximum possible number of abandoned (neglected) calls while ringing calls for different workgroups by a tenant.
- Average Conversation Time:
- Answer Rate: The rate of answered (the total number of calls received by a workgroup assigned agent) calls by total calls.
- Abandoned Rate: The rate of abandoned calls by total calls.
- Queue Overflow: The maximum number of incoming calls to be routed to the queue where other calls were addressed at that time and the available lines were busy so that there would not be an overflow of the dispatched calls.
- Queue Timeout: The maximum number of inbound calls to remain in the queue before the inbound servers disengage it.
Check meaning Workgroup Level Goals
Scroll below the tenant level and you will find Workgroup level, Click on +Add New:
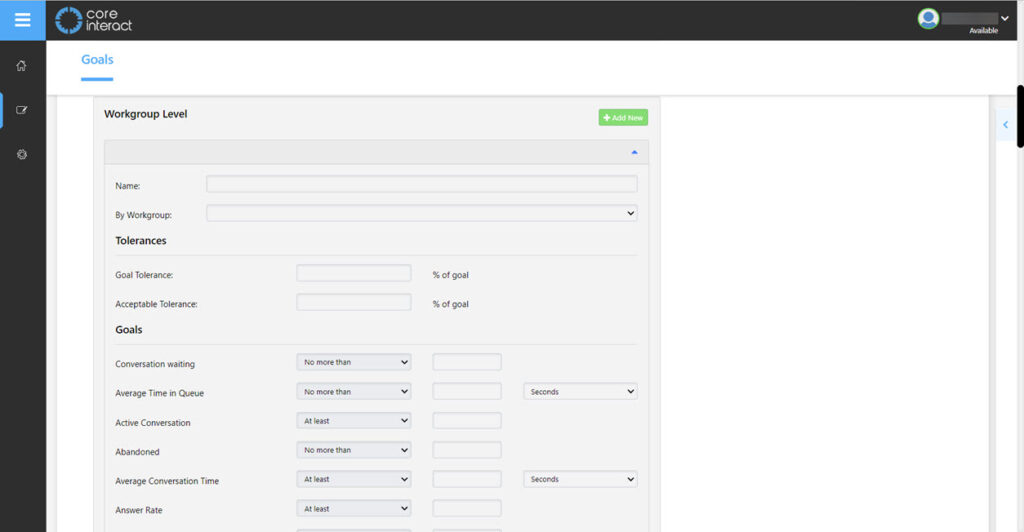
Below is a magnified view of the setting headings:
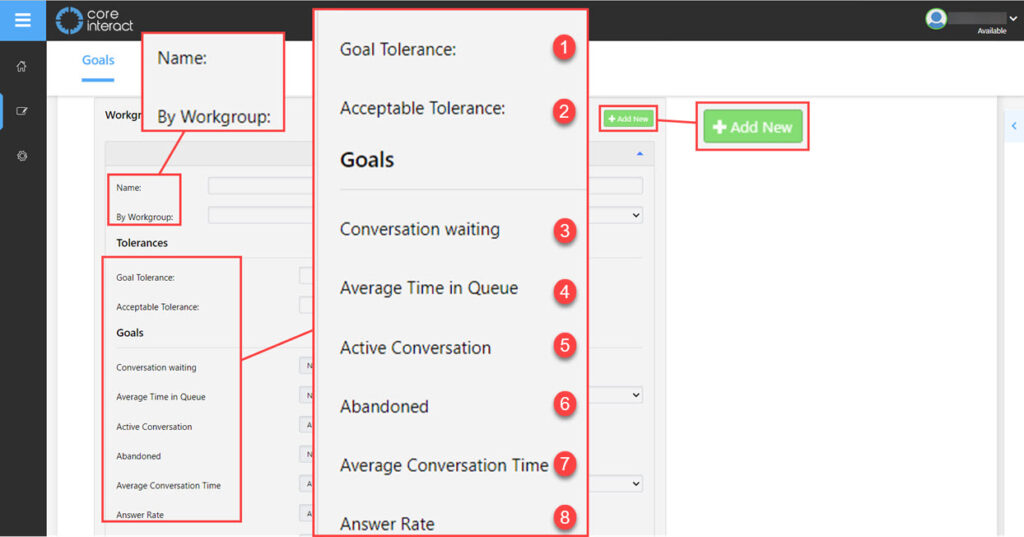
The goal will need to have a name and a workgroup from the drop down list. Now we can look at the tolerances and goals:
- Goal Tolerance – The desired level of threshold to be applicable.
- Acceptable Tolerance – The lowest level of threshold to be achieved by each of the goals.
- Conversation Waiting – The count of all conversations in queue. The maximum possible number of waiting calls in conversation (while having other active calls).
- Average Time In Queue – The average of total duration in queue. The total time spent by an agent or tenant in Queue Waiting (Average Time difference between waiting for conversation queue type to active queue type in queue).
- Active Conversation – The possible number (count) of ongoing conversations.
- Abandoned – Total abandoned call count (abandoned calls possible within a workgroup).
- Average Conversation Time – The average conversation time among the ongoing calls to that specific workgroup.
- Answer Rate – The rate of answered (the total number of calls received by a workgroup assigned agent) calls by total calls.
Source management
Access this menu by clicking on the edit menu then click on source management:
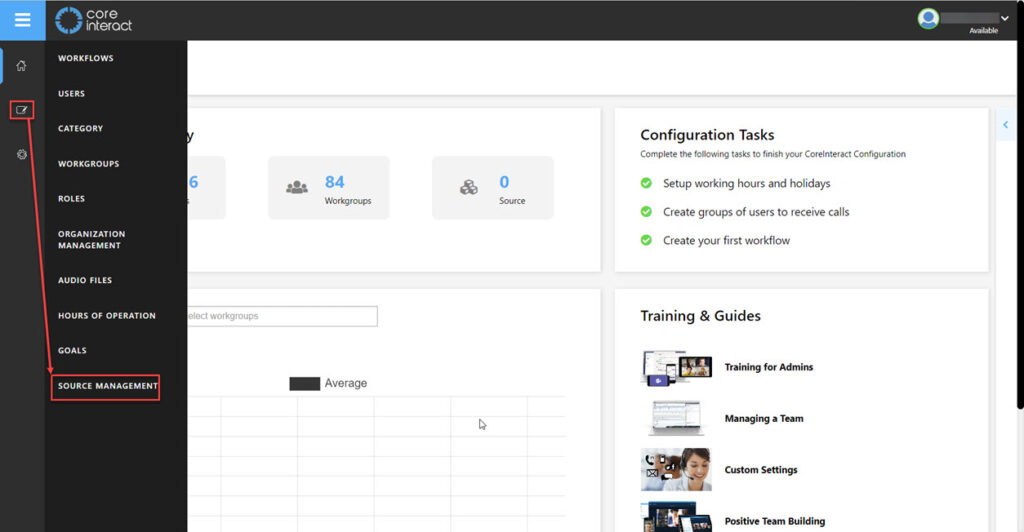
Now if you have any data integrations enabled you will see them in the next page:
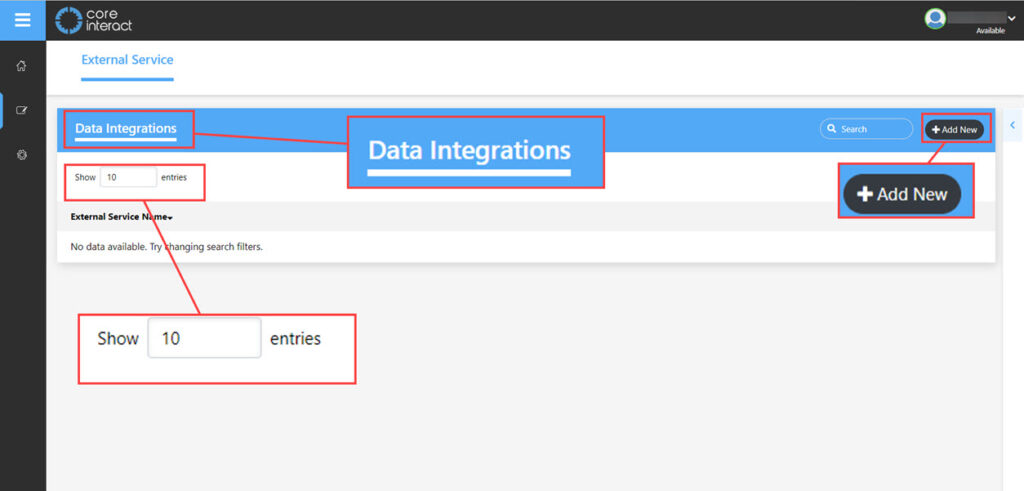
This section will contain the information of any 3rd party data source which can be subsequently used to provide routing logic to your workflows. Professional services may be required, please speak to your account manager.
It includes the API configuration in CoreInteract for accessing and checking customer records. You must add a body parameter and response to this API (Url). The details can be accessed by clicking on the ‘i’ icon available on the right side of the Url.
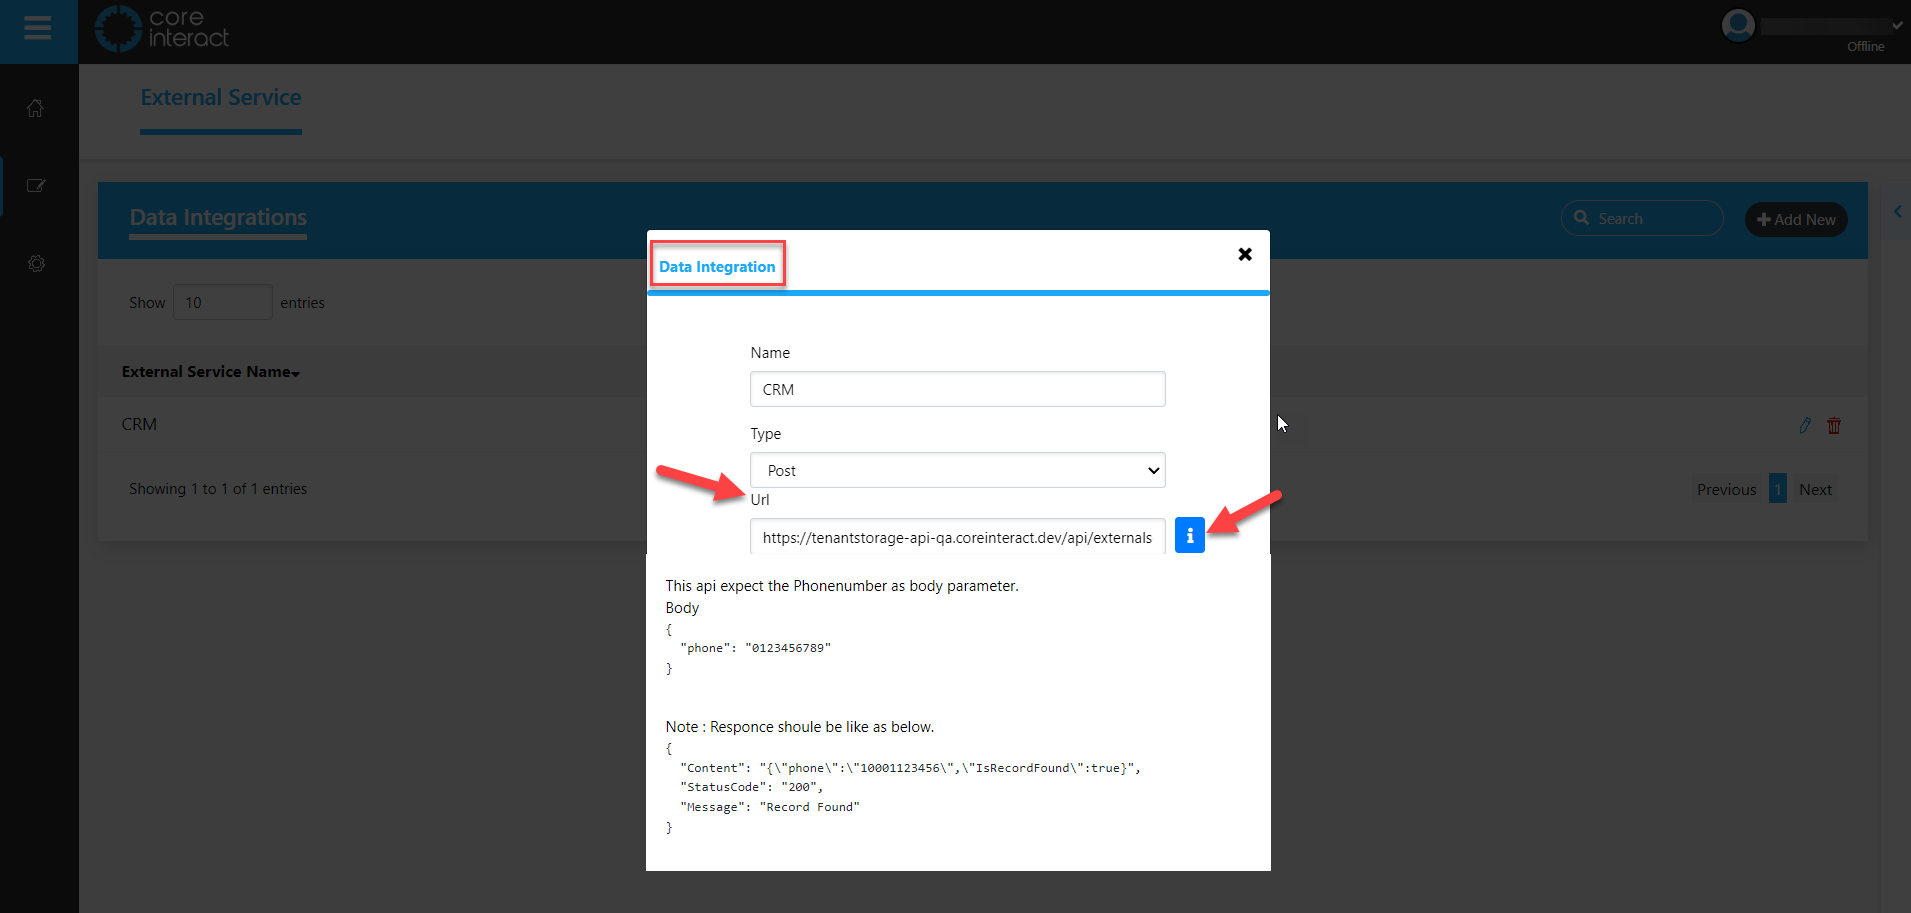
This API expects the Phone number as a body parameter.
Body
{
“phone”: “0123456789”
}
And the response is as:
{
“Content”: “{\”phone\”:\”10001123456\”,\”IsRecordFound\”:true}”,
“StatusCode”: “200”,
“Message”: “Record Found”
}
The API you have used in the Source management of CI is used in the workflow of CI inside the logic card to check the customer API. It checks if the phone number we have provided exists in DB or not for processing the calls. While having inbound calls (call form tenants), the API we have used in CI is used to check the customer records. While checking, if the phone number exists in our record, then the flow will proceed to the other steps. If the phone number does not exist in our record, then the flow will follow the else condition.
If IsRecordFound = True, then flow will proceed (acording to your workflow).
If IsRecordFound = False, then the flow will proceed to the End.
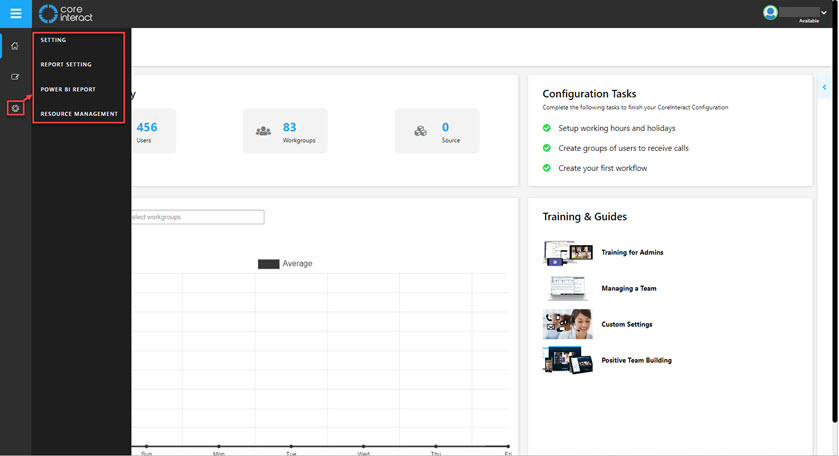
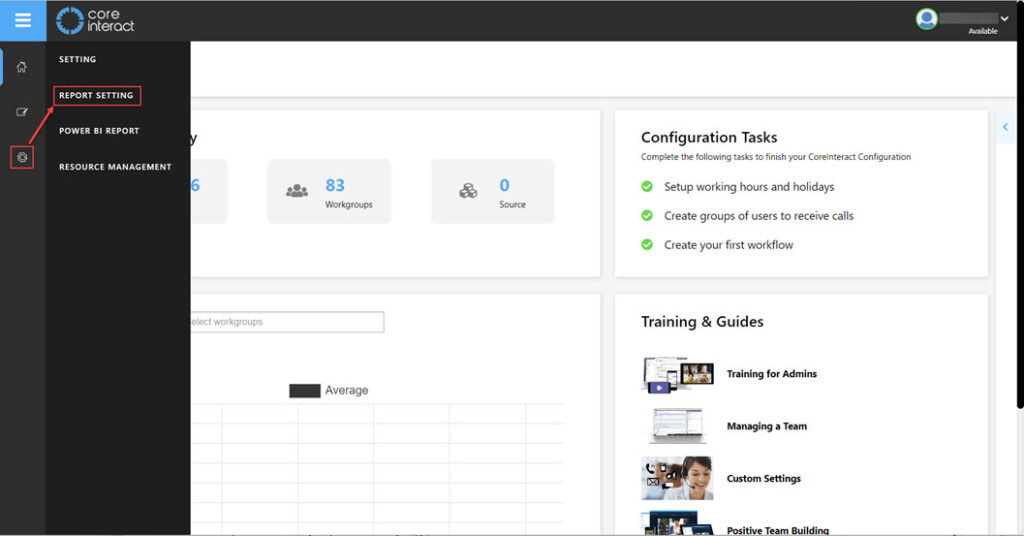
Settings menu
The other menu option is Settings, click on the cog icon to the left and you will see the following options:
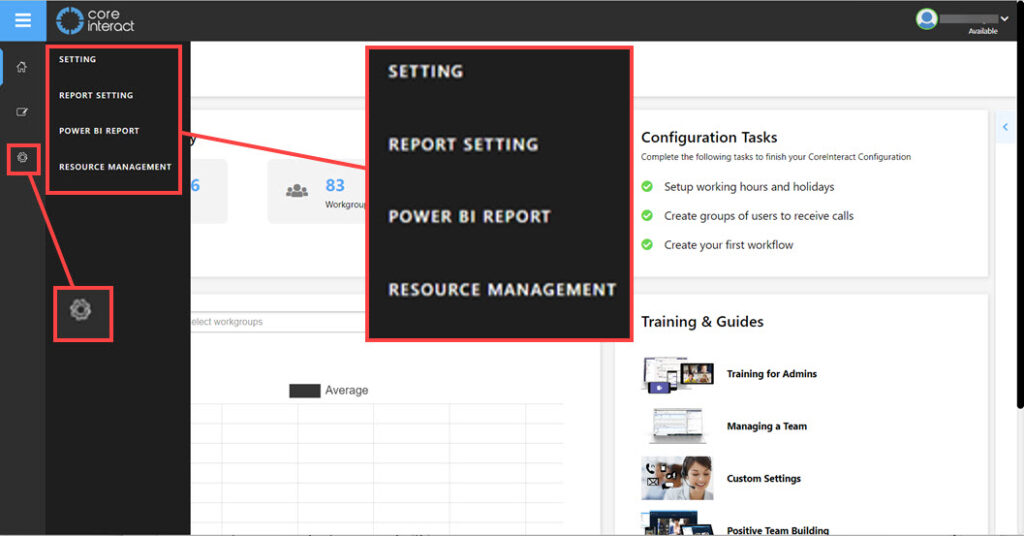
From top to bottom the options are:
- Setting – Option to set time zone and presence that calls will go to.
- Report Setting – Access to reports and creating new reports.
- Power BI report – Sign in here if you have the power BI reports enabled.
- Resource Management – Resource accounts and calling bot.
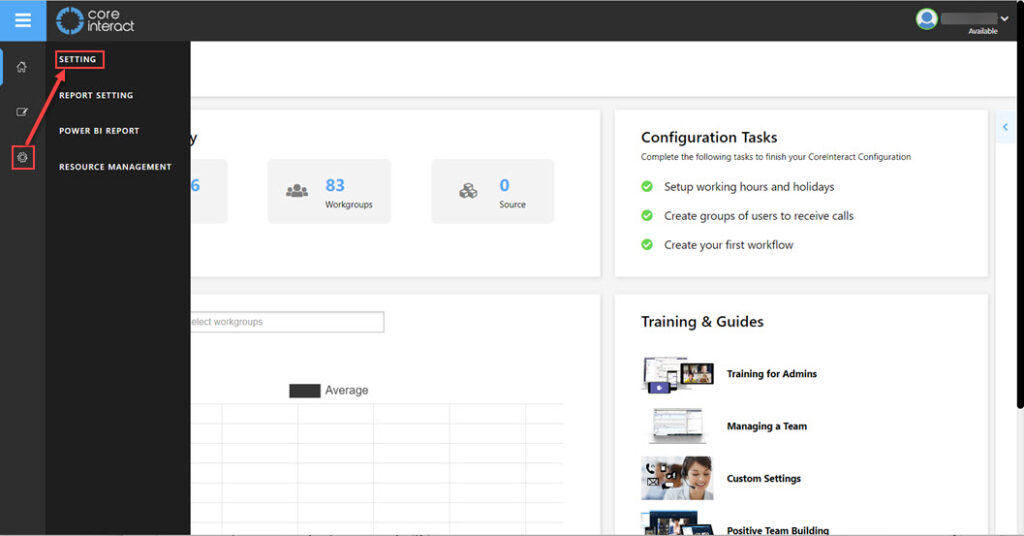
Setting
To access setting go to the menu click on the cog icon then setting:
This will show the following options, Organization Settings and Presence Settings. Looking at the Organization settings first here you can change the time zone of the system:
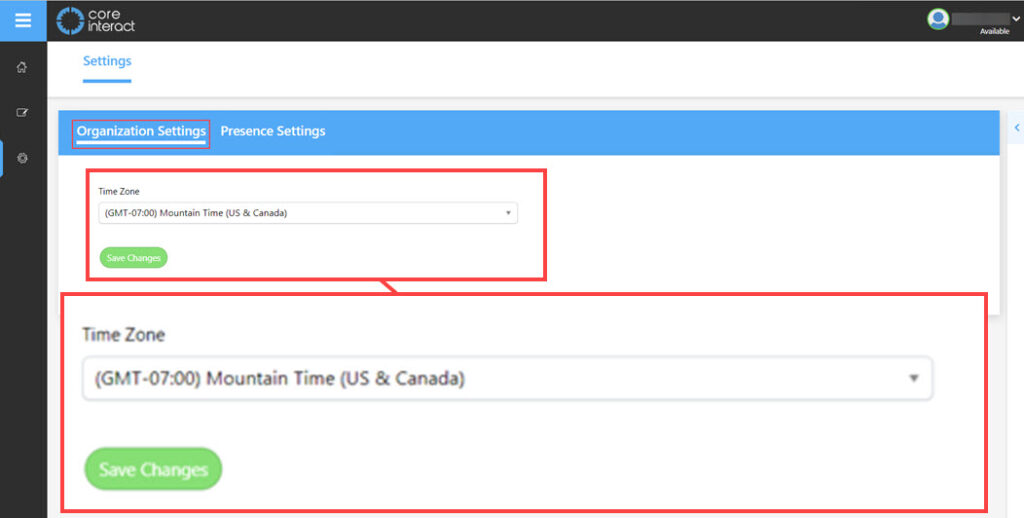
To change this click on the current time zone then select from the drop down menu the correct zone for your needs, once done click on Save Changes.
Now click on Presence to see the following options:
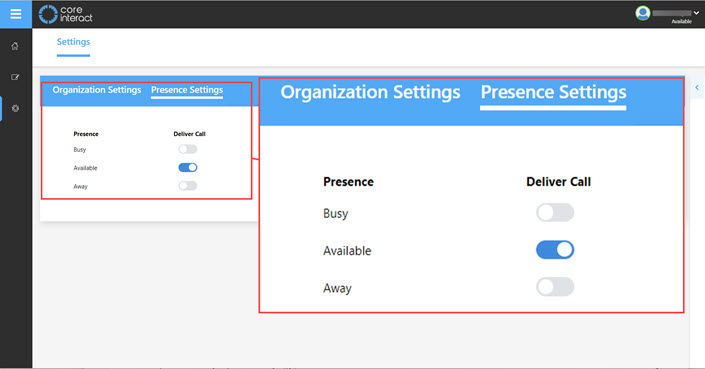
This is where you can decide on what status an agent can be in and still receive calls. Best practise would be to have the Available status set to receive calls.
Report Setting
To open the report settings go to the menu and click on the settings (cog) icon, then click on Report setting:
Now you will see a list of any already created reports along with the time they are scheduled for, the time zone and frequency:
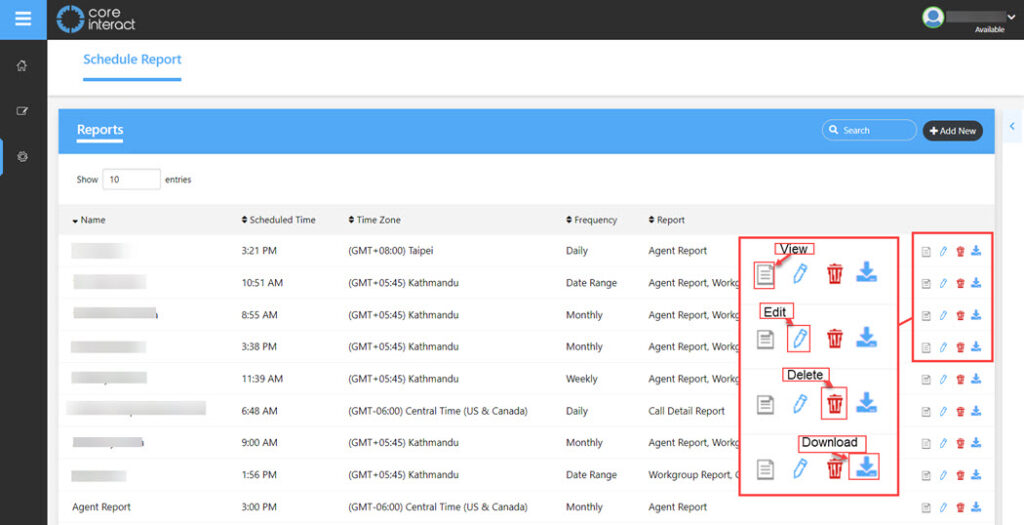
To the left of the reports you have the options of:
- View – Click to view the selected report.
- Edit – Click to edit the selected report.
- Delete – Click to delete the selected report.
- Download – Click to download the selected report.
Creating A New Report
Create a new report by clicking on +Add New in the top right of the reports screen:
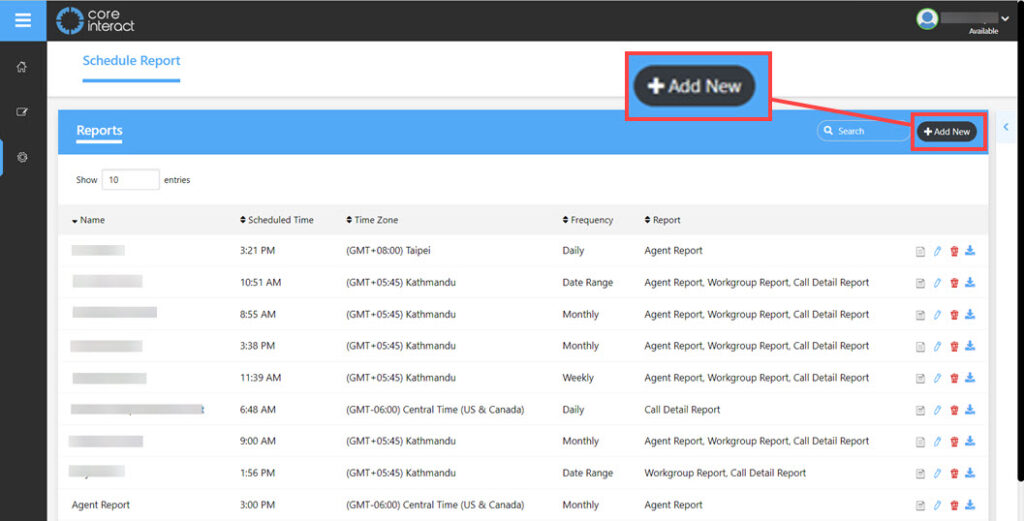
A pop up will now show in the centre of the screen:
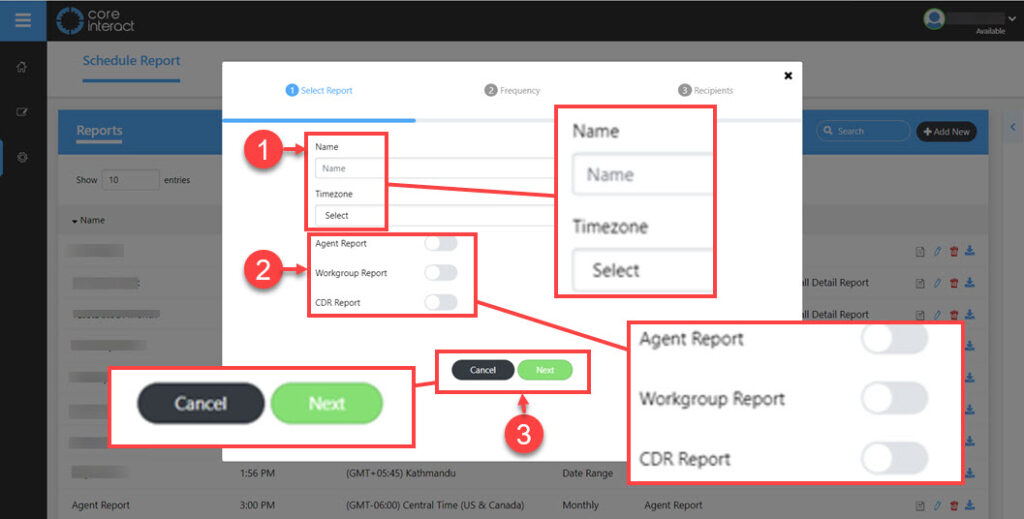
- Report Details.
- Name – Give your report a name by typing in the box.
- Time Zone – Choose the time zone that you would like to use for the report.
- Type of report.
- Agent Report – will give a report of the selected agents statistics for the time period selected.
- Workgroup Report – A report based on the statistics of a chosen workgroup in the period of time selected.
- CDR Report – A call data report giving a list of all calls in a selected time period.
When you have completed this section click on next.
In this example I have chosen to create an agent report:
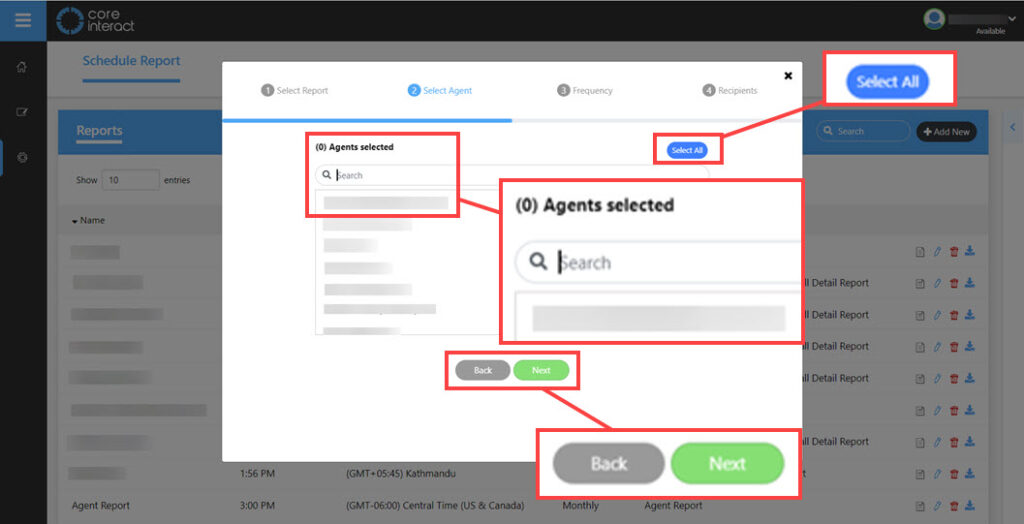
Here you have the choice to select individual agents or you could click on select all to add all agents. Once you have the selection you require click next.
Now you will be asked for the frequency of the report:
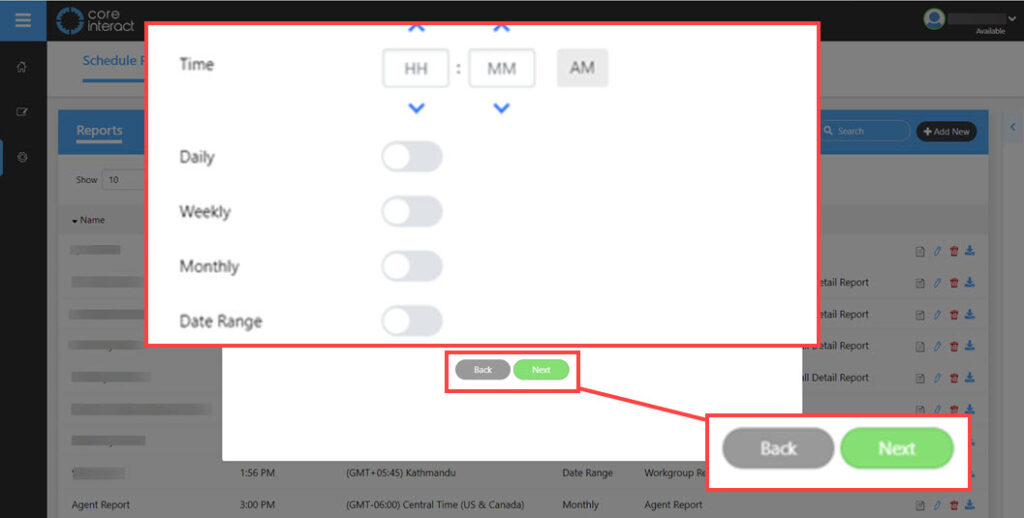
Choose the time that you would like the report to run, this can be set in hours and minutes in an AM/PM style.
The arrows above and below the boxes for hours and minutes can be used to set the numbers either up or down, to change from AM to PM click on the box containing AM and it will change to PM.
Now choose if you want the report daily, weekly, monthly or choose a date range.
Daily will ask for a time to run then you can move to the next step.
Weekly will open a smaller section under the weekly toggle asking you to choose the day of the week you would like to run the report:
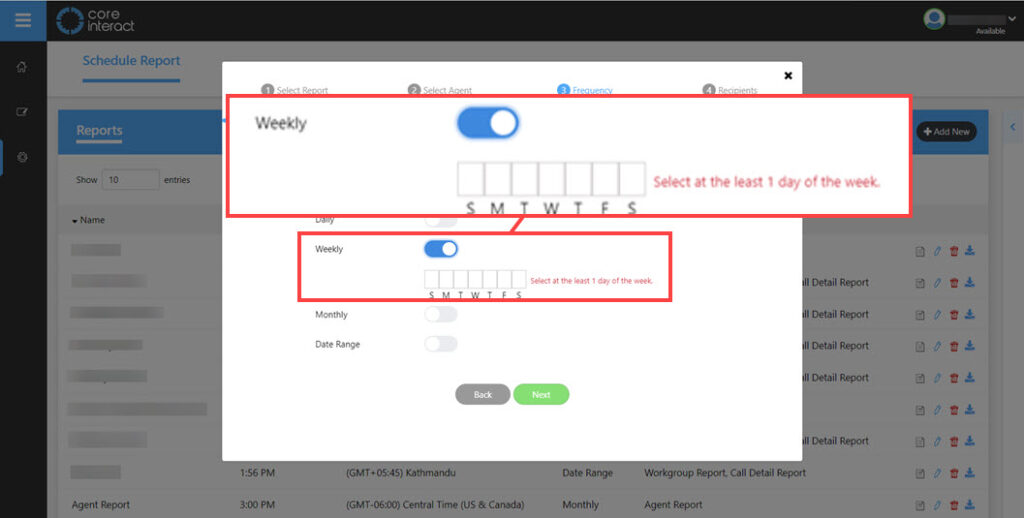
To choose the day just click on the box above the day, this selection begins on a Sunday and ends on a Saturday. Click next when done.
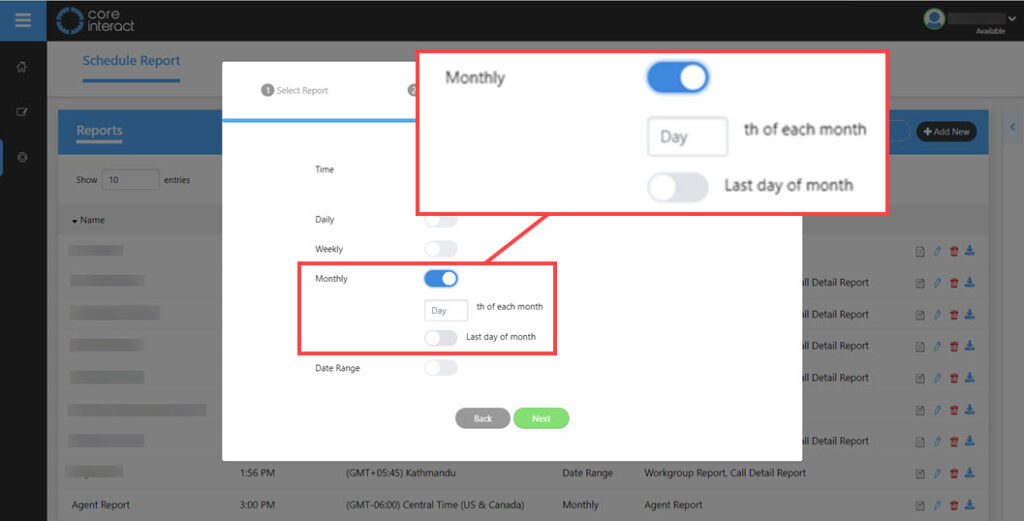
Weekly will open a small section to ask what date of each month the report should run, there is also an option to choose the last day of the month:
The last option is the date range:
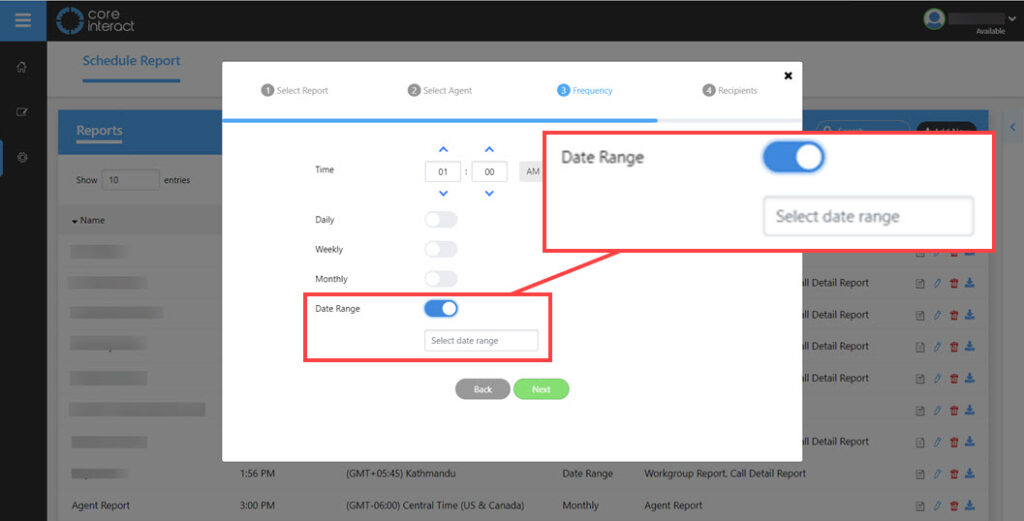
This opens a selection below the toggle for you to add the date range required, when you click on the box to input the date a calendar will appear:

When you have completed this section click next.
The following step will ask you for an email of the person/group that the report will go to:
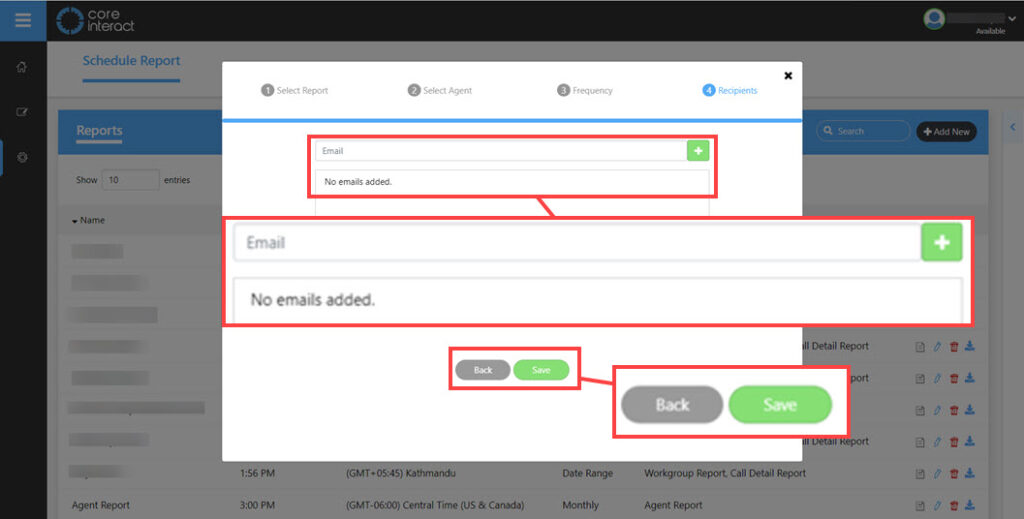
This step will be the same for any of the report styles listed above.
Now that you have the Reporting setup you must specify an email address for CoreInteract to send the report.
This email address can be external and does not have to be part of the users within CoreInteract.
You can add as many emails as you like.
Type the email address in the email bar and click the plus icon to add it to the list. CoreInteract will be able to spot if the email entered is not formatted correctly.
Once you have added an email address to the report settings click save and your report will be setup.
Power BI Report
It is possible to access Power BI Reports from CoreInteract for Admin. This requires all users that want this ability to have a Power BI Pro license.
Once information has been provided the Development team will configure Power BI. Information required will include:
- Names
- Email addresses
- Time Zone
Once configured it will appear on the home screen.
To access the power BI report settings click on the setting (cog) icon then Power BI Report:

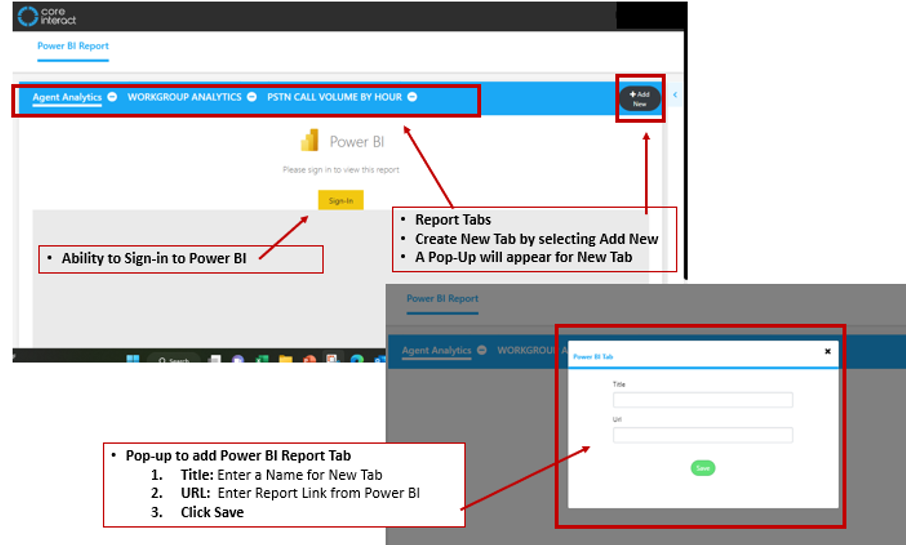
This will open a pop-up for you to sign into Power BI and an option to add a new report tab.
There are three options of these reports:
- Agent report – Report on selected agents statistics.
- Workgroup Report – Report on selected workgroup(s) statistics.
- Call Volume By Hour – Report on the volume of calls per hour.
Resource Management
Access the resource management by clicking on the setting (cog) icon then click on resource management:
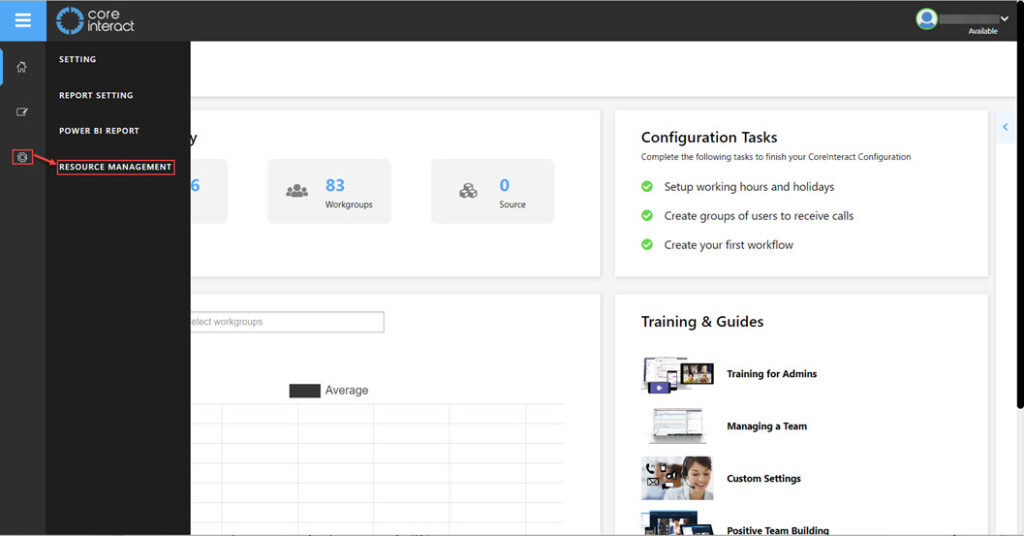
In here you will see the settings for the resource accounts and the calling bot. The below screen shot shows the resource accounts (indicated by the white line below the title):
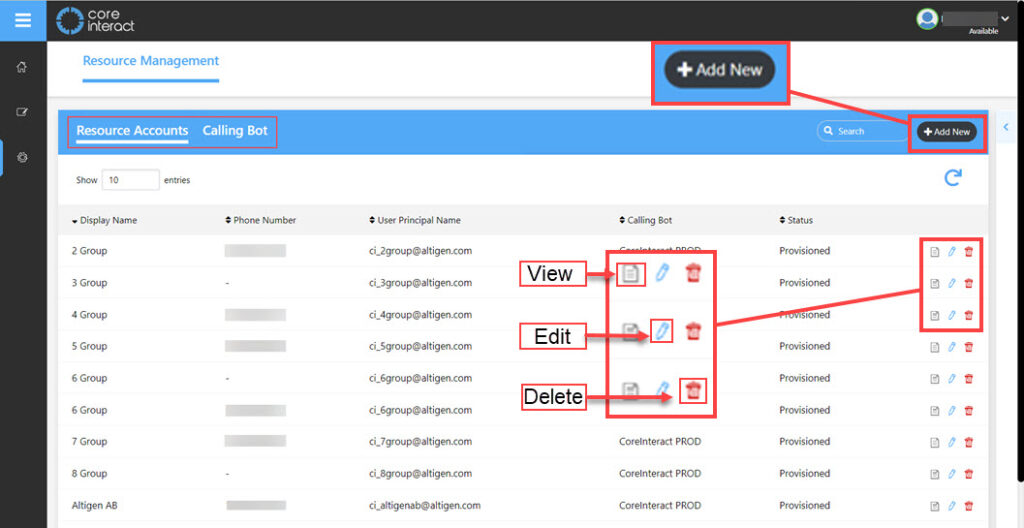
In the same way as we have been able to do in previous pages we can view any of the resource accounts already created, we can also edit or delete these by using the icons to the left of the selection.
Creating A Resource Account
Click on the +Add New button in the top right of the screen. A pop up will show now where you will be asked to fill in the following:
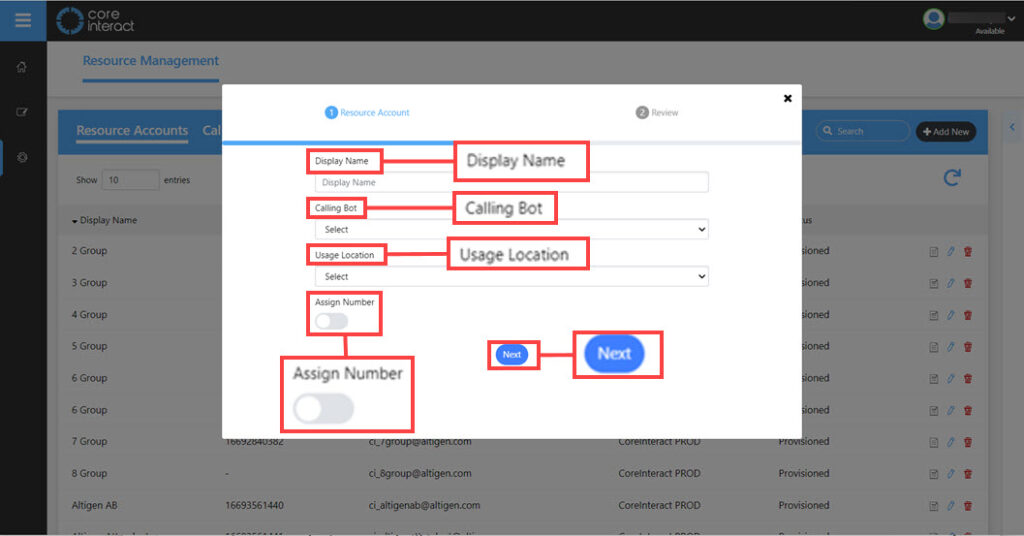
From the top down:
- Display Name – A name for your resource account
- Calling Bot –
- Usage Location – Choose a country from the drop down list.
- Assign Number
- Next
Give the account a display name then select a calling bot from the drop down menu.
Select the usage location from the list of countries.
If you toggle the assign number on the box will expand with a new selection:

External calls
This section also shows how to enable external calls, when you assign a number make sure you set the toggle to activate the external call enablement. You can also edit any of the already created resource accounts and add the external calls to these.
Once set in here it will appear in the workflow builder as a logic card option.
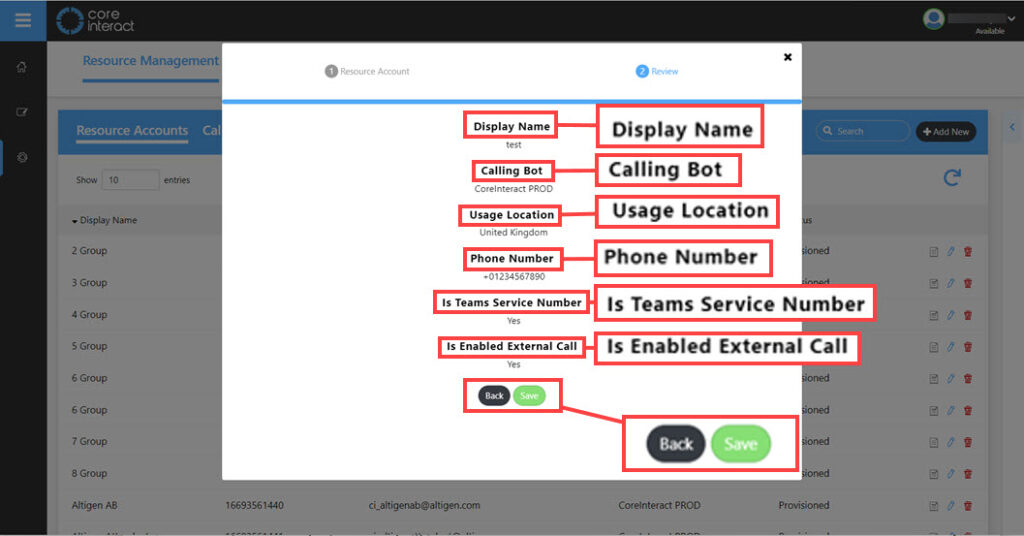
This section is asking you to say if this is a Teams service number and if it is enabled for external calls, Then fill in the number that will be used. Click on next.
A review of the input information will now appear for you to review. If it is correct click on save or if you need to edit the information use the back button:
Calling Bot
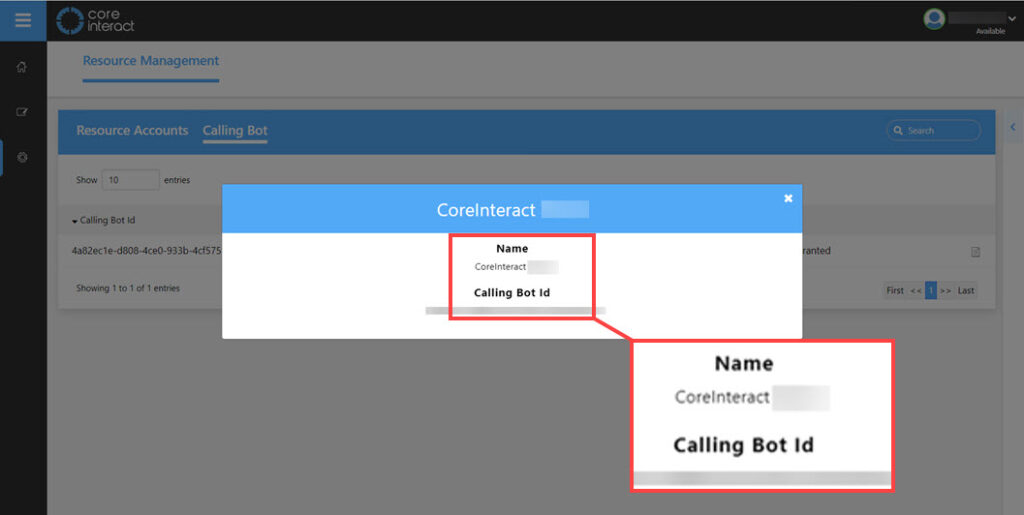
Under Resource Management is also the Calling Bot setting. Clicking on here will show the Calling Bot(s) that are applied:
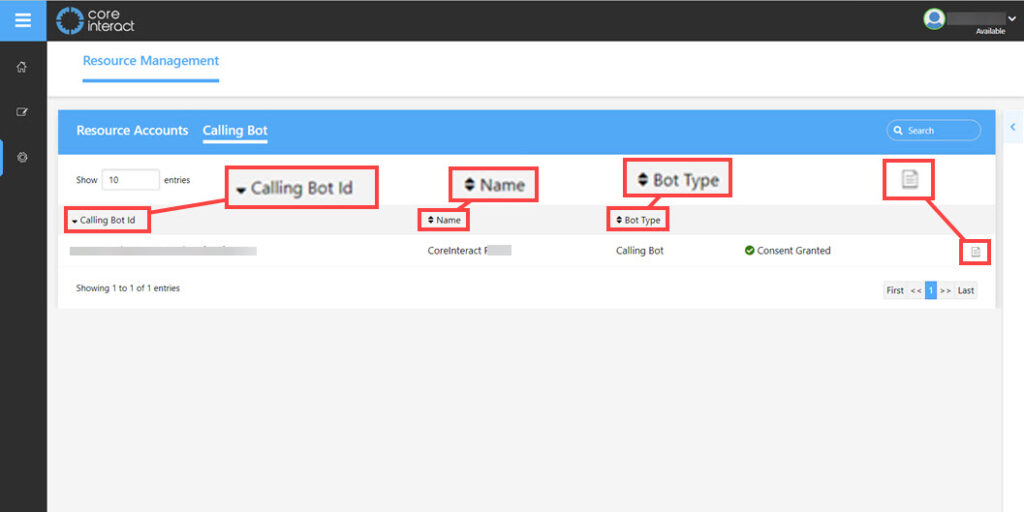
Clicking on the Page icon to the right will show a review pop-up of the Bot:
CHECK Organizational Management
Organizational Management in CoreInteract is used to easily configure which roles/users have access to view/manage other roles/users’ information.
For example, a manager will need to be configured in a way that can view/manage reporting and other information of the users to who they are directly responsible.
Organizational Management allows you to easily manage your business’ hierarchy in a visual way.
Click Edit in the Menu bar then click Organization Management.
Note: You must complete the Roles section to be able to edit the Organization Management within CoreInteract.
Editing the Organizational Management Tree – by Role
In the example shown, we have moved Test A to Mentor by clicking on Test A and dragging it over to the Mentor Box.
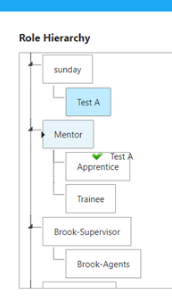
CoreInteract will Show a green tick if that Role can be assigned as shown.
However, if the Role cannot be assigned CoreInteract will display a red cross.
In this example, Mentor now has the ability to have access to Apprentice, Trainee and Test A’s information. However, Mentor does not have access to Brook supervisor or Brook Agents below.
To look at a specific Role Hierarchy, click on the Role in the left-hand box.
The right-hand box will then only Highlight the selected Role.
To Go back to viewing the complete Role Hierarchy, click on the specific Role again.
Editing the Hierarchy Tree – by User
The steps to edit the Hierarchy Tree is the same as the Roles above. However, you will be able to see the users’ name and the role they have been assigned in blue below.
This is useful to see if there are any users who have been assigned the incorrect Role during Setup and can be amended later.
Once you have set up your Organizational Management tree you can move on to setting up Workgroups and User Assignments.
Workgroup Report
| Field | Description |
|---|---|
| Date | Date Of Call When Reaching The Workgroup Queue |
| Workgroup | Name Of Workgroup |
| Total Calls Offered | Total Calls Per Day (Total count of conversation in workgroup queue per day, unique by conversation) |
| Total Answered Calls | Total Calls Received By An Agent In A Day (Total count of conversations with conversation type Active in agent queue, unique by conversation |
| Total Call Handle Time | Total Time Engaged In A Call (Total of the tome difference between start date of workgroup queue with ConversationQueue type Ringing or Active |
| Calls Abandoned In Queue | Total Number Of Calls That Did Not Reach The Agent Per Day (Total number of calls that ended in Workgroup Queue) |
| Average Talk Time | Average Of Customer Engaged With The Agent Per Day (AverageTalkTime->TotalTalkTime/TotalAnsweredCall | TotalTalkTime) |
| Calls Abandoned During RNA | Total Number Of Calls With Ring No Answer By Agent |
| Calls To Voicemail | Total Number Of Calls That Went To Voicemail (Total number of calls in workgroup queue with Conversation Queue Type Voicemail) |
| Average Call Answered Time | Average Time Taken In A Day To Answer A Call ( Average of time difference in workgroup queue between Conversation Queue Type Ringing to Activate in Queue) AverageCallAnswerTime->Average of WorkgroupCallAnswerTime – WorkgroupCallStartTime |
| Average Time In Queue | Total Time Spent By An Agent In Queue Waiting. (Average of time difference between waiting conversation queue type to active queue type in workgroup queue) *average of (CallAnswerTime – WorkgroupQueueStartTime) – If call is answered by an agent. *Average of (WorkgroupQueueEndTime – WorkgroupQueueStartTime) – If call is not answered by any agent. Peak Wait Time – Time when queue is busiest |
| Abandoned Percent | Total Percentage Of Abandoned Calls By Call Total |
Agent Report
| Field | Description |
|---|---|
| Date | Date Of Call In Reaching Agent Queue |
| Workgroup | Name Of The Agent Associated Workgroup |
| Agent | Name Of The Agent |
| Total Calls | Total Number Of Calls Redirected To An Agent (Total conversation In Agent Queue group by agent and unique conversation) |
| Total Answered Calls | Total Number Of Conversations With User Conversation Queue Status Active In Agent Queue. |
| Total Abandoned Calls | Total Number Of Conversations With User Conversation Queue Status Rejected |
| Total Talk Time | Total Time Difference Between Agent Queue With Status Active To Call End |
| Average Talk Time | Total Talk Time / Total Answered Calls |
| Average Call Answer Time | Average Time Taken By An Agent To Answer A Call (Average Time between Agent queue with conversation queue status Ringing to Call answered by agent) AverageCallAnswerTime->Average of (AgentCallAnswerTime – AgentQueueStartTime) |
Call Detail Report
| Field | Description |
|---|---|
| Conversation ID | Unique ID Of The Conversation |
| Call Start Date | This Is The Start Date When The Call Reached CoreInteract System |
| Call Start Time | This Is The Start Time When The Call Reaches The CoreInteract System |
| In Coming Caller ID | Phone Number Of The Caller Who Calls To The CoreInteract Starting Point |
| Starting Point | This Is The Phone Number Attached To The Workflow In CoreInteract |
| Workflow | This Is The Name Of The Workflow Which The Caller Calls |
| Workgroup | This Is The Name Of The Workgroup To Which The Call Will Be Transferred |
| Conversation Route Type | This Is The Route Type To Which The Call Will Be Transferred |
| Workgroup Queue Start Time | This Is The Time When The Call Reaches The Workgroup Queue Activity |
| Workgroup Queue End Time | The Time When The Call Leaves The Workflow Queue |
| Busy Handling | When The Busy Handling Of The Workgroup Setting Is Triggered, Then The Field Value Is True Else It’s False |
| Busy Handling Forward Voicemail | When Busy Handling Is True, Then If The Call Goes To The Voicemail Then This Field Will Have The Voicemail Box Name |
| No Answer | When The No Answer Of The Workgroup Setting Is Triggered, Then The Field Value is True Else It’s False |
| No Answer Forward To Voicemail Box | When No Answer Is True, Then The Call Goes |
| Group RNA | When The Group RNA Of The Workgroup Setting Is Triggered, Then The Field Value Is True Else It’s False |
| Group RNA Forward To Voicemail Box | When The Group RNA Is True, Then If The Call Goes To The Voicemail Then This Field Will Have The Voicemail Box Name |
| Queue Timeout | When The Queue Timeout Of The Workgroup Setting Is Triggered, Then The Field Value Is True Else It’s False |
| Queue Timeout Forward To Voicemail Box | When Queue Timeout Is True, Then If The Call Goes To Voicemail Then This Field Will Have The Voicemail Box Name |
| Queue Overflow | When The Queue Overflow Of The Workgroup Setting Is Triggered, Then The Field Value Is True Else It’s False |
| Queue Overflow Forward Voicemail Box | When Queue Overflow Is True, Then If The Call Goes To The Voicemail Then This Field Will Have The Voicemail Box Name |
| Agent Name | The Name Of The Agent To Whom The Call Was Transferred Or Who Answers Or Rejects The Call |
| Agent Queue Start Time | Time When The Call Is Redirected To Agent |
| Agent Queue Answer Time | Time When The Call Is Answered By The Agent |
| Call End Time | Time When The Call Was Ended |
| Workgroup Transfer | If The Workgroup Setting Is Set To Workgroup Transfer From Any Of The Workgroup Settings Like Busy Handling, Group RNA, Queue Overflow, Queue Timeout Or No Answer Then This Field Is Set As True |
| Workgroup | The Name Of The Workgroup Which The Call Was Transferred From The Workgroup Transfer Method |
| Agent Transfer | If The Workgroup Setting Is Set To Agent Transfer From Any Of The Workgroup Setting Like Busy Handling, Group RNA, Queue Overflow, Queue Timeout Or No Answer Then This Field Is Set As True |
| Transferred Agent | This Field Is The Name Of The Agent To Whom The Call Is Transferred From The Agent Transfer Method |