FrontStage offers a fully customizable contact center solution. This could be a simple setup and view or a complex personally configured system. What you have will be dependent on what needs the business has. There are add-ons to FrontStage that provide many solutions.
Logging in
Once FrontStage is installed, a link will be given to enable login. Clicking on the link will open a window asking for Microsoft 365 credentials, these will be used to verify identity. Once this is verified the web application will open and be ready for use.
Agent View
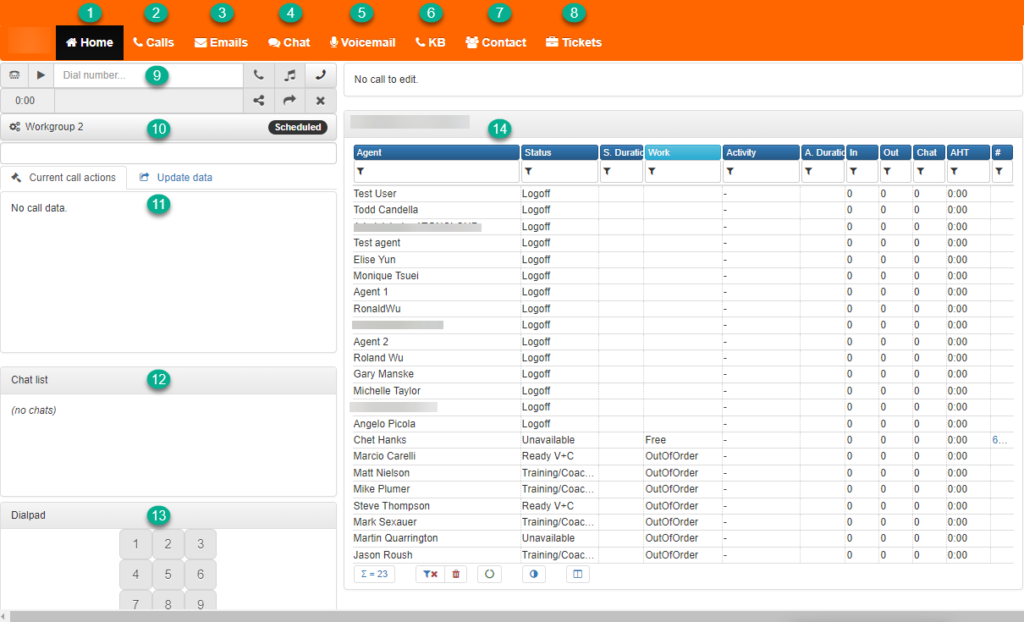
| 1 – Home screen | Main view the agent has when logging in. Calls can be: Made, taken and scheduled from this screen | |
| 2 – Calls | A view of all inbound and outbound calls in the agents workgroup | |
| 3 – Email | Gives a list of all queue messages in the agents workgroup and all messages in the agents workgroup | |
| 4 – Chat | Lists all active chats and all chats in the agents workgroup | |
| 5 – Voicemail | Voicemail queue and all received voicemails in the workgroup | |
| 6 – KB | Knowledge Base, agents can fine useful web links, FAQ’s and other knowledgeable documents in here to assist them on calls | |
| 7 – Contacts | List of customer contacts | |
| 8 – Tickets | List of customer tickets, showing the status for each | |
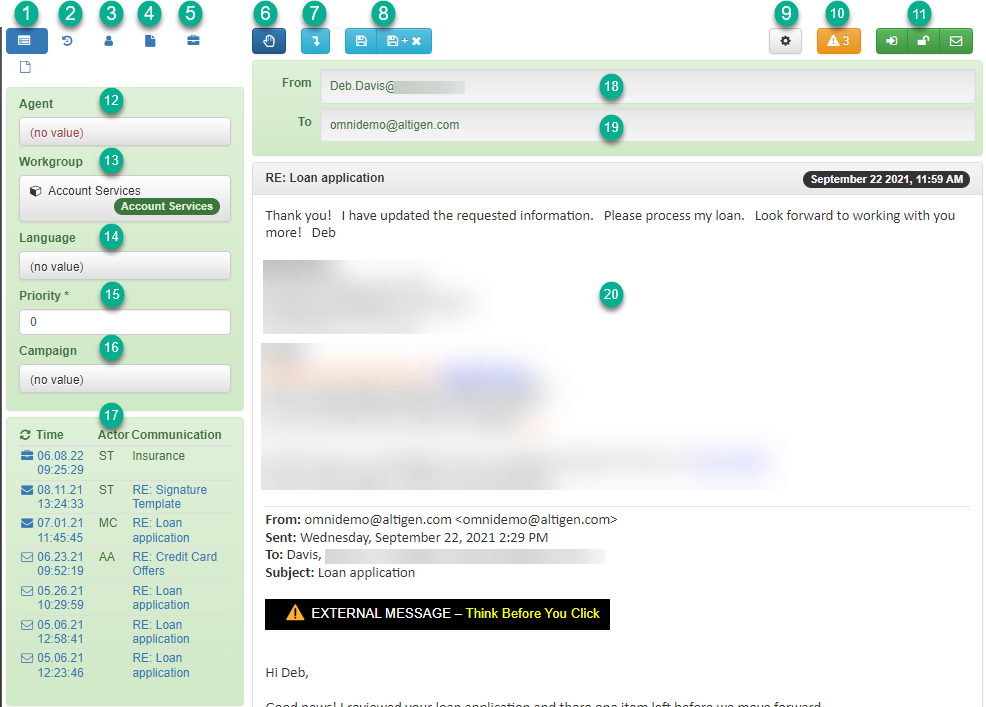
| 9 – Dialed number | The number that the agent has dialed, numbers can be typed into here | |
| 10 – Workgroup | This shows the name of the workgroup the agent is working in | |
| 11 – Calls Data | In here the agent can update the data from a call or select actions for the current call | |
| 12 – Chat Data | Agents chats appear in this box | |
| 13 – Dial Pad | Use to input the number of the person to call | |
| 14 – Statistics | List of agents in the same workgroup, their status and activity | |
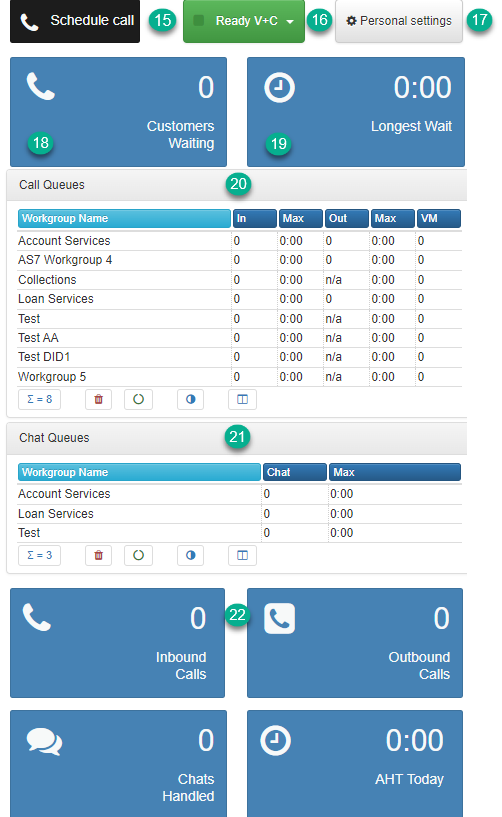
| 15 – Schedule A Call | If a customer requests a callback or you have a campaign then the agent can schedule a call to happen on a set date and time, an agent can be directly selected to make the call. | |
| 16 – Status | Availability status of the agent | |
| 17 – Personal Settings | Language and layout theme prefrences | |
| 18 – Customers Waiting | Current amount of call in queue | |
| 19 – Longest Waiting Time | Shows the time the longest call has been in the queue | |
| 20 – Call Queue statistics | Lists workgroups the agent is associated with and their current statistics | |
| 21 – Chat Queue Statistics | Lists the chat workgroups and their statistics | |
| 22 – Agent Statistics | Gives an easy view of the agents statistics for the day |
Availability Status
An agent in a Ready status can deal with Calls, Chats, Emails and Tickets, some companies may decide to have a status that combines all of these or they could have many Ready statuses giving options to one or more of those choices.
Distribution Conditions
Calls are sorted by the distribution conditions that are set on the system.
When a call comes in the system will look for the following:
- Available Agent (ready status)
- Appropriate Project Skills
- Appropriate Language skills
Any agent fitting the above criteria who has been in an idle state for the longest will get the call.
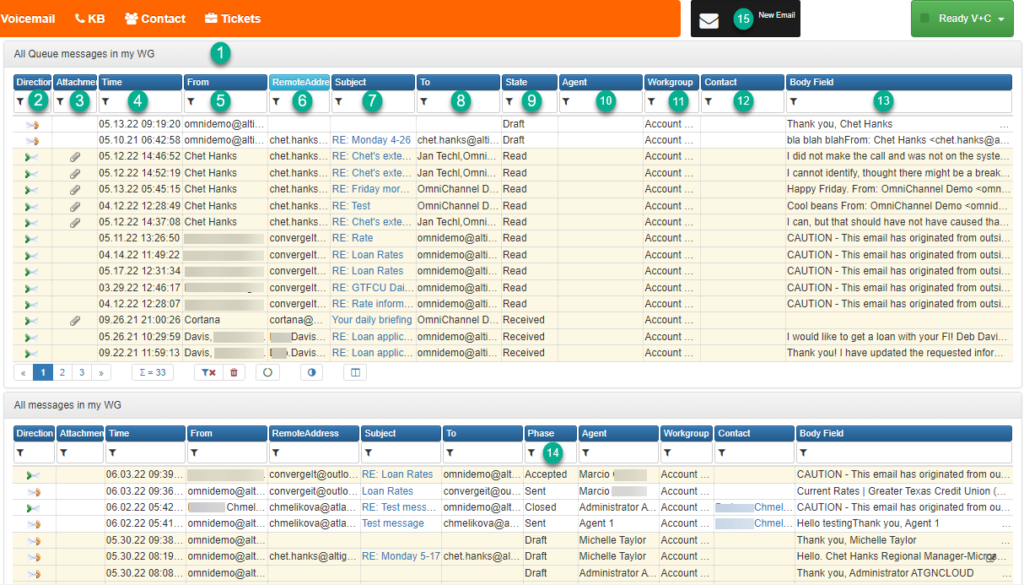
| 1 – All Queue Messages In My Workgroup | Shows a list of all emails in the workgroup queue |
| 2 – All Messages In My Workgroup | Lists all messages in the workgroup |
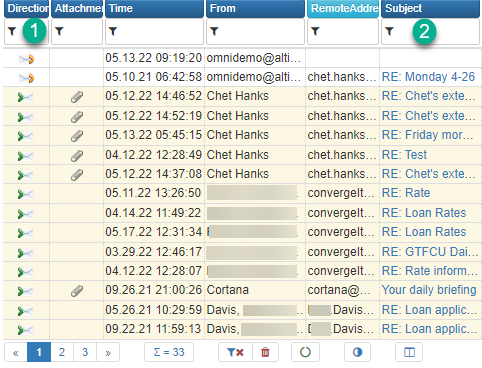
| 3 – Direction | Shows if the email is inbound or outbound |
| 4 – Attachment | A paperclip shows the mail has an attachment |
| 5 – Time | Time and date mail was sent/received |
| 6 – Remote Address | This is extracted from the email address string |
| 7 – Subject | Subject of mail |
| 8 – To | Email address it is sent to |
| 9 – State | shows the current status of the mail |
| 10 – Agent | Shows who is dealing with the mail |
| 11 – Workgroup | Tells the agent what workgroup the mail has come in for |
| 12 – Contact | If the email is from a known customer this will populate |
| 13 – Body Field | Gives a small amount of text from the mail as a preview |
| 14 – Phase | Allows the agent to see if the mail has been accepted, closed, sent or read |
| 15 – New Email | Clicking on here will allow the agent to compose a new email |
Open and View
An agent can open an email by clicking on the direction icon for that mail or the subject field.
Message Editor
| 1 – Information | Gives the above view | |
| 2 – History | Changes the left side to show any old contact information | |
| 3 – Contact | Will either have the information or the agent can add the contact in here by clicking on the + in the red box | |
| 4 – Notes | Shows any notes on the contact | |
| 5 – Issue | Allows logging. linking, unlinking and allows the agent to open the issue in an editor window | |
| 6 – Accept | Before the agent can respond to a message or correct the data to return it to a queue they have to accept the email | |
| 7 – Go to Original | Will open the original email in the chain | |
| 8 – Save changes/ Save changes and Close Window | As expected | |
| 9 – Settings | Options on the email address suggestions search, maximum number of suggestions, suggestions based on previous contact and options on opening related communications | |
| 10 – Form Errors | Any errors in the form will be flagged by a warning triangle and a number. hold the mouse pointer over for details | |
| 11 – Information | These are just information buttons they have no function | |
| 12 – Agent | Name of the agent who is working on the email, option to select another agent and return to queue | Metadata can be changed |
| 13 – Workgroup | Name of the workgroup the agent is in, option to change the workgroup and return to queue | Metadata can be changed |
| 14 – Language | Language the email is in, this can be changed and added back to the queue | Metadata can be changed |
| 15 – Priority | Set a priority for the email to be dealt with | |
| 16 – Campaign | The campaign associated to the email, this can be changed and put back into a queue | Metadata can be changed |
| 17 – Time and Communication | Shows the dates and times of the last communication along with a preview of the subject | |
| 18 – From | Tells the agent who sent the email | |
| 19 – To | The agent can choose who the email sends out to | |
| 20 – Message | The reply or email the agent is sending, below would be any previous emails. |
Some options hold Metadata these can be altered by the agent to allow the email to go into another queue that would be better suited to the request/message or, to a specific agent.
To change the Metadata and return the email to queue, the agent needs to read the mail and then decide on the correct workgroup or agent for the email. Now they change the Metadata and return the message to the queue.
Chat
This feature works much the same as the Email. Click on the Chat button on the top menu, this will open the list of messages. An agent can only receive chats and not create them.
When a new chat comes in it will populate the chat list, when the agent clicks on the message the bar will go from red to orange and a chat window will open.

Clicking this opens a widow for the chat session:
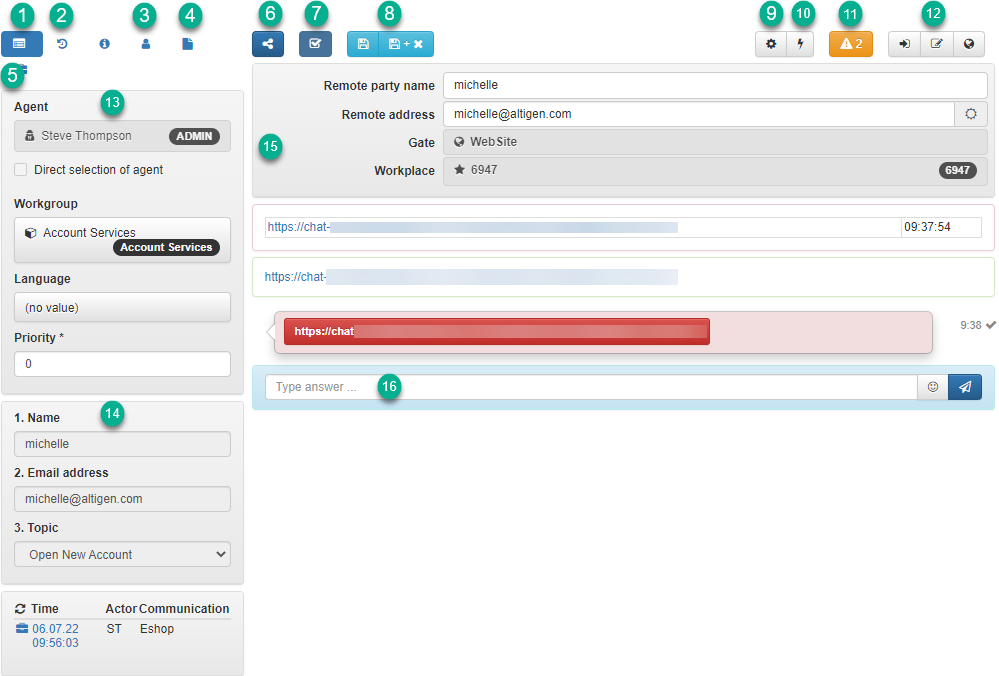
| 1 – Information | Shows the information on the chat |
| 2 – History | Gives a view of any previous chats from this person |
| 3 – Contact | Details of the contact, allows the agent to add the data if it is not already in the system |
| 4 – Notes | Any notes associated to the contact will appear in here |
| 5 – Issue | Agent can log an issue as with email |
| 6 – Return To Distribution | Allows the agent to choose another agent, workgroup or language and return the chat to the queue |
| 7 – Finish | When the chat is completed the agent can click this to close the chat |
| 8 – Save Changes/Save and Close | Either save changes or save changes and close |
| 9 – Settings | Conversation view setting options |
| 10 – Settings | Shortcut settings |
| 11 – Form Issues | Highlights any issues with the chat, refer to the email section for more details |
| 12 – Information | These are just information buttons they have no function |
| 13 – Agent | This section contains the metadata information, the agent can change the agent, workgroup or language in here and return to the queue |
| 14 – Chat Details | Details the person using chat has input, with a time and date below |
| 15 – Remote party details | Name and email address of the person in the chat with the access method and the agents workplace |
| 16 – Reply to chat | Type replies in here for the chat session |
Calls
When an agent is logged in and in the Ready state calls will begin to come through if the agent meets the conditions or is selected as a direct agent. If the agent is selected as a direct agent and is not in a Ready state the call will not go to another agent it will remain in the queue.
Incoming calls will show on the call bar in the main screen.
Normally there is a set time for the call to ring to the agent, this is usually set at around 20 seconds. After this limit the call would be marked as a missed call for the agent and FrontStage will attempt to deliver the call to another agent that matches the conditions. If no other agent is found then the call will continue to ring the first agents workplace.
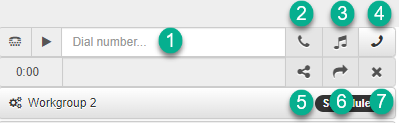
| 1 – Dial Number | Type in the number to dial |
| 2 – Hang Up | Use this to end the call |
| 3 – Hold | Place the call on hold |
| 4 – Dial | Click to dial the number |
| 5 – Transfer | Use to transfer the call using consultative transfer |
| 6 – Direct Transfer | Transfer the call direct to another agent |
| 7 – Hang up split call | Hangs up the consultative call and put you back on the call with the customer, used when the person you have tried to consult is busy or unavailable |
Call Transfers
Call transfers can be made in different ways.
- A Project Transfer
- Consultative Transfer
- Non consultative Transfer
If an agent is in a call and they realize the customer has come to the wrong project or has chosen the wrong language, etc. then they can transfer the call. The agent will change the metadata and return the call to the queue, from this point FrontStage will try to find another matching agent that meets the conditions.
Agents can also choose to transfer the call to a fellow agent rather than placing it back in the general queue.
A call can also be transferred keeping the recorded Meta Data by using the “Update Data” Button.

When an agent is in a call and clicks on here a drop down menu will appear. They can then choose where the calls goes and the recording will continue.
The above image shows the metadata the agent can change.
Consultative Transfer
If preferred an agent can initiate a consultative transfer, this is where the customers call will be placed on hold (the customer will not hear any of the call just the hold music until they are either transferred or returned to the agent) and the agent will ring through to the person and ask if they can take the call. If they can, the agent transfers the call and goes back into a ready state. If the call is rejected the agent will hang up the split call and be back on the call with the customer.
To begin a consultative transfer the agent should dial the number of the person they need and click on the transfer button. The call is transferred by clicking the arrow in the blue box.
Non-Consultative Call Transfer
Also known as an unassisted transfer or one-step transfer. To do this an agent will dial the number of the person they wish to transfer to and then click on the arrow in the blue box. This will transfer the call and place the agent back into a ready status.
Scheduling a Callback
A callback can be scheduled from a call or chat. This is helpful if the customer is busy but has time later in the day or week. The call can be scheduled from the call by clicking on the back facing arrow to the right of the number or, in the calls or chat section there is an option at the top to schedule a call. Both methods will open a new window with the options of agent, workgroup, language and priority. To the right of this is the place to add the number to call, display name, workgroup, date and time, duration or pick a schedule mode.
Outbound Calls
Within FrontStage an Outbound call is distinguished according to whether they are scheduled for a Campaign (These are referred to as Project Calls) or not related to any Campaigns (referred to as Private calls) The preferred method of making an outbound call is via a scheduled call. There are other ways an agent can make an outbound call, to make an outbound call an agent can type in a number and choose the campaign it relates to this is referred to as an Ad-Hoc Project Call. Lastly, an agent can just dial a number and not associate it to a campaign, this is then classed as a private call and wont be logged.
NOTE: A call within a Campaign is not referred to as a Campaign call but rather a Project call. This is due to each Campaign having specific projects set. This process allows the Campaign calls to be distributed to appropriate agents based on their Project Skills.
Call Wrap Up
When a call ends the agent will have a status that is usually referred to as “Completing Info” this is usually set for around 40 seconds although this can be altered.
This allows agents time to complete call handling activities such as, entering information in forms, external systems etc. Then it usually automatically switches the agent back to a “Ready” status.
NOTE: If this process requires more or less time then, this can be manually set by the supervisor in the administration.
Tickets
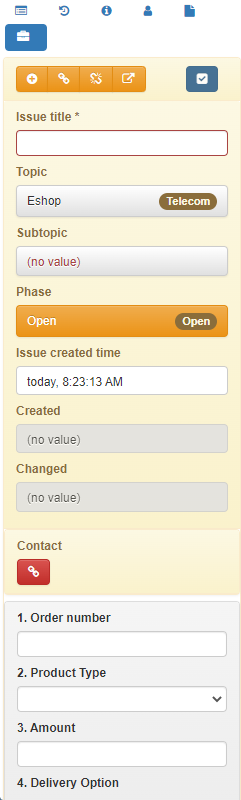
Tickets can be associated to a call and a chat. These could be business related, or order or delivery related. The agent will fill in the details and can open a webform to provide more details.
Voice record, TTS, bookmarks
Simplified access to call recordings (playback and download), transcription and notes are made possible directly in FrontStage by inbound and outbound call editors. If a recording, its transcript of text (TTS), or notes is available, the below example is from a call log.
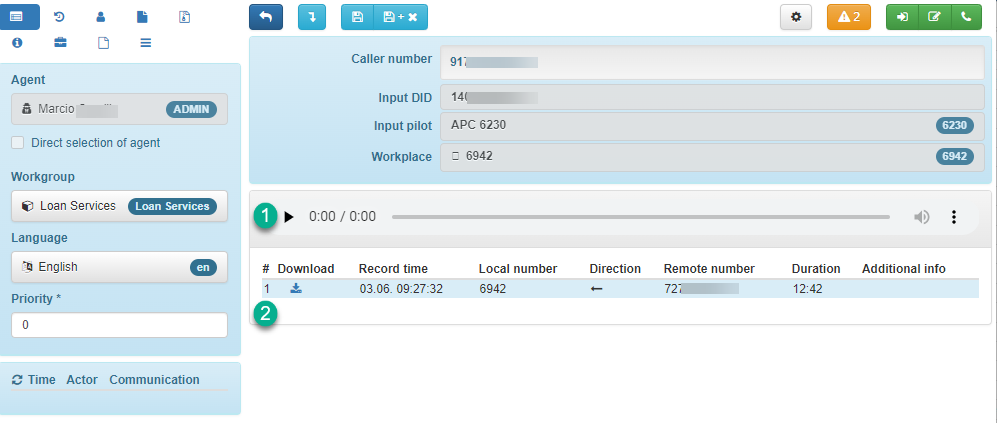
| 1 – Recording | Option to play a recording |
| 2 – Download | Download the file of the recording |