- Licenses
- Adding A User in MaxCS
- Adding a user in MaxCloud UC
- Adding an Extension in ProServer Admin for MaxCS
- Adding an Extension in ProServer Admin for MaxCloud
- Adding an Extension in FS Admin
- Adding a New Agent in FrontStage Admin
- Assign Skills
- Assigning Proficiencies
- Seating’s
- Roles
- Wrap-up Codes
- Status
- Holiday Settings
- Adding or changing Phrases
NOTE: When adding an agent, the extension must be based on the PBX and established in the Pro Server and, in Frontstage administration as a workplace. After adding an extension to the proserver it must be restarted.
Before adding any users check you have the correct license count.
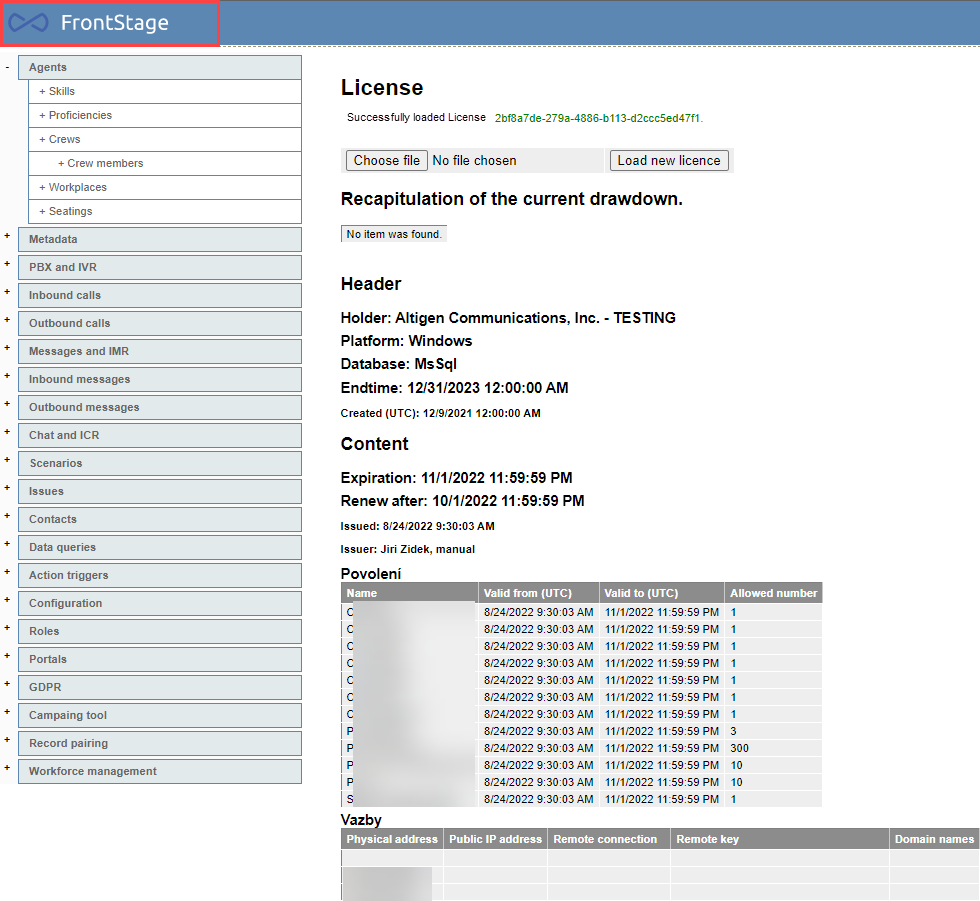
Licenses
Licenses are for workplaces (concurrent users)
To View license information, click the FrontStage Logo. If you need additional licenses, then contact your account manager in Altigen. They will be able to request the new license file that can be uploaded here.
Adding A User in MaxCS
Before adding a user into FrontStage an extension has to be created within MaxAdministrator.
Within Extension Configuration choose the ‘Add‘ button then fill in the information. These extensions will be set up on the MaxCS server.
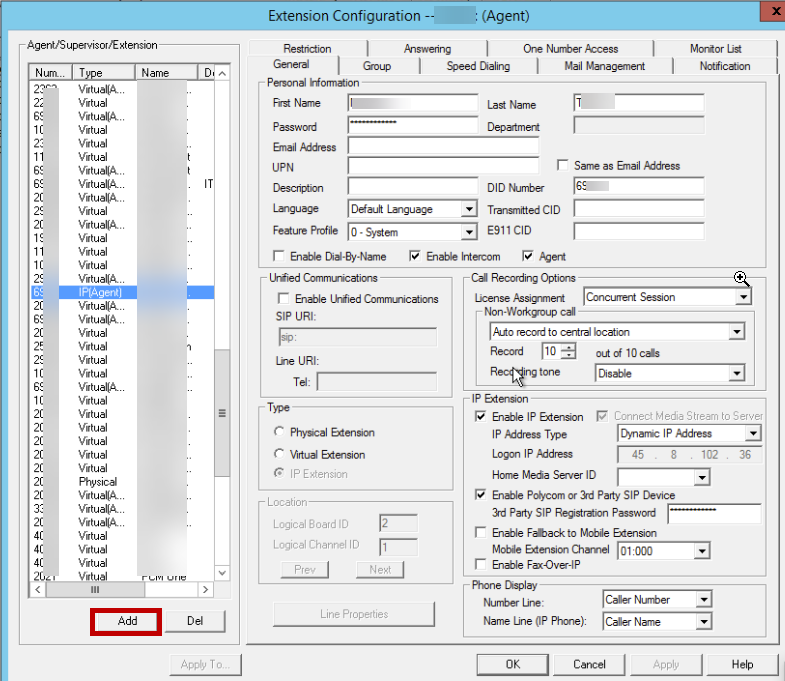
- Input Users first and last name
- Set DID Number to the Extension Number
- Enable Agent
- Enable IP Extension
- Enable 3rd Party Extensions
- Enable Call Recording 10 out of 10 calls
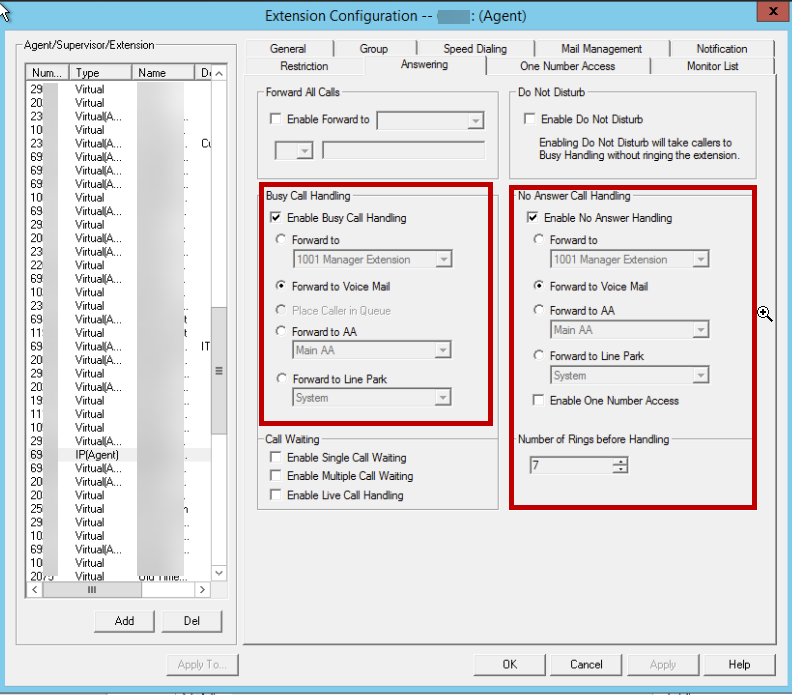
- Ensure the new Extension is not a member of any group
- Set Busy call Handling and No Answer Call handling to Voicemail
- Disable Call Waiting
- Set the Number of rings to 7 so the Voicemail will not be answering the calls
- Allow call to be transferred or conferenced to an outside number
- Assign a MaxCommunicator and an IPTalk License to the new user

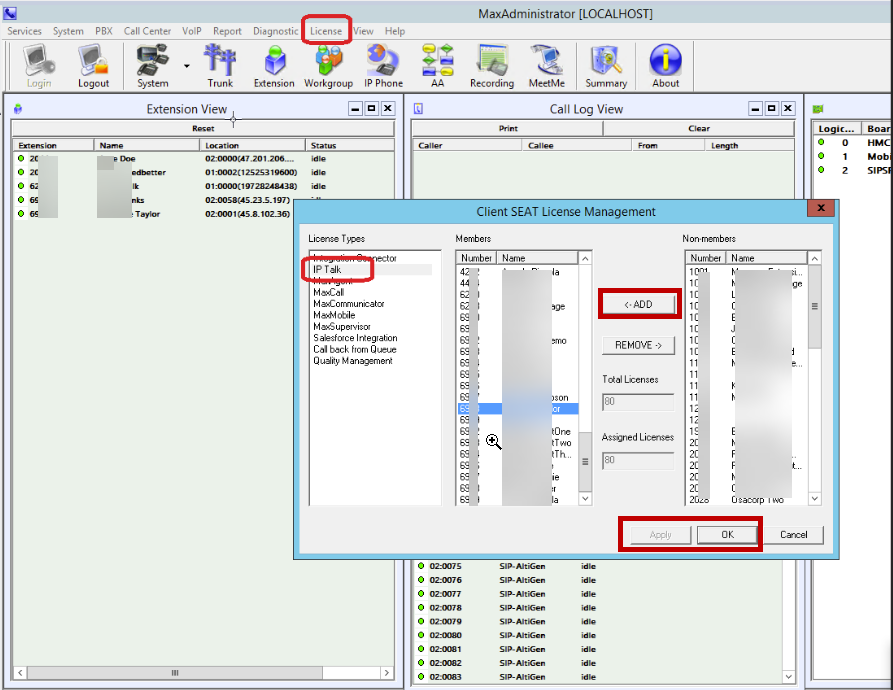
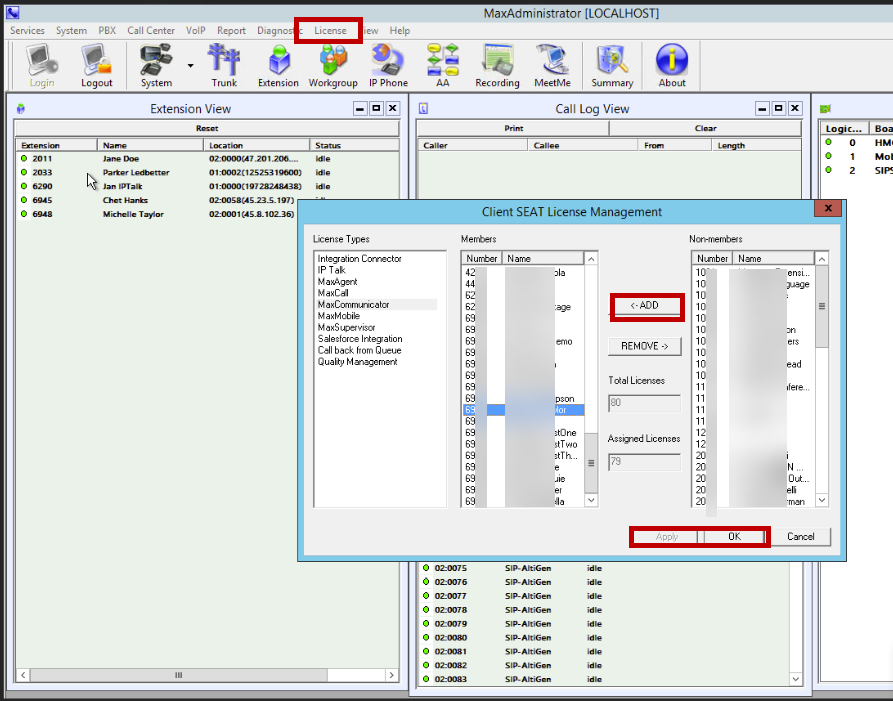
Once this has been completed the MaxCS server will need to be rebooted. When this is being done the licenses applications will also need to be rebooted. We would recommend you have two screens open one for the server and one for the licenses so you can run both together.
Adding a user in MaxCloud UC
To add a user via the MaxCloud UC, click on the icon in the left side menu for Operations:
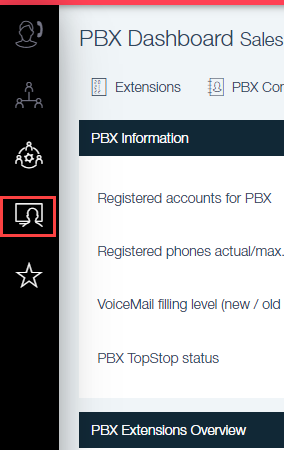
Next click on users:

Add the user’s email, first and last name along with the language. The next Menu box along to the right will ask for the PBX Name and a password.
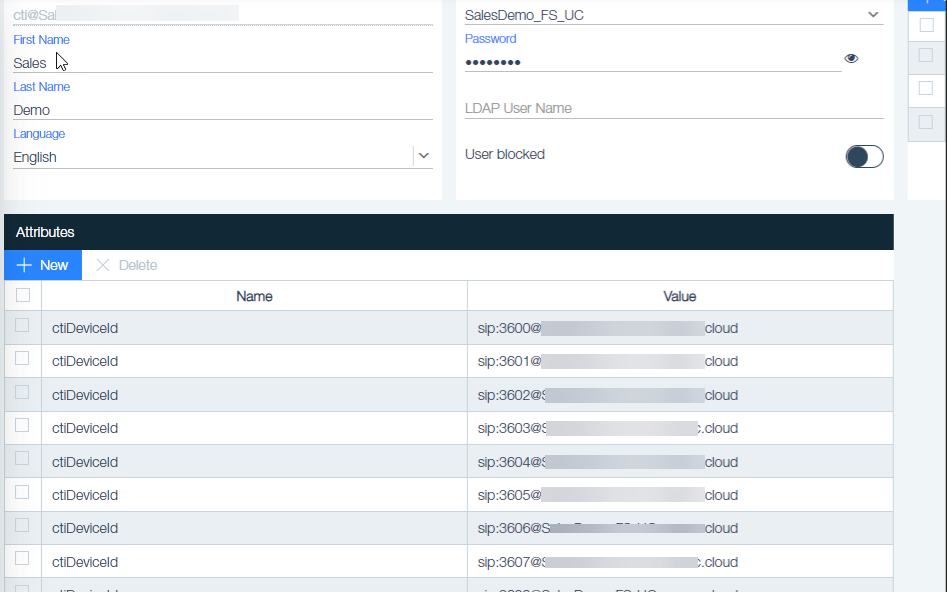
The above image shows the Attributes settings. These need to be added for each user. Click on:

This will open a text box:
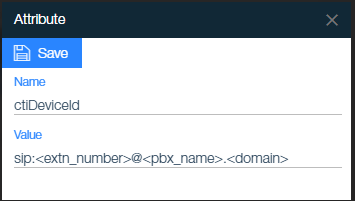
In here add the name as CtiDeviceId the the Value will be as explained in the above screen shot. Once this is complete click on Save and this will take you back to the last screen. Click on the save at the top of this page.
Adding an Extension in ProServer Admin for MaxCS
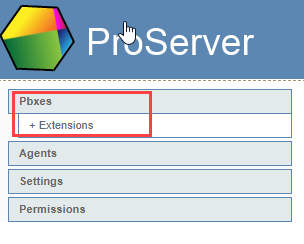
The next step is to open the ProServer Admin, by logging into ProAdmin the opening PBX Extensions:
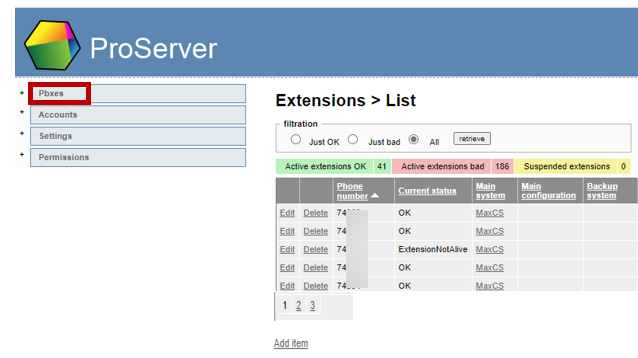
Clicking on PBX’s will open a drop-down menu, showing Extensions.
Select Extensions then click on Add New Item at the bottom left of the screen. This will open the following view where the extension details can be placed.
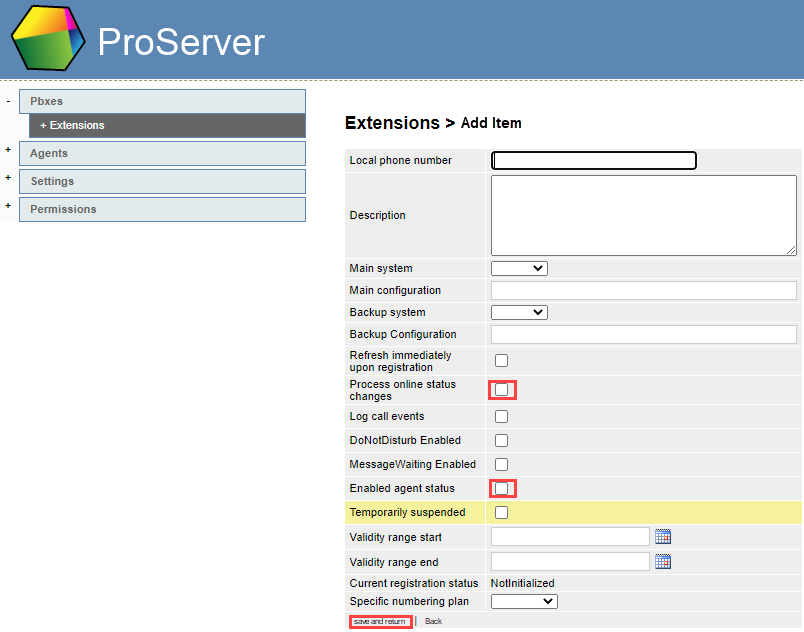
- In the Local Phone Fields, enter the new extension number
- In the Description field, enter the new extension number again
- Set Main System to MaxCS
- Enable the 2nd Checkbox labeled Process Online Status Changes
- Enable 6th Checkbox labeled Enable Agent Status
- Click Save and Return
Note: After Business hours you must restart the ProServer Service to Activate the Extension
Adding an Extension in ProServer Admin for MaxCloud
Follow the steps as above but make sure the Main System is pointed to the MaxCloud system:

As above the ProServer will need a restart when possible.
Adding an Extension in FS Admin
Log Into FS Admin
Click Agents>Workplaces (Extensions)
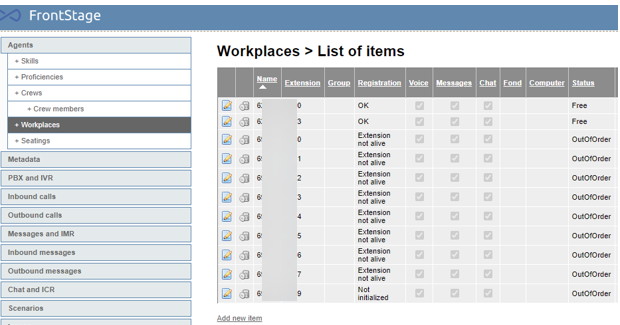
Click on Add New Item
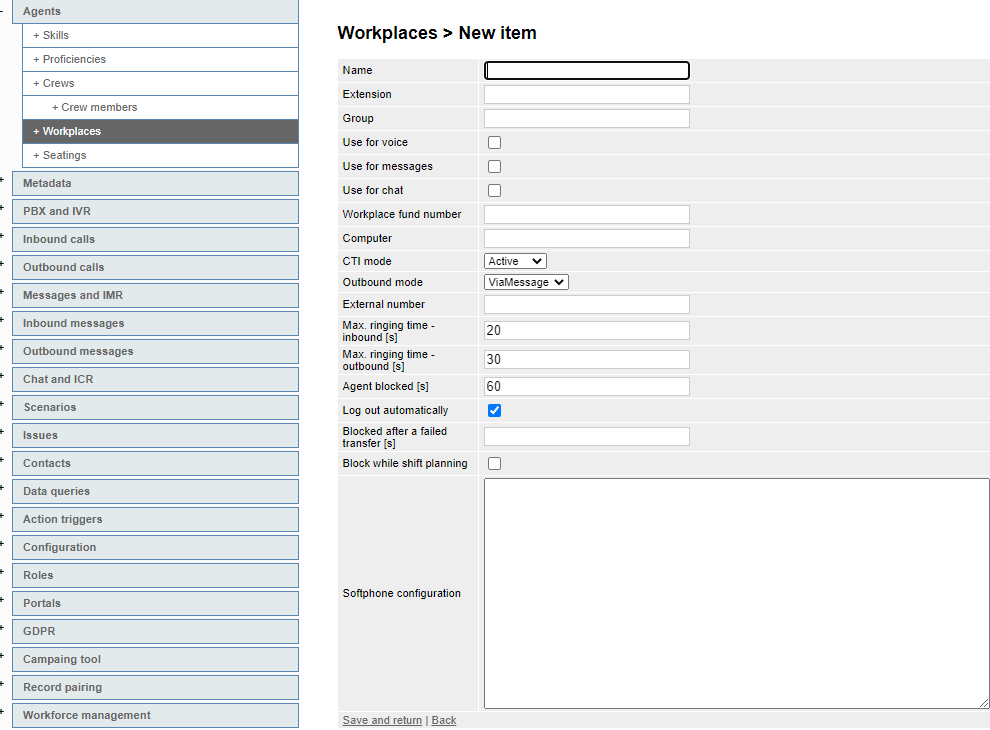

- In the name Field, enter the new extension number
- In the Extension Field, Enter the new Extension number again
- Check use for Voice
- Check use for Message
- Check use for Chat
- Uncheck Logout Automatically
- Click Save and Return
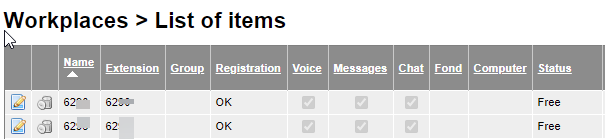
- The extension will now show OK and Free if MaxCommunicator is logged in
Adding a New Agent in FrontStage Admin
Now let’s take a look at adding the skills, proficiencies and seatings. To create a new agent, either add from the template or click add new item. This portion can be created during business hours.
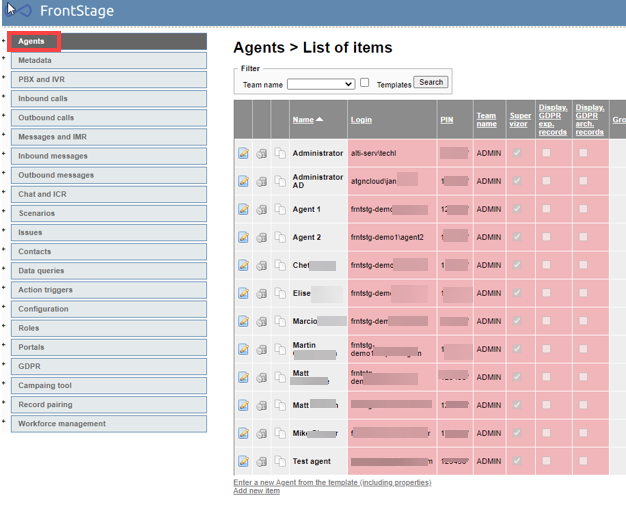
At the bottom of the list of Agents is ‘Add New Item’ click here. Or if using the Template click Enter New Agent from the Template.
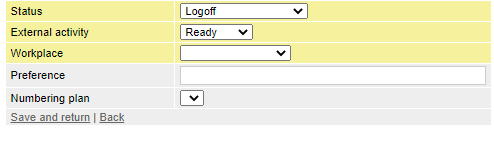
If Add New Item is selected, a screen will show asking for the agents’ details. The image has been split up for ease of reading.
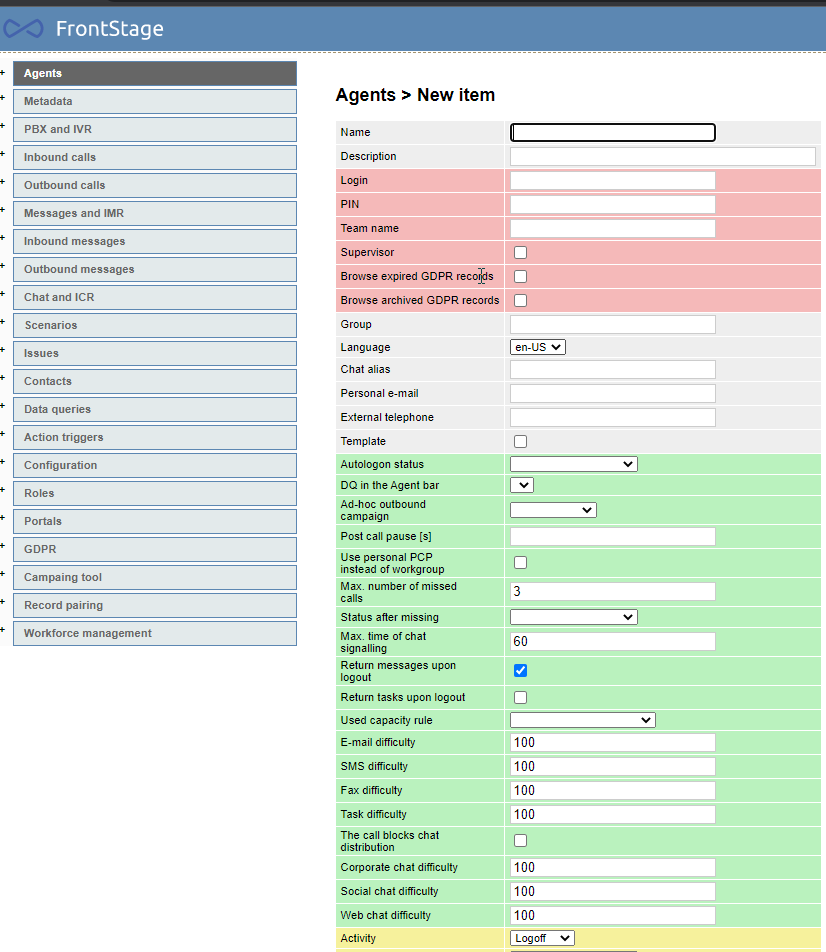
| Name | Name of Agent |
| Description | Location Information Provided |
| Login | Set the login to the Azure login for this agent |
| PIN | Set the PIN to the Employee ID provided by the customer |
| Team Name | Enter the Workgroup Name |
| Chat Alias | Set chat alias for the name to show in chat windows |
| Ad-Hoc Outbound Campaign | Set Ad-Hoc outbound campaign to A1-FIS Support |
| Status after Missing | Set the Status after missing to Unavailable |
| Used capacity Rule | Set Used Capacity Rule to ‘1 call or 3 chats’ |
| Difficulties | Set the skill level for the agent as required using these fields |
Once these fields have been completed click on Save and Return.
Assign Skills
After an agent has been added to the system they can then be assigned to workgroups. Under the Agents tab is Skills.
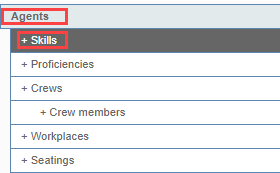
Click on Skills to view the following page:
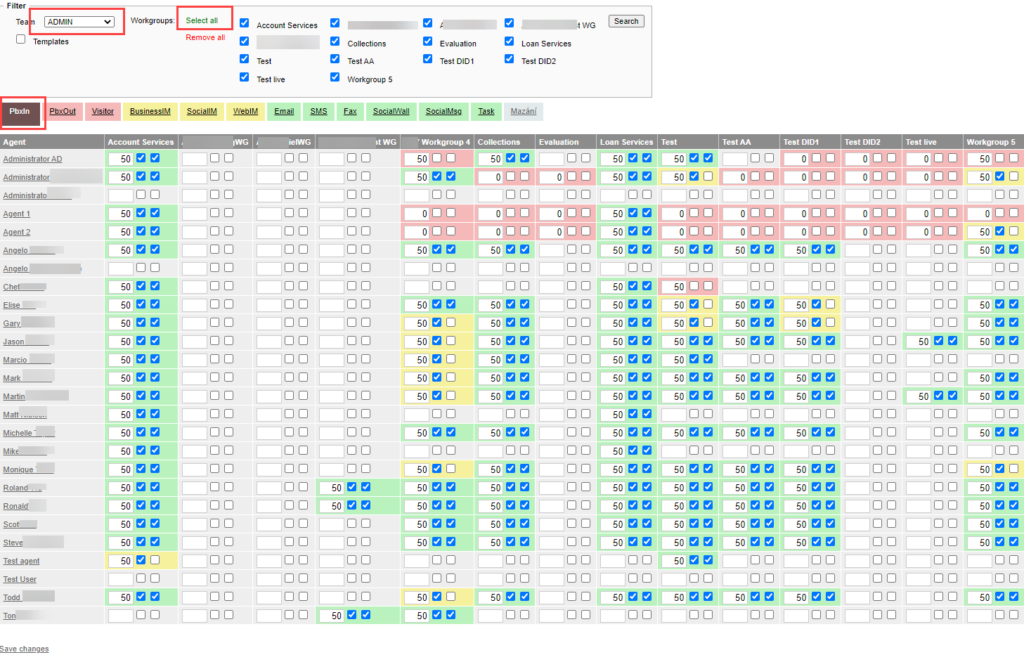
Click on select all (shown above) to select all the workgroups, this will show a view of all workgroups as Columns and Agents as Rows
As this view allows you to see all the agents it means copying skills from another agent already in the Team is quick and easy.
- If not already selected, select PBX In
- Next input the same values for the new agent as the one you are copying from
- Enable the same check boxes for this new agent that you see configured in the agent you are copying from
- Select PBX out (next to PBX In)
- Again, input the same numbers for this new agent as you see configured in the agent you are copying from
- Select WebIM (in the same menu as the PBX in and out)
- Input the numbers again as before for the new agent
- Enable the same Check boxes as the agent you are copying from
To view a list of Agents in a workgroup, select the workgroup from the drop-down menu and click search.
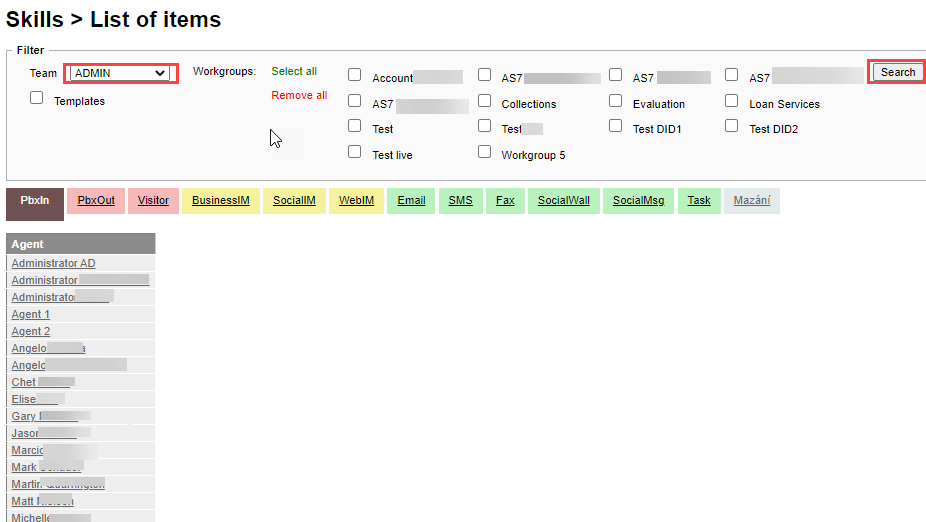
The skills matrix is used to configure the routing of requests from channels (voice, chat… etc.) to contact center agents according to their knowledge. This means that all inbound calls will be distributed by priority to the available agent with the highest skill level for the project, the condition for distribution of a call to an agent is the fact that both check boxes are checked.
When making any adds of changes remember to save before moving on to the next task.
Assigning Proficiencies
Just like the skills, proficiencies allow the calls to be distributed to the correct agent. In the below example the choice is simple as there is only one language. As with skills, selecting a team in the drop-down will show the list of agents. Choosing Select all or in this case English, will show the list with the proficiency for each agent.
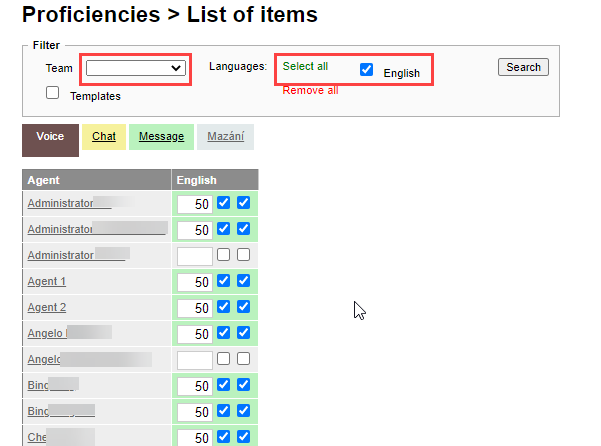
Select the workgroup select the language (English) Now choose the tab to set the proficiency in:
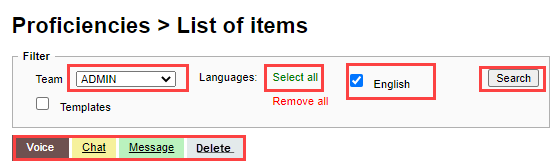
| Tab | Description |
|---|---|
| Voice | For calls |
| Chat | For Webchat |
| Message | For Email |
| Delete | Shows list of agents and allows deletion |
When complete click Save Changes at the bottom of the page.
Seating’s
Now the extension and agent have been created they need to be linked together in Seating’s.
Select Seatings from the Agent Tab.
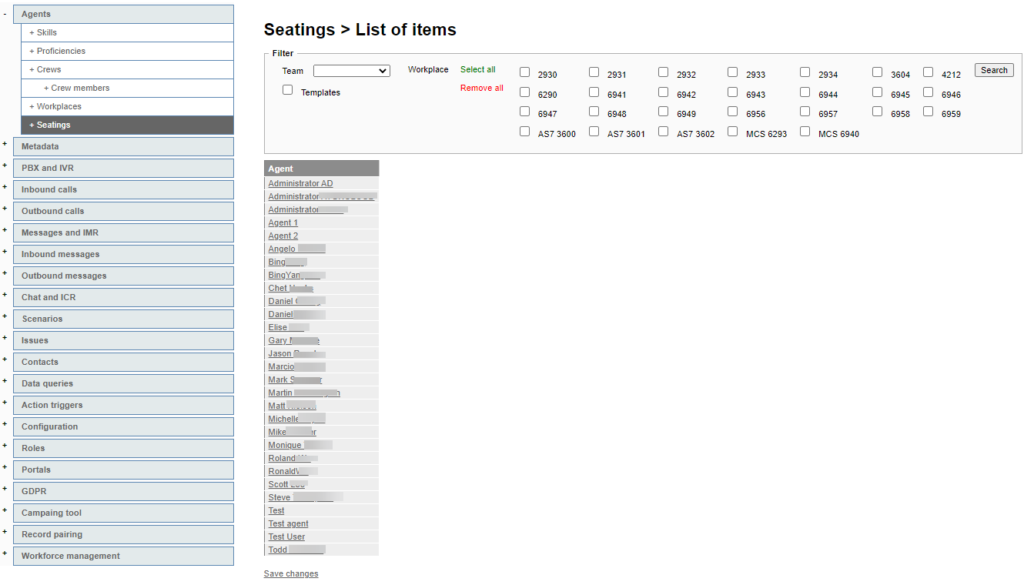
- Choose the Team
- Click the Extension number
- Press Search
- Select the pencil next to the Agent Name
- Check the Pro Caller, WebCaller and WebClient boxes in both columns
- Press save
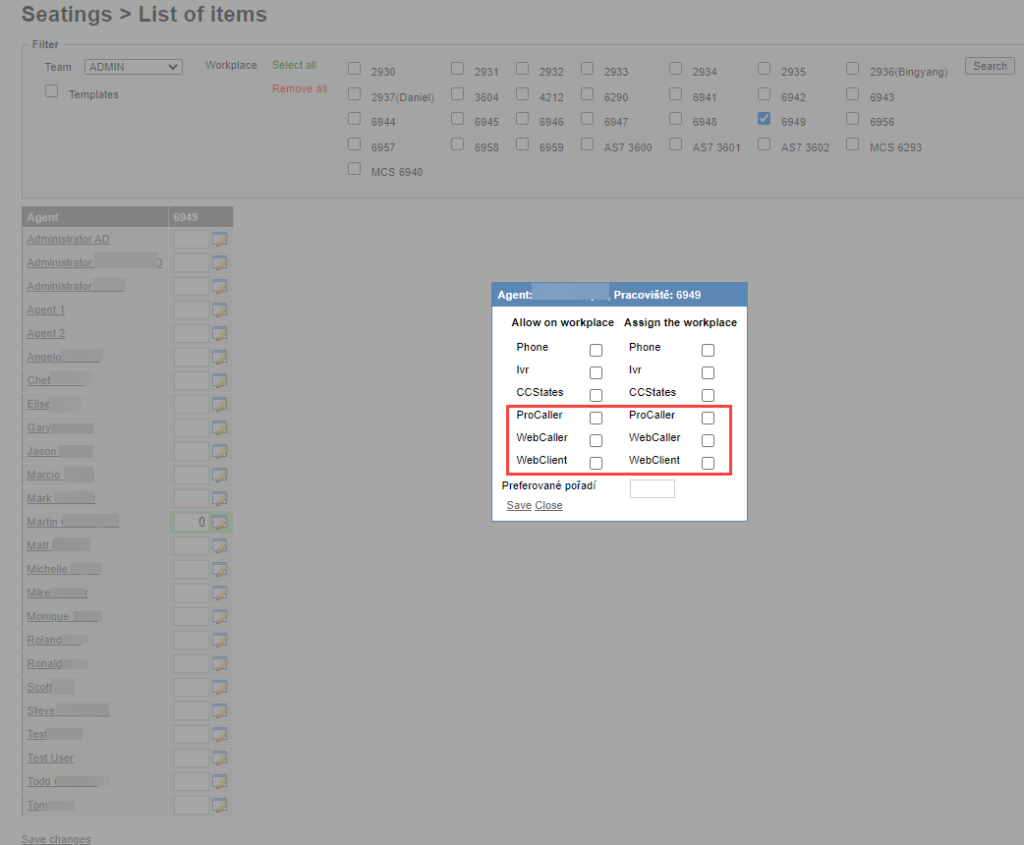
The result is the extension will show in client dropdown in the FrontStage client but only after you refresh Twice.
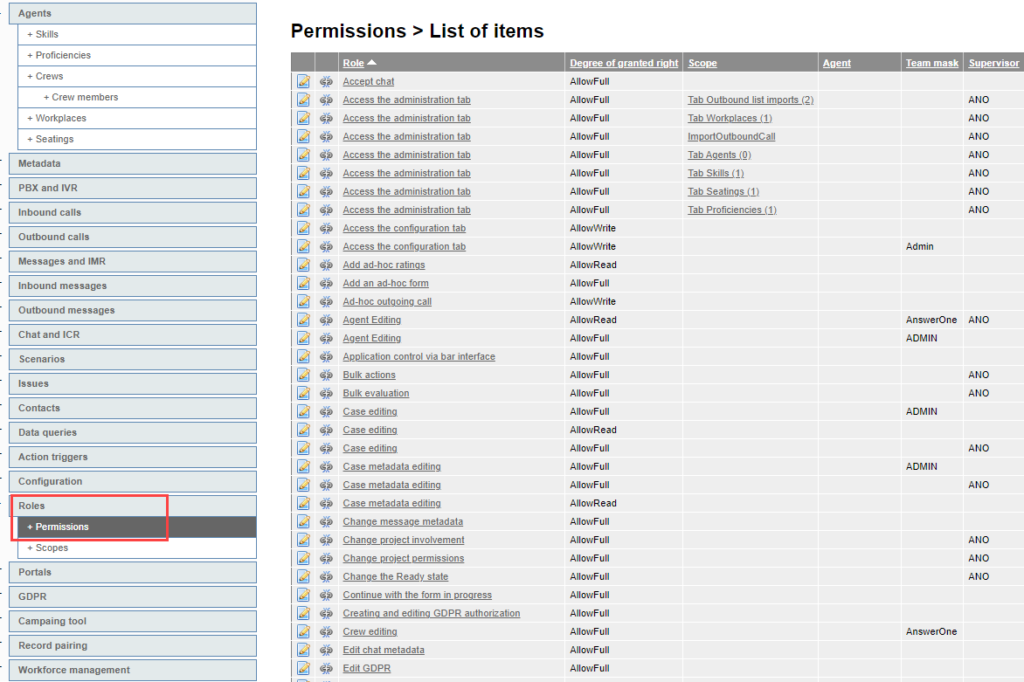
Roles
Under Roles in the left-hand menu, select Permissions. This is where agent permissions are created, they are then assigned in the Agents.
If there are permissions already set, they will show in list form in here:
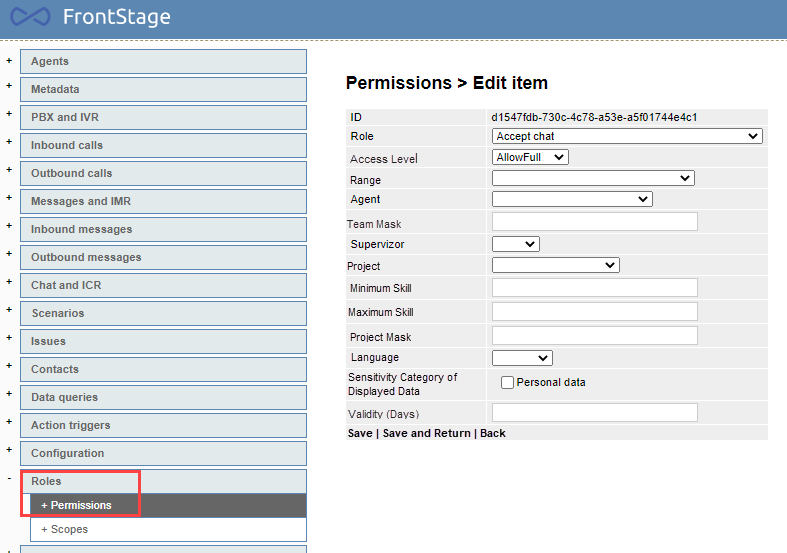
To edit any of these permissions click the pencil and paper icon to the left of the permission and change the settings as required:
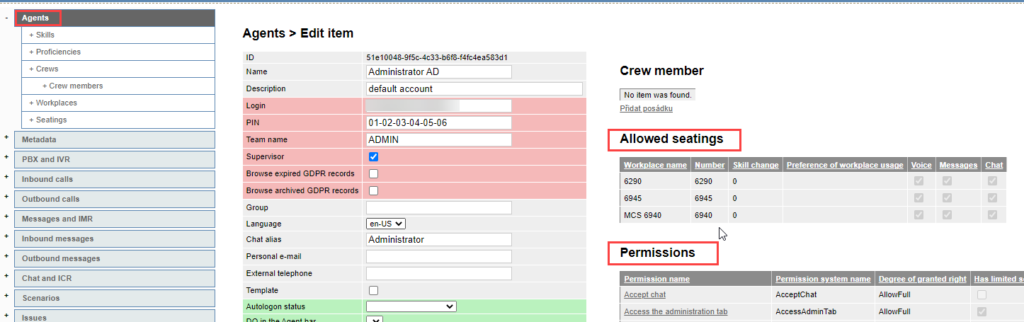
These will show in the Agents tab, click on agents then select a workgroup or Agent and edit that agent. This will show the Agents details and the workplaces they are in:
Click on any of the permissions to be able to edit:
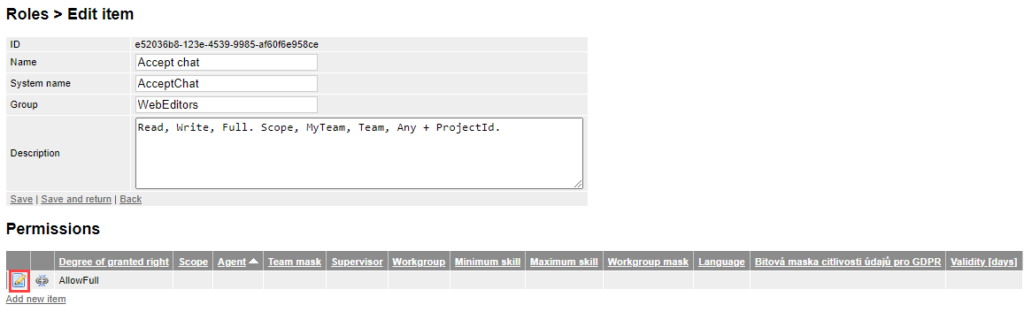
Click edit as shown above, now a view of all editable fields is available. After any changes click save.

Wrap-up Codes
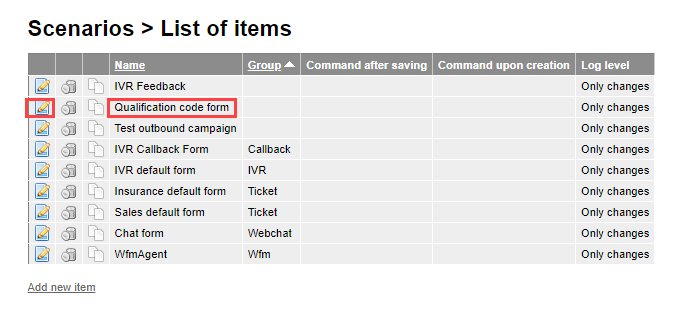
Open Scenarios from the left-hand Menu. Click on +Scenarios:
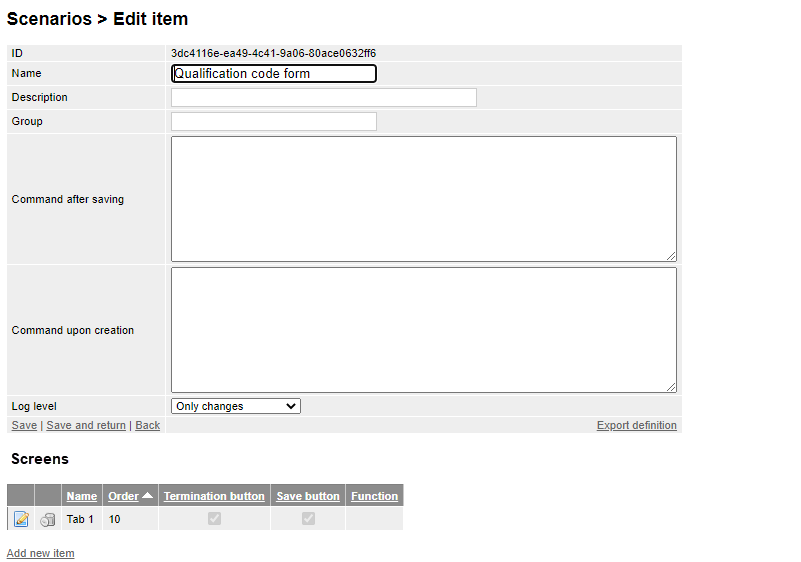
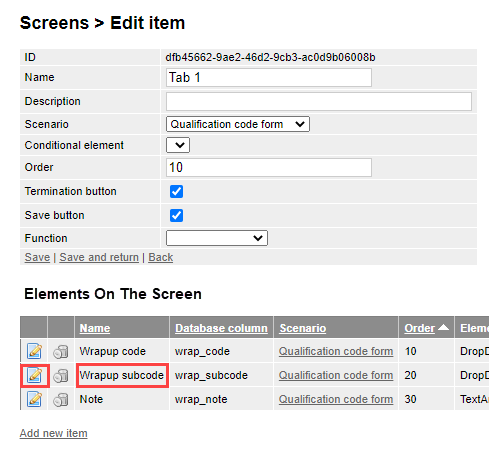
Next edit Qualification Code Form. Click the paper and pencil to the left of this.
Now click on the paper and pencil at the bottom of the screen to edit tab 1.
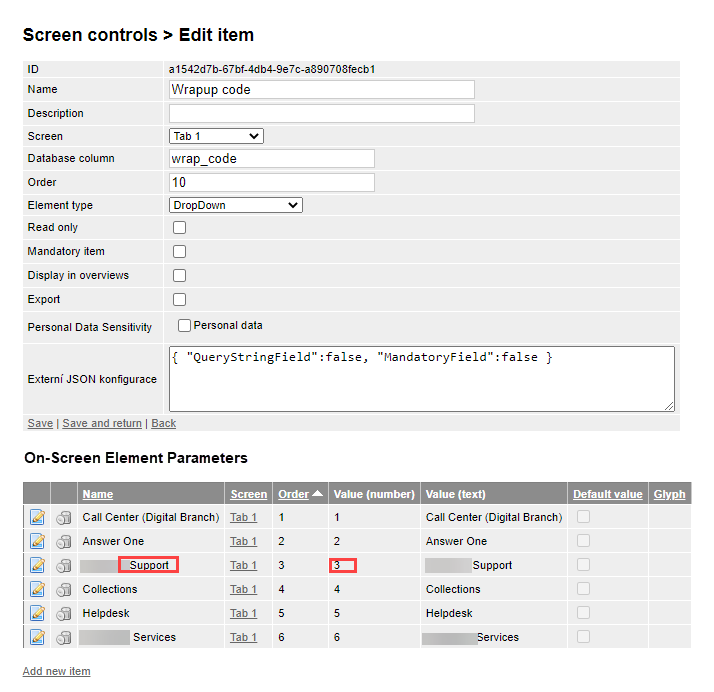
Edit Wrap-up Code to see the value number of each department:
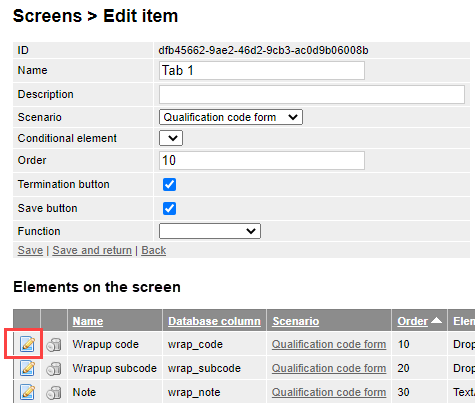
Now you can see the value codes that are assigned to each item. The below example shows 1-6 in the value codes. Say, Support is where changes need to be made. That shows as value 3, this means their wrap-up codes will be the 3000 series. Click the back button.
Next edit the Wrap-up Subcode:
This will open a list of values for the wrap-up codes.
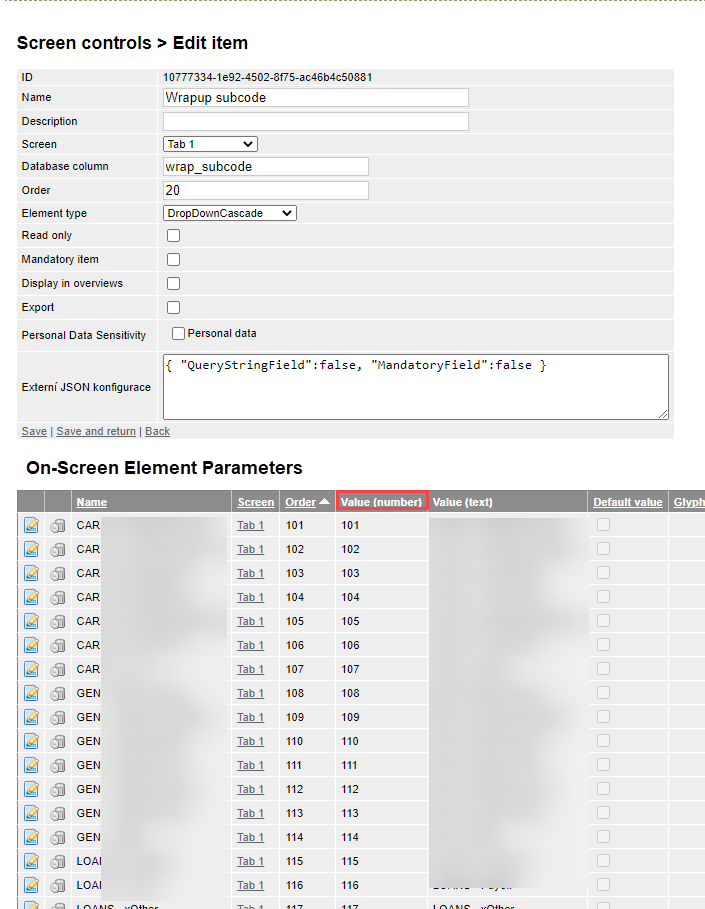
Scroll down the list of items till you get to the 300 values:
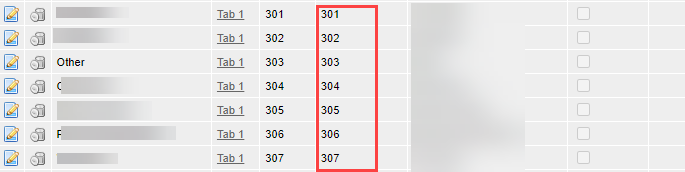
Select the value to change and click to edit (paper and pencil icon to the left)
Next edit the scree control parameters as required:
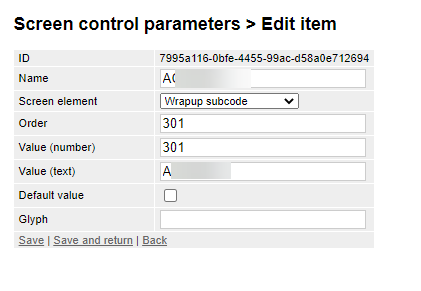
Click on save and return. These steps can be repeated for as many as needed.
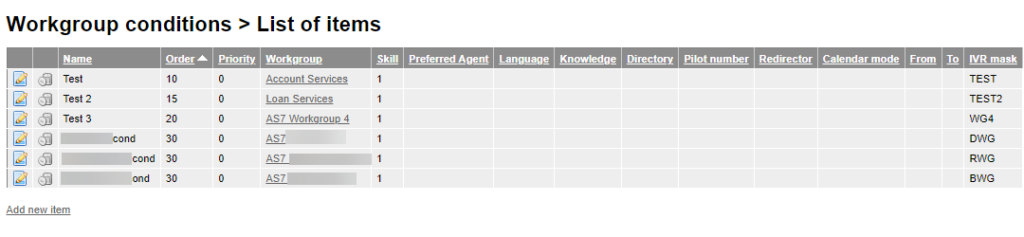
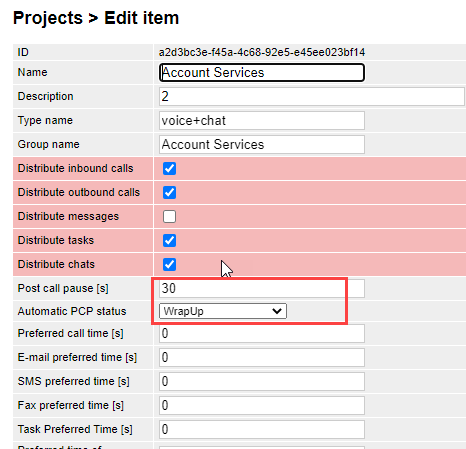
To change the time allowed post call for wrap-up go to Inbound calls, workgroup conditions and select a workgroup
Status
A status can be set in the Metadata section of the Menu. Open the Metadata menu and click +Status:
When adding holidays always press save at the end of each one,
These can be added in the ‘Holidays’ Section of the main admin screen, on the left-hand side.
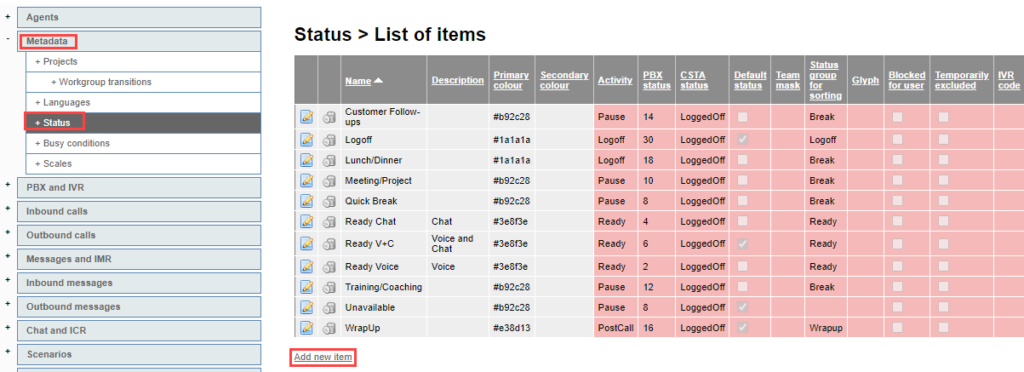
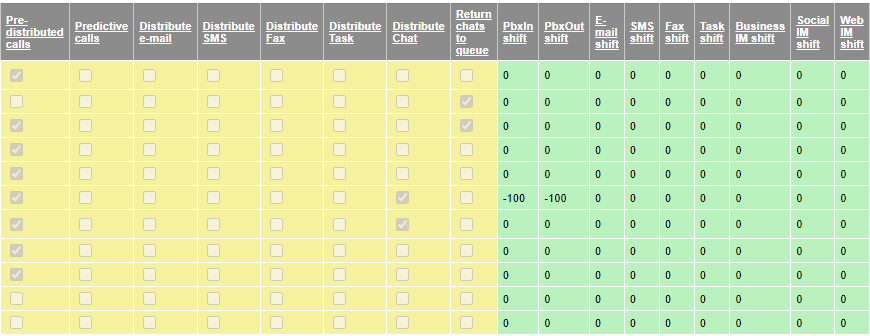
This opens the list of current status that are set. This list runs across the screen. At the bottom is a button to Add New Item:
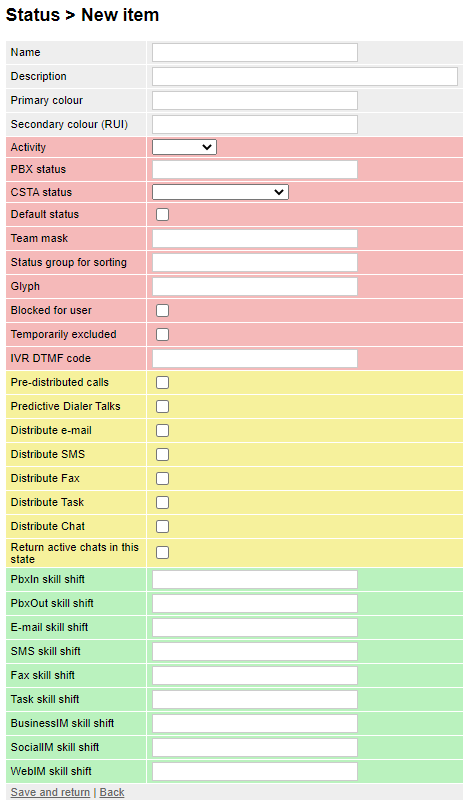
Fill in the form as required. The color field requires a Hex Code. Once done click on the save and return button at the bottom.
Holiday Settings
Holiday settings in Frontstage cover not only public holidays but also working hours and shift patterns.
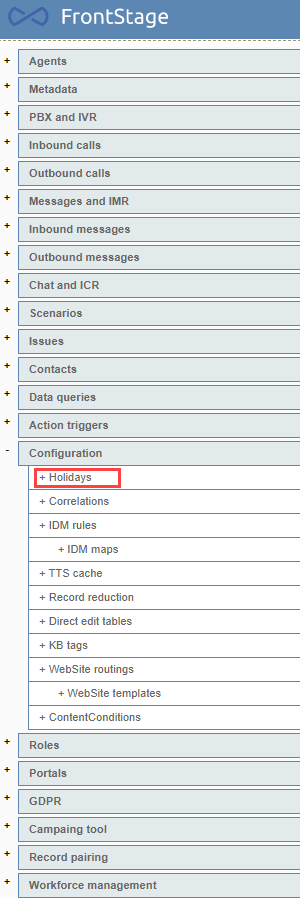
In this section work hours, public holidays and Special times can be configured. Choose Configuration then click on Holidays
To the right of this will be a list of any holidays already set. At the bottom of the list is an option to Add New Item.
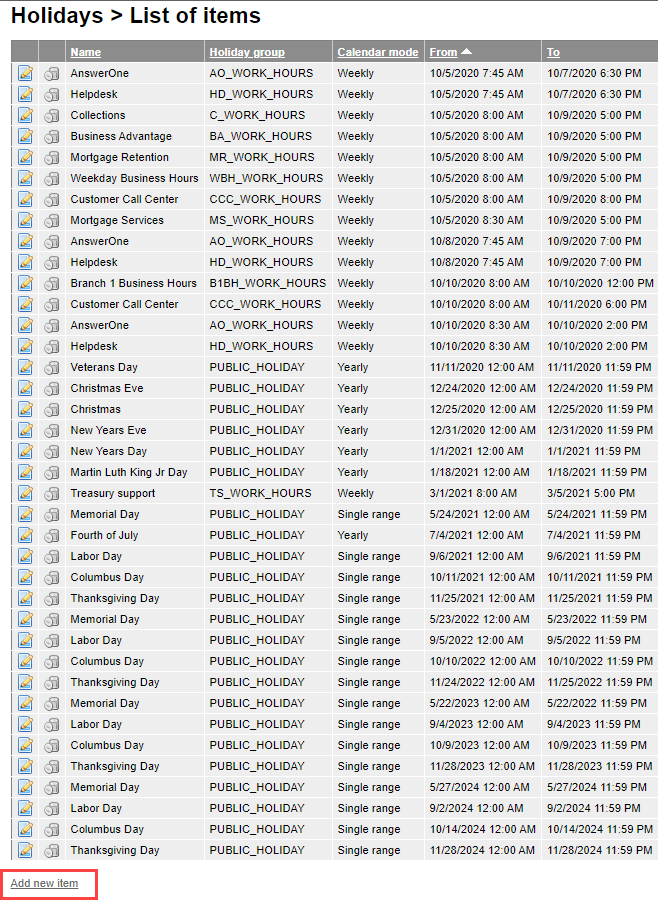
Any of the existing holidays can be edited by clicking on the pencil and paper icon to the left of each.
Once in this screen you can add a new holiday (although the title here is holiday it is more a schedule) Each holiday can be set to be, Yearly, Weekly or single range. When inputting working hours (say Mon – Fri 8am – 8pm) click on Monday for the start day and a Friday as the end day, now the system knows that each calendar Monday to Friday will follow the rule. This can be pointed to a message that will play with DTMF menu and repeat as listed in the system. Each DTMF tone key will forward to a different option (group) within your settings, this is set in the IVR Script setting.
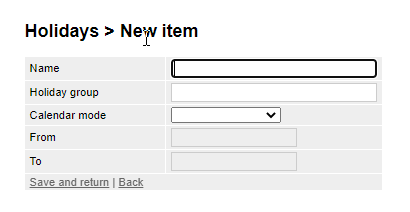
To add a new holiday, give the holiday a name (example: Easter) choose a holiday Group, (example: Public Holiday) next click on Calendar mode and choose from:
Then select the From and To and, date and time. Next click Save and Return to save the holiday.
To Edit an existing holiday, choose the holiday you want to edit and click the icon to the left of this. Now you will have a screen showing how that current holiday is set up.
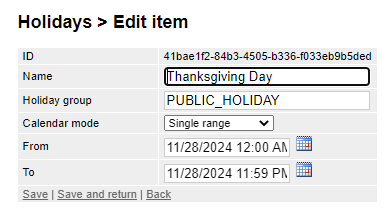
This can now be altered, the holiday and holiday group can be renamed, the calendar mode, dates and times are also editable. once you have set this to the new settings click on save and return.
When all have been added they can be configured to each workgroup in workgroup conditions.
Once added the holidays will be ready for the system to read so when you have an IVR script set, and it is looking for holiday this is the list it will check.
Adding or changing Phrases
Before adding a Phrase into the IVR settings first they have to be stored. Below are instructions for both MaxCS and MaxCloud.
Adding an Audio File to MaxCS
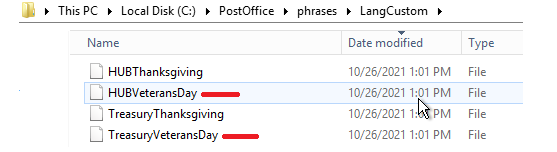
Convert any .wav phrases provided by the customer to Altigen format and place them into C:\PostOffice\Phrases\LangCustom
Adding an Audio File to MaxCloud
In the menu click on the PBX icon then Extensions:
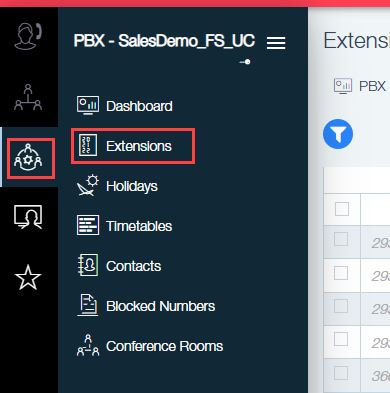
Now you will have a list of extensions.

Click on the correct IVR extension that will play the audio file. This will open the following:
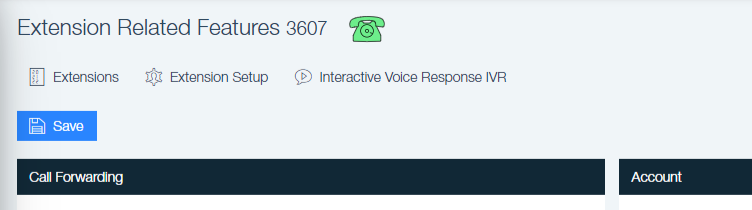
Select Interactive Voice Response IVR.
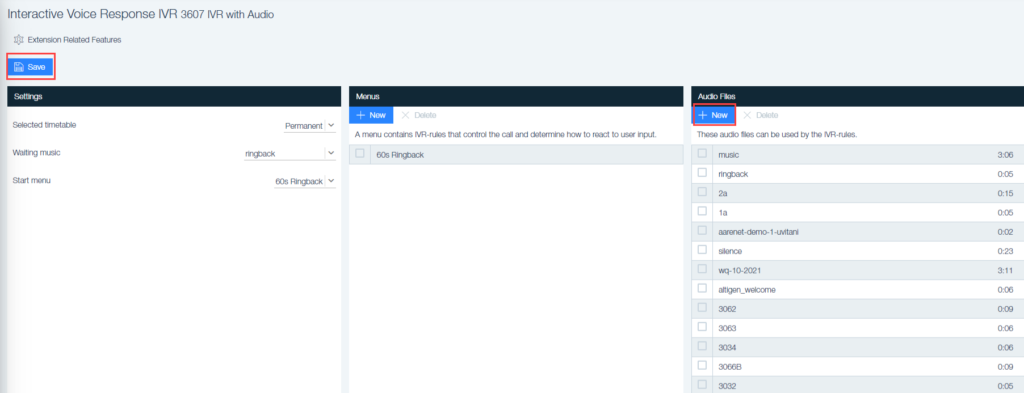
To add a new audio file, select +New on the right of the screen and follow the steps that are requested.
Once finished press Save in the top left.
Adding Audio File to IVR
Log into FrontStage Admin
- Click on PBX and IVR
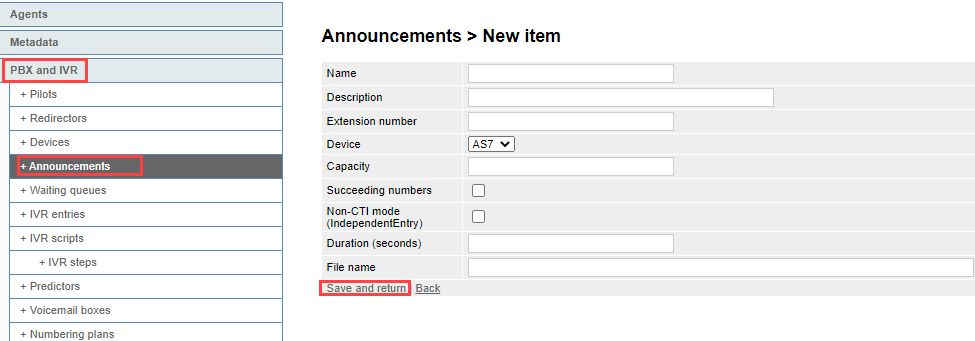
- Give the announcement a name, Description Extension Number, Choose the Device (based on where the audio file is)
- Add the file Name as it is in either the MaxCS or the MaxCloud.
- Click save and return
Go to Inbound Calls> Pre-Conditions and look for the number that needs to have the message added.
Select the IVR Script for that number:

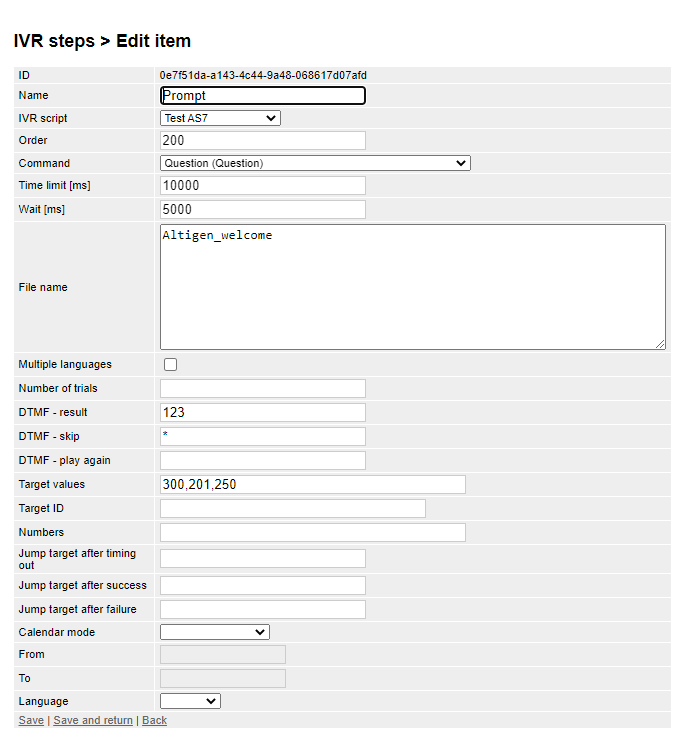
This opens the settings for that IVR Script allowing editing. Choose where the announcement should be played. In the below example the announcement will play the Altigen Welcome:
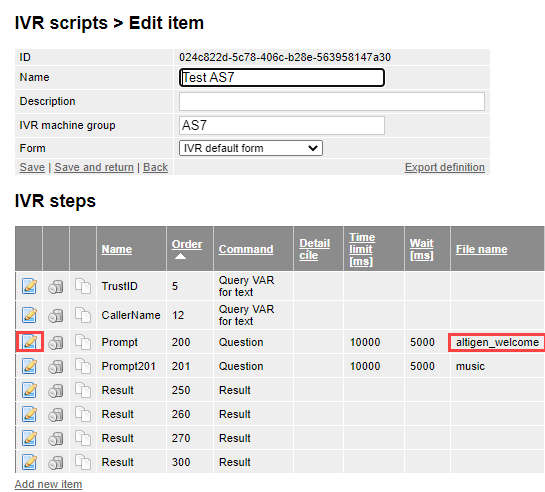
Click on the pencil and paper icon to the left to edit the announcement or to add to an announcement to another step:
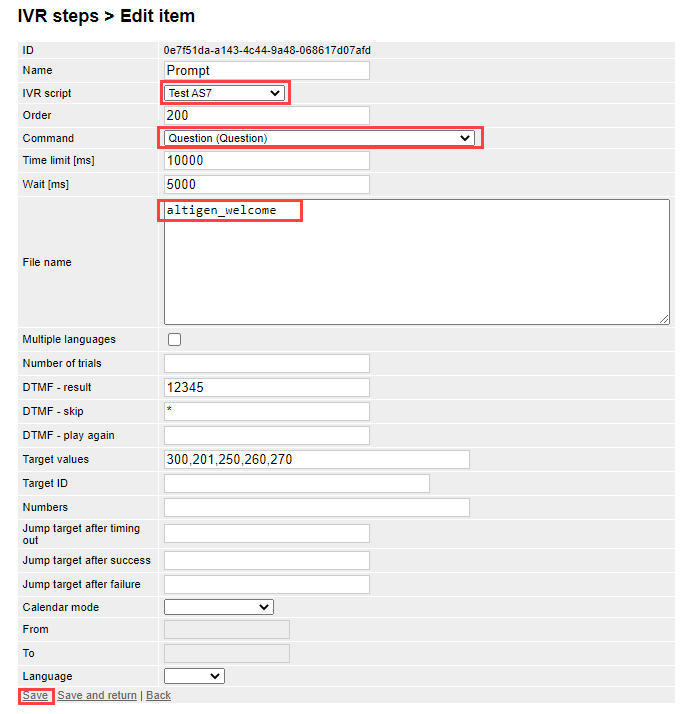
In the IVR script select the script name, select a command from the drop-down list. In the File Name field place the name of the file as it is stored in either the MaxCS or MaxCloud as described above.
By doing this, changes can also be made to existing announcement.
Altering a Holiday Script
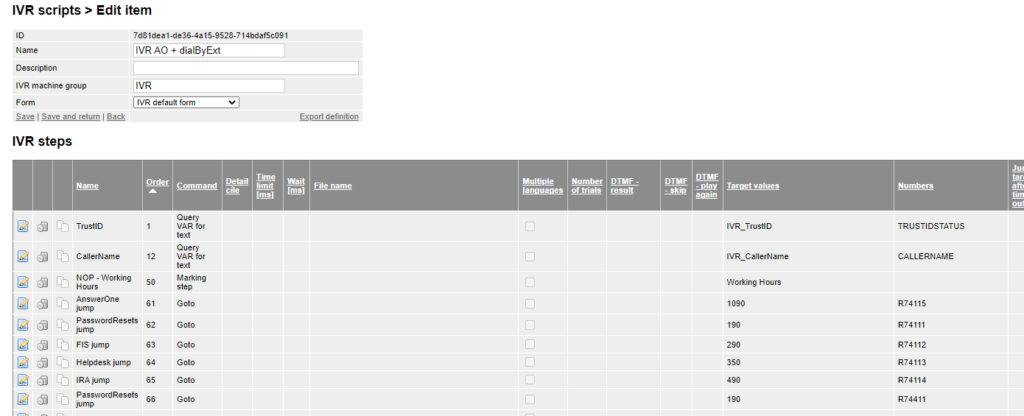
Under PBX and IVR, select IVR Scripts. Select the required script and click on the pencil and paper icon. Or create a new script by clicking on Add New Item.

After clicking edit a list of IVR Steps will be shown for that option. The system will read them in order and act on a True result.
Scroll down the list till you find the Branch on holidays in the command list:
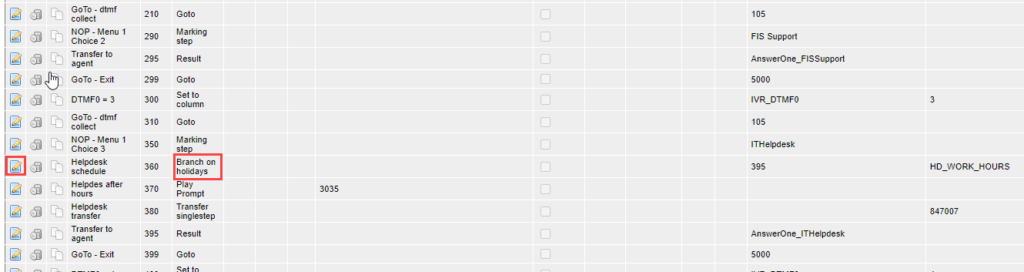
Click on the edit icon:
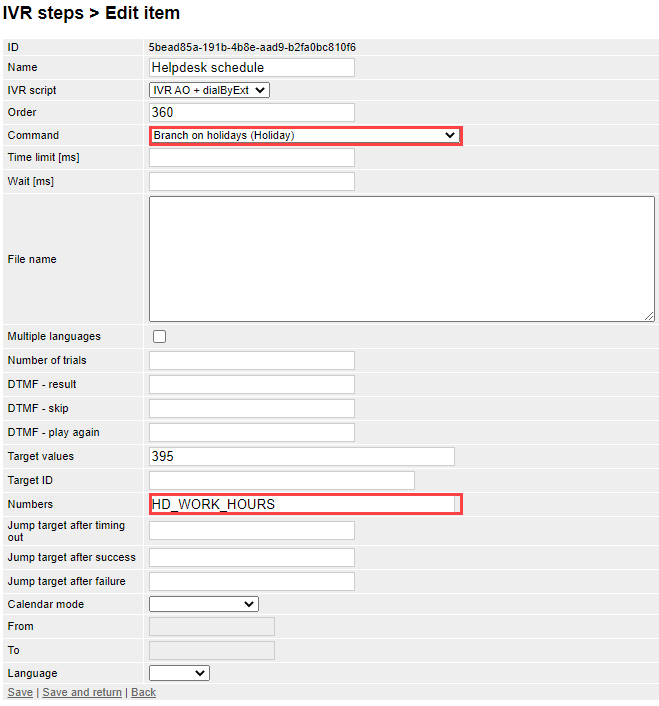
This tells us that the system will look up the settings for the ‘Holiday’ HD_Work_Hours, if it sees that the date matches a Holiday it will pass the call to step 395.
If this is not how it should react then edits can be made in here, or if it requires an extra script choose GoSub from the Command Drop-down. This allows a scrip in a script.
IVR Steps and Scripts
To see the IVR Scripts, click on PBX and IVR then IVR Scripts. This will show the current scripts, to edit or view one of these click the pencil to the left of that script.
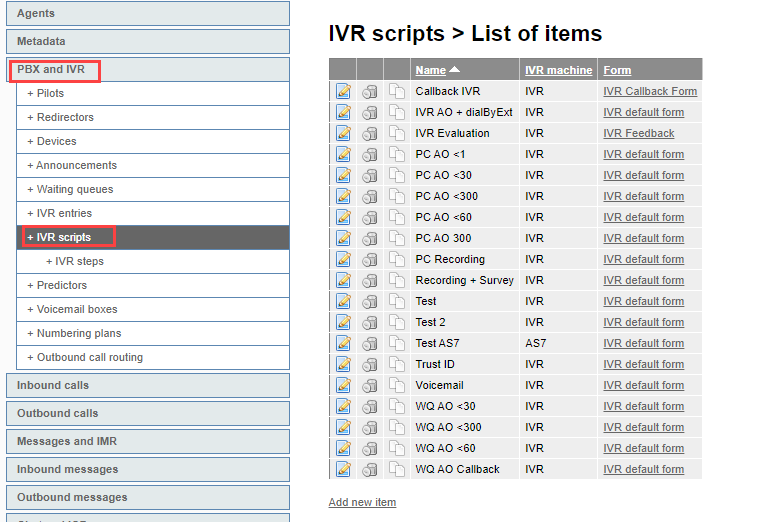
This will open the IVR Steps for this script:
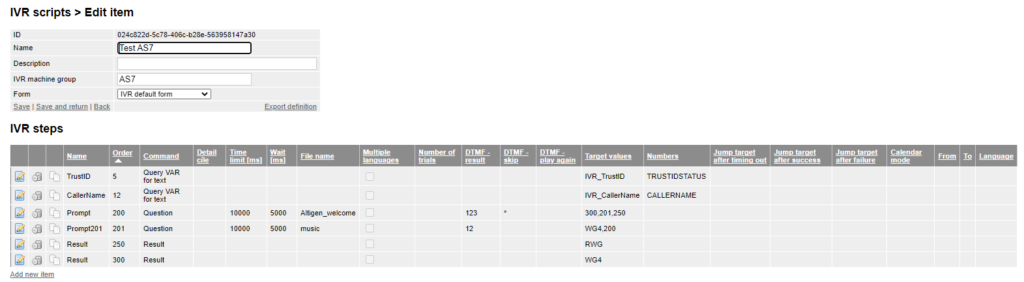
Each of the steps can be edited again by clicking the icon to the left, this opens the settings for that step:
Each step can have its own settings. DTMF tones can be used to direct the calls to the correct queue. Maybe press 1 for accounts, 2 for Sales. The menu will have DTMF tones set with a rule for those options, so the system knows where to point the call when the option is chosen. The system can also look up the groups from the ‘Holidays’ menu so it will try the opening hours rule and if it is outside of the hours, it will redirect as is set. Same with a Public holiday.
The steps will run in order so the first action will be based on the lowest number in the steps. If the target value step cannot be actioned the system will revert to the next step in the menu. This makes up a call flow.
Working hours can be defined as Weekly. For example: Say working hours are Monday to Friday 8am to 8pm, pick the Monday on the calendar as the start and the Friday as the end. Set a start and end time. Now the system will know that each week these settings will activate in the times you have set.
Note: The Time Zone is set based on the server location at the moment so time zones would need to be altered accordingly.
Options for extra period could be used for one off occasion where working hours could be shorter or the menu is changed, extra hours set in holidays as CCC Extra Hours. These settings have the calendar mode columns set to single range, this means both the date and time must be input.
DTMF, menu options are set in DTMF result, Number of trials (how many times the menu will play through) DTMF option repeat key can be set. Target values for the DTMF keys is also listed
Messages are stored on the AS7 Wav files changed on the AS7 will change on the FS platform make sure any new message will be able to follow the DTMF prompts or change these to match
Frontstage supports Script nesting, one big script leading off to small scripts
Preconditions can be used to make advance temporary changes these do not use the holiday rules these are only for the scripts. preconditions will go into the script listed then will look up the holidays