- Azure Admin Consent
- Timetables
- Adding a Holiday
- E911 Email Notification
- MaxCloud UC E911 Location
- E911 Extension Assignment
- Users
- Adding an Extension
- Adding an Extension
- Extension Related Features
- Voice Mail Box Features Extended
- Setting up a Voicemail Center in AS7
- Call Recording
- Assigning a phone
- Polycoms
- This section is for systems that are licensed, setup, and ready for AnConnect browser.
- Extensions as IVR
- Adding an Audio file to the IVR
- Extensions as call distribution
- Kill command
- Breakout of an Advanced Call Distribution ACD Queue as a Caller
- PBX Calls Logs
- Note:
- Call Reports
- Anonymous Caller
- Reporting
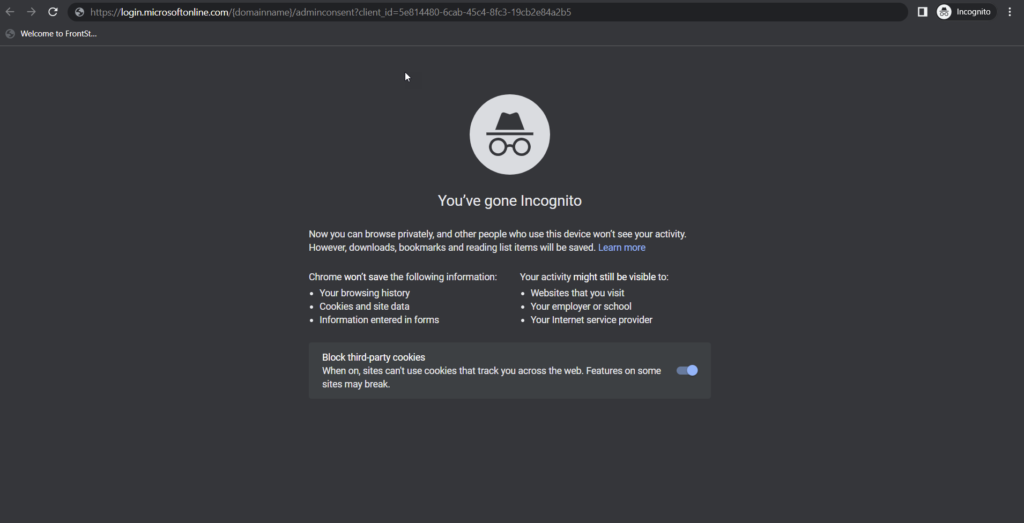
Azure Admin Consent
This needs to be performed for each install, deployment will need to engage with a person on the customer’s side who has Azure Admin Consent, they should provide the customer a link and have them enable the option. Failure to perform this integration will result in the users getting an error message and not being able to answer calls.
To enable Azure admin consent follow the below steps:
- Open an incognito window.
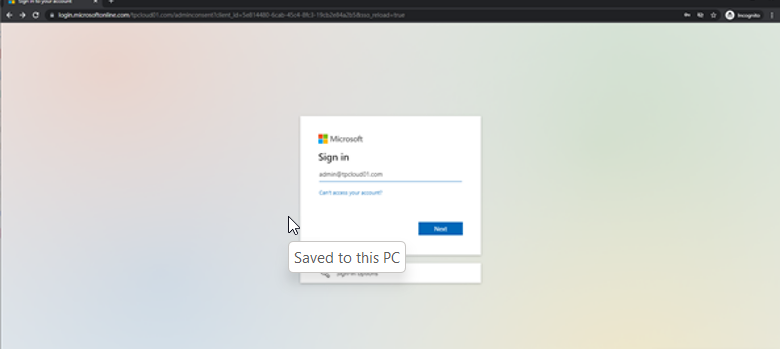
- Input the URL: https://login.microsoftonline.com/{domainname}/adminconsent?client_id=5e814480-6cab-45c4-8fc3-19cb2e84a2b5 (replace {domainname} to your domain name.)
- Input Admin user name
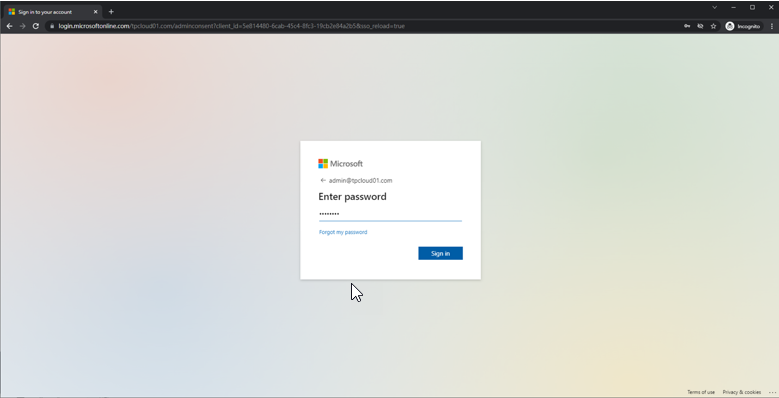
- Input Admin user password
- Click Accept to consent
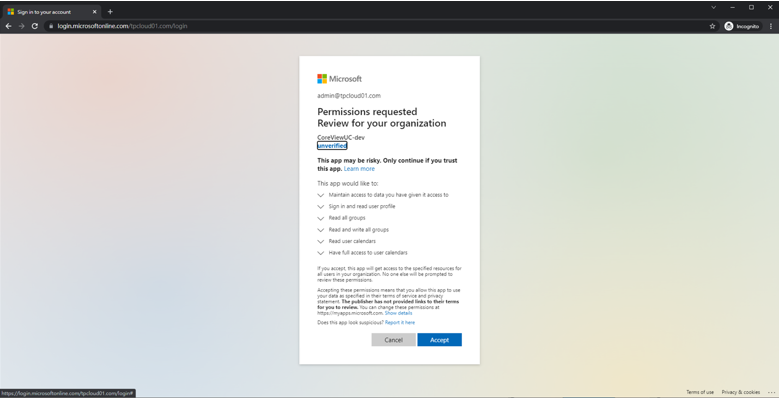
- Redirect back to the login page.
- Check the URL: https://uc.maxuc.cloud/?admin_consent=True&tenant=35af6c32-bbbf-477e-9014-2bd83802cac2#/welcome
- You can find the result of Admin consent and your Tenant ID
Timetables
Timetables within the MaxCloud should be setup prior to anything else for ease of use within AA/Extensions/Call Distribution while setting up those items. They can be modified at any time later if required.
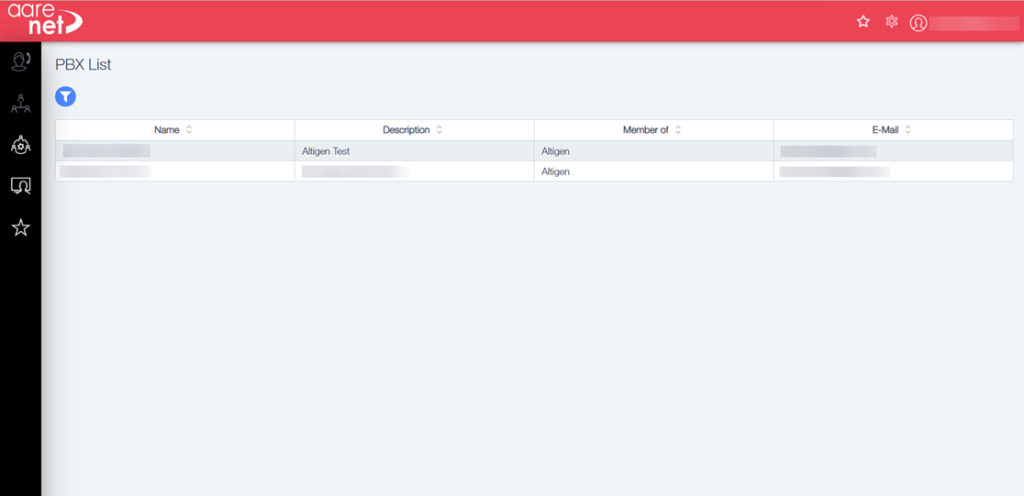
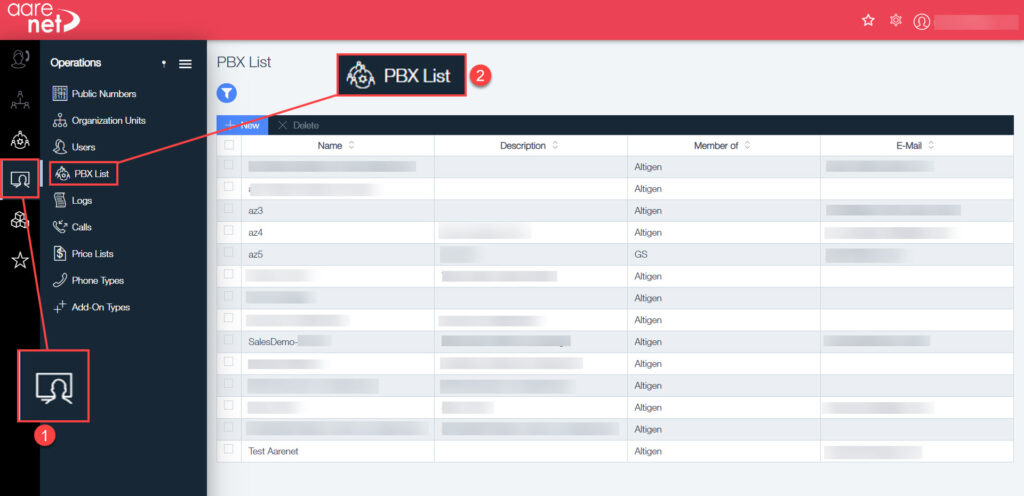
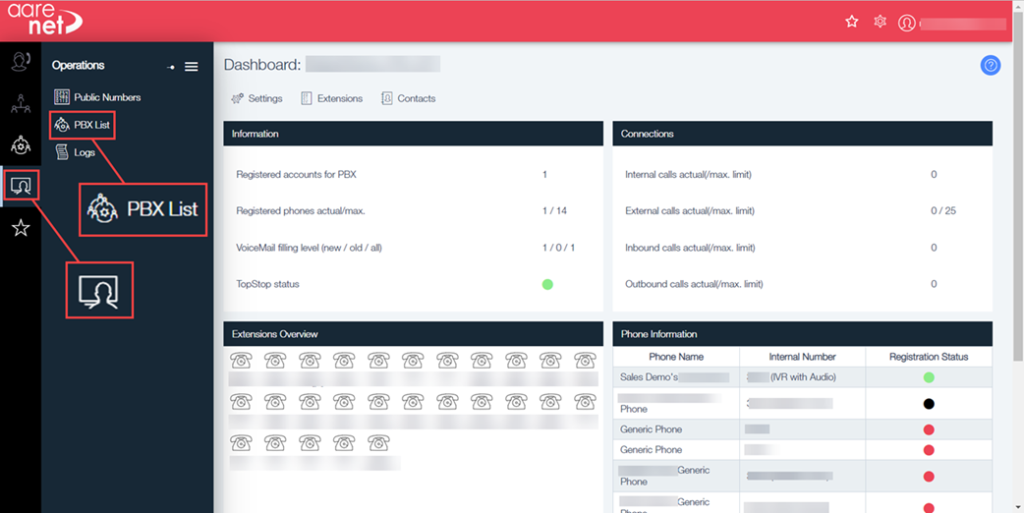
To navigate to the PBX of choice first click on the Operations icon then PBX List:

This will open a page with the full list of PBXs that are available. If the company has more than one PBX, choose the correct one from the list by clicking on its name:
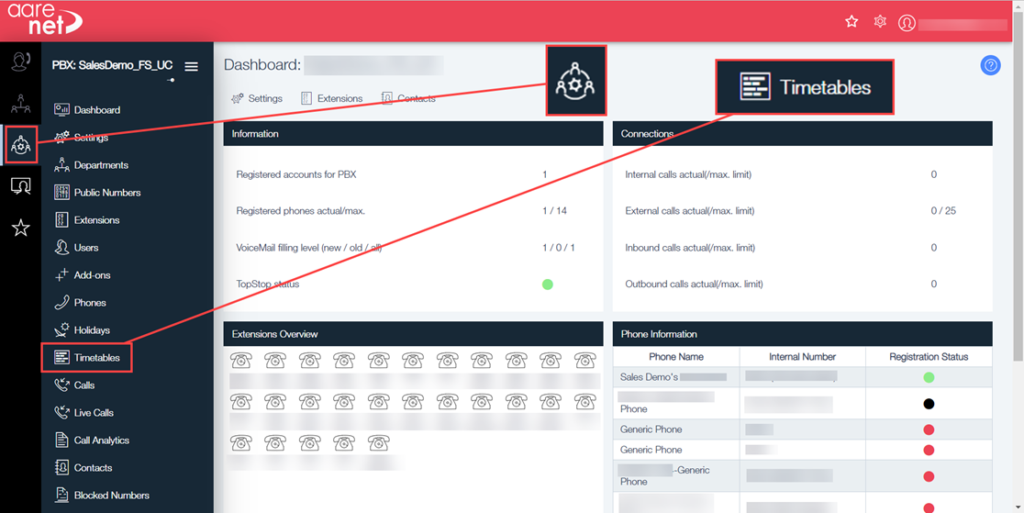
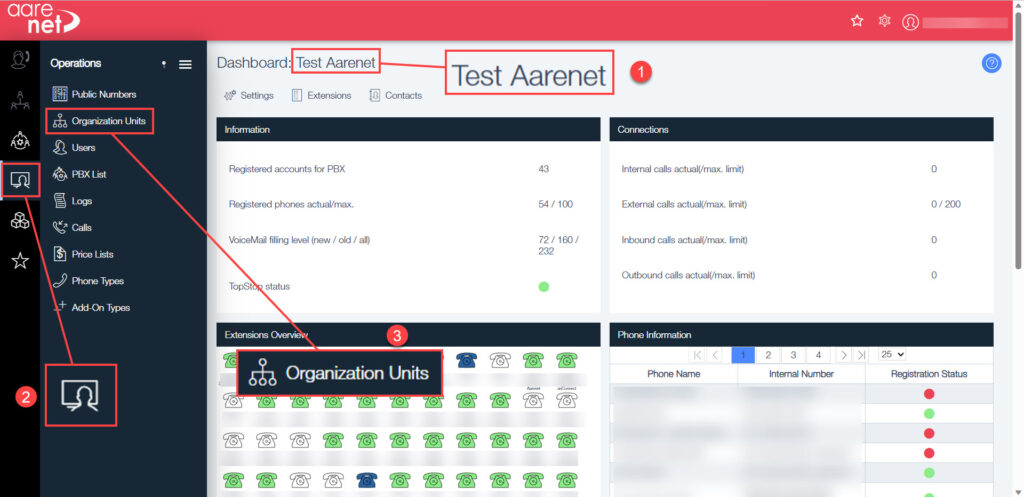
Now to get to the Timetables, go to the menu again and click on The PBX icon, this will show the list of settings for the PBX chosen. Scroll to Timetables:
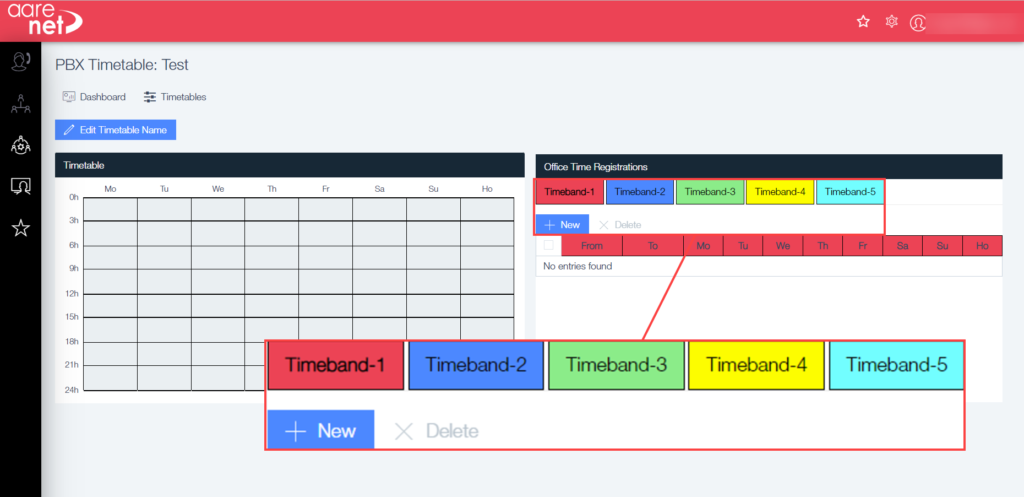
Add as many timetables as you feel necessary, naming them logically for use. An Admin can select colors based on their preference, below is an example of how to set these.
Holiday timetables should also be added at this point, remembering to change the dates as the year progresses to avoid inaccurate holidays in years to come.
Start to build timetables:
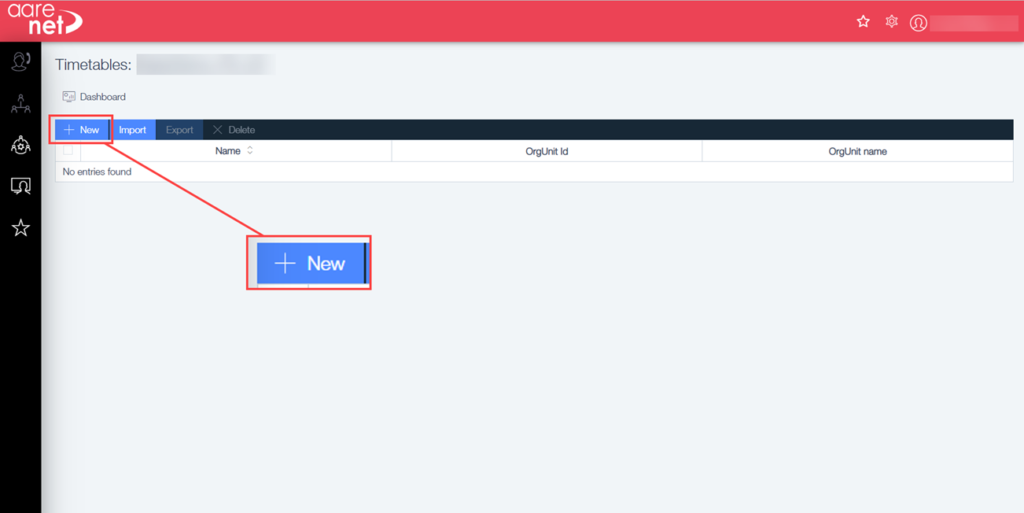
- Click on the button ‘+New‘
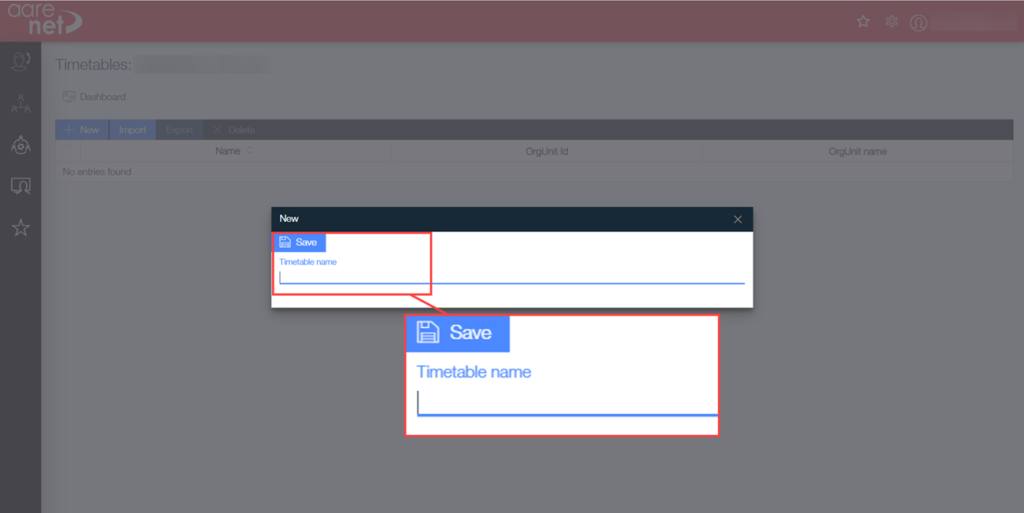
- Enter a name
- Click on the button ‘Save‘
- The newly created timetable will now show in the menu list:
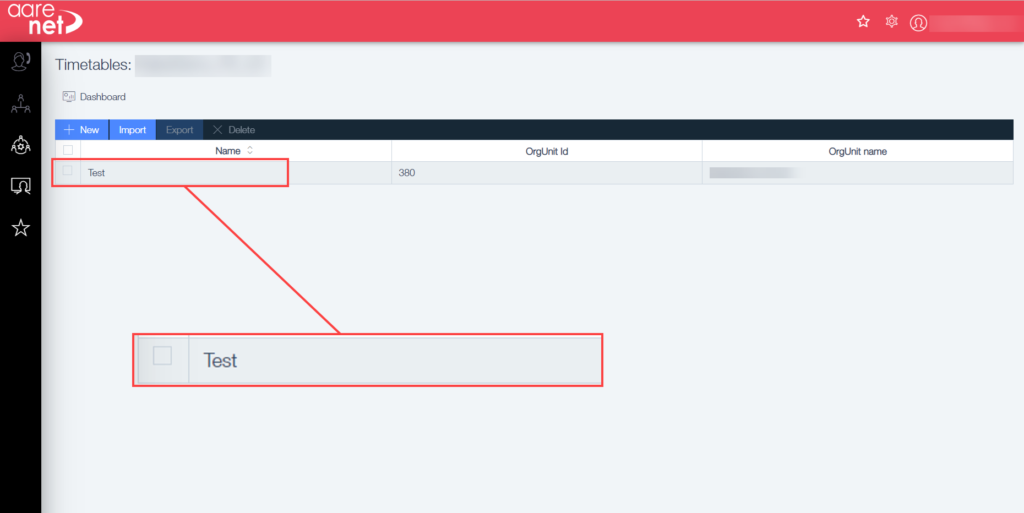
- Click on the line and it will redirect to the timetable set up:
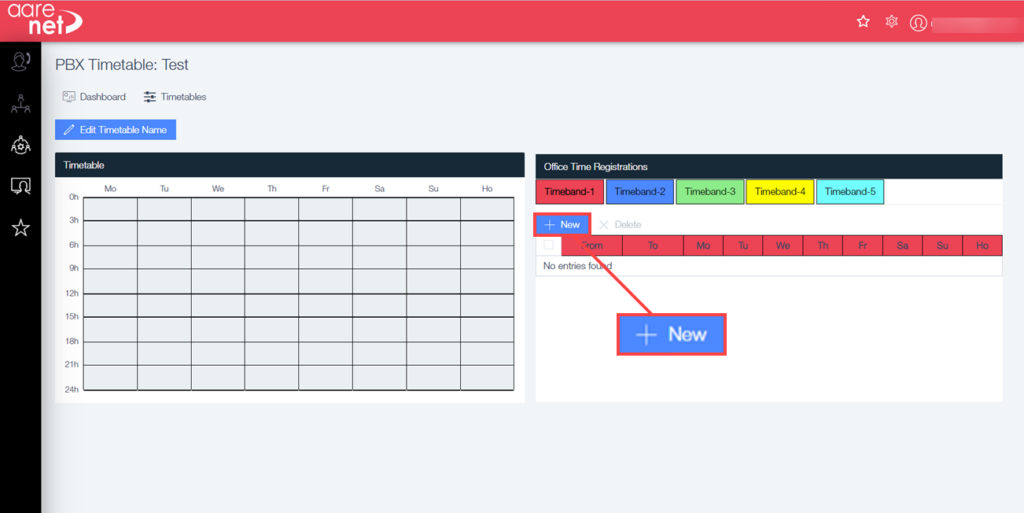
- Choose a Time band
- Click on ‘New‘
- Time-bands can be associated to prompts later and can be useful for items such as, lunch, business hours and, afterhours as an example
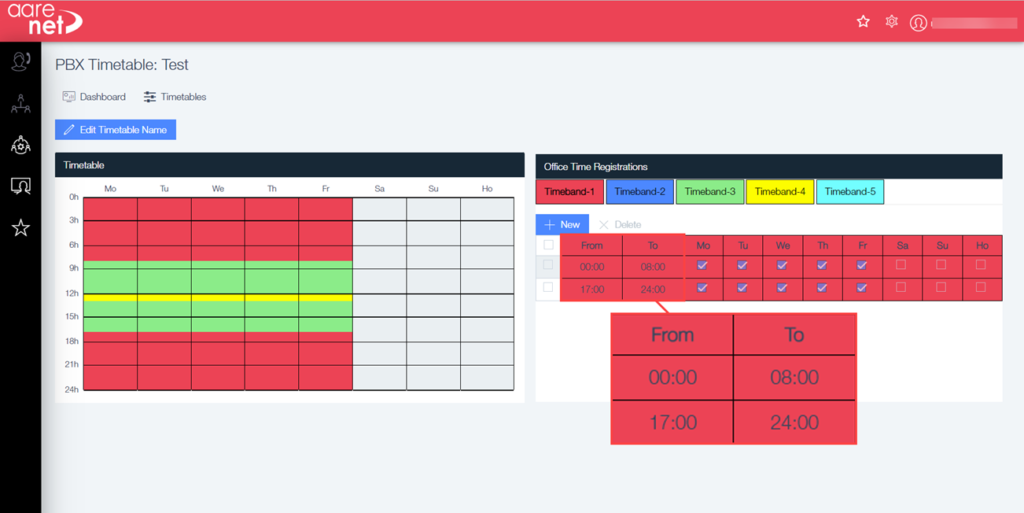
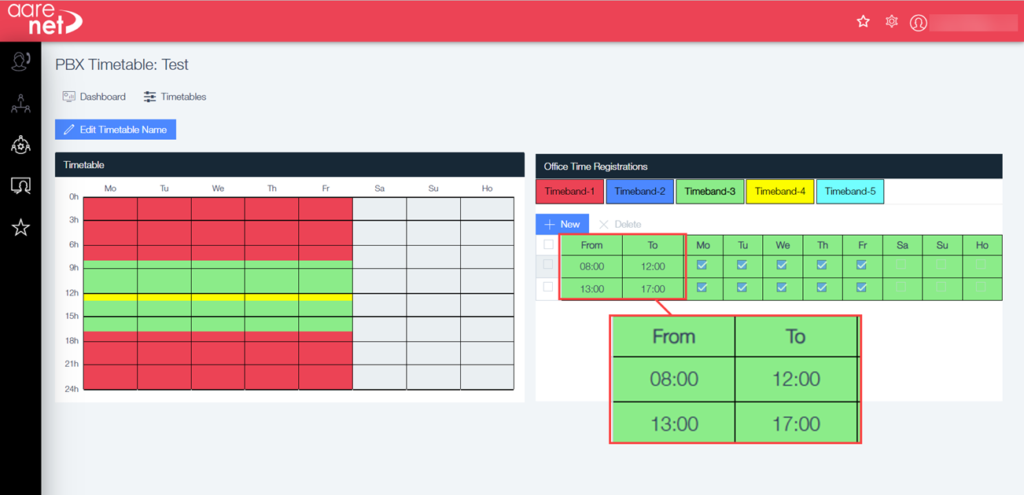
- We will first select a band and decide on Business working hours. In this example we will use Time-band 3 (green) for working hours, as it makes sense in an on/off situation
- Click on the Time-band
- Click on the ‘+New‘
- Type in 8:00AM or use the calendar and scroll to your intended ‘from‘ time
- Type in 12:00PM or use the calendar and scroll to your intended ‘To‘ time
- Select Mon-Fri with checks
- Click on ‘Save‘

- Now, since we are already in Green, we will add the after-lunch period
- Repeat steps 4-7 using, 1:00PM to 5:00PM
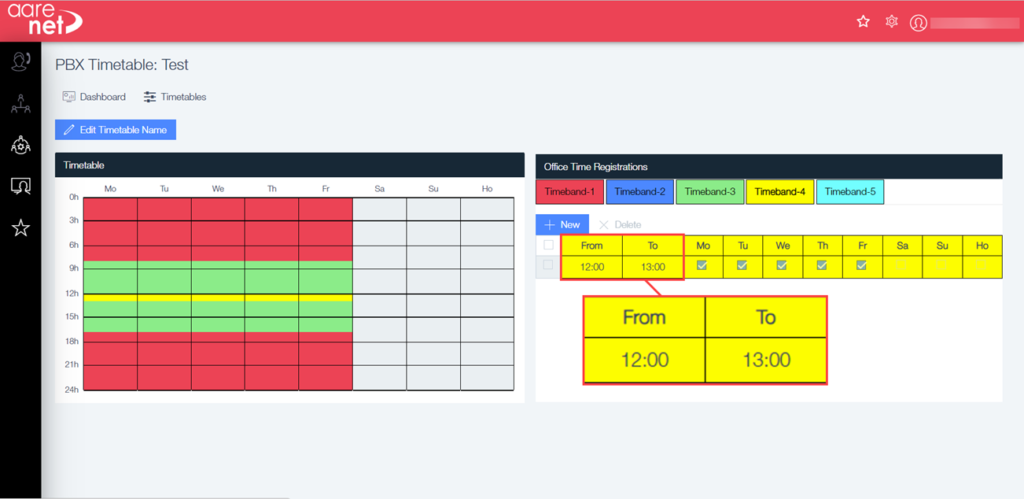
- Now we will fill in lunch with time-band 4 (yellow)
- Click on time-band 4
- Now we will complete our day by using the time-band 1 (red) after-hours
- Repeat steps 4-7 using, 12:00AM to 8:00AM
- Repeat steps 4-7 using, 5:00PM to 12:00AM
Example Image Below:
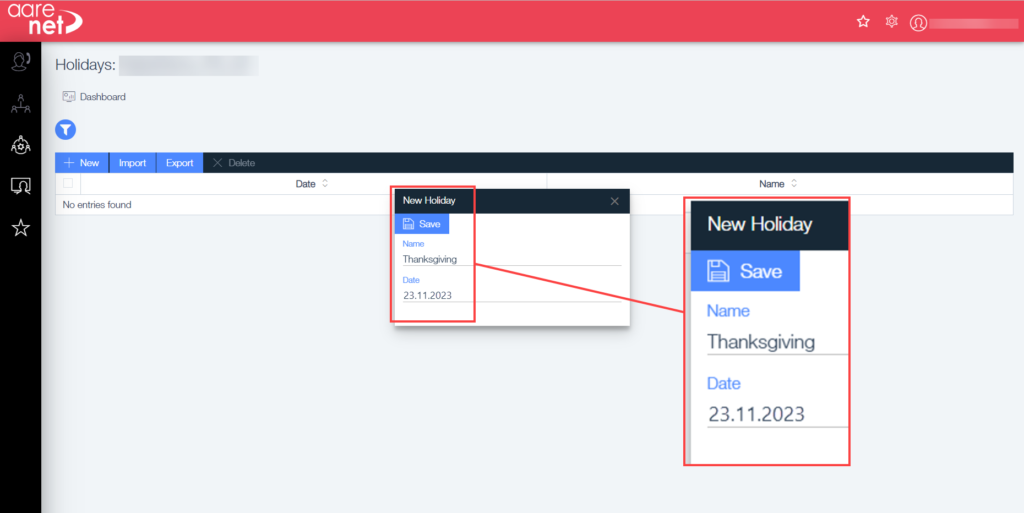
Adding a Holiday
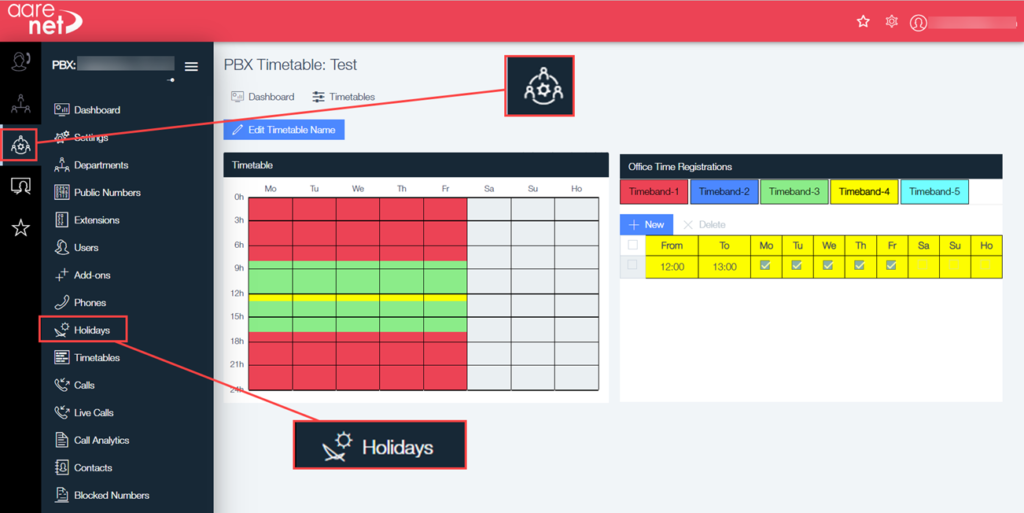
- Click on the ‘PBX‘ icon on the left
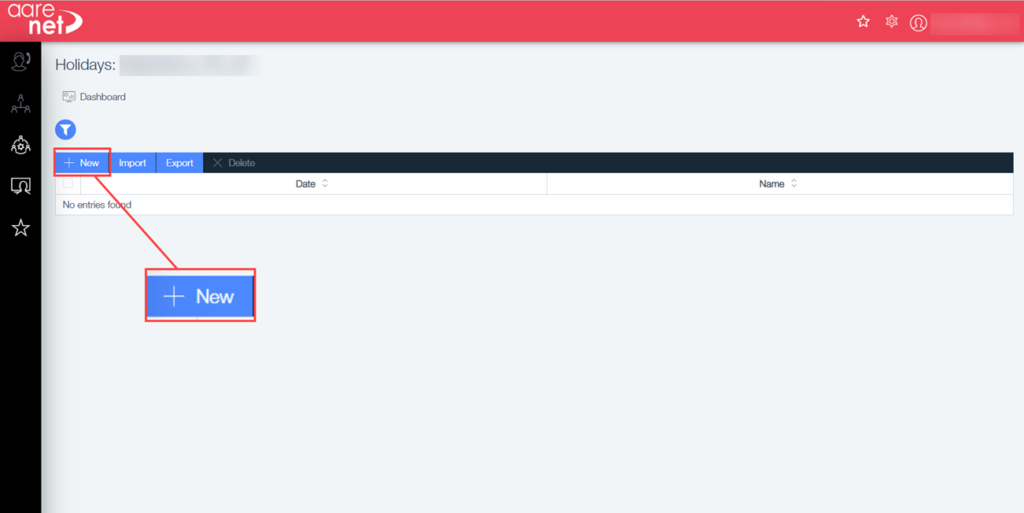
- Click on ‘Holidays’
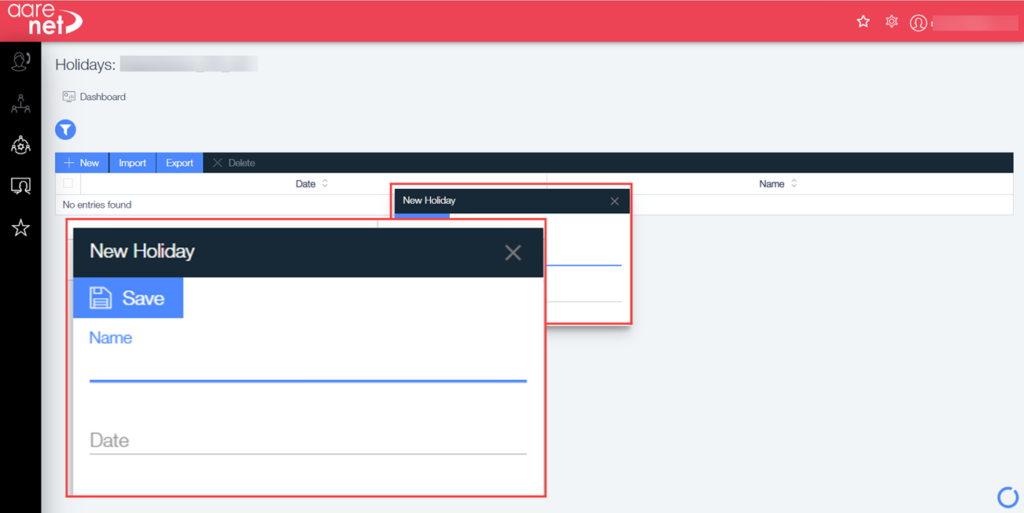
- Click on ‘+New’
- Give the holiday a name, such as ‘Thanksgiving’
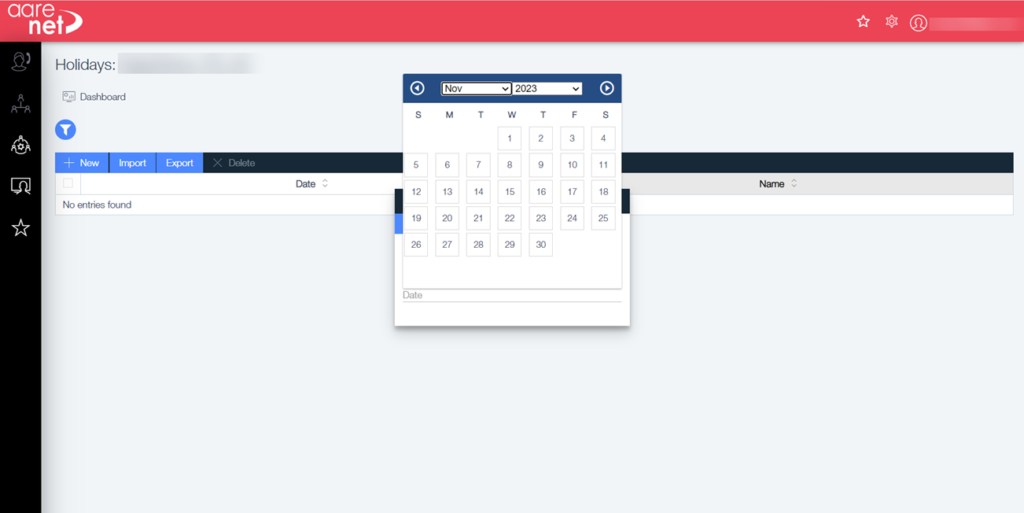
- Click on ‘Date’ and navigate to the date of choice. Here we will select Nov’ 2023 clicking on 23.
- Click on ‘Save’
- Now let’s add Black Friday, as we assume to be off that day also.
- Repeat steps 3-6, naming it ‘Black Friday’ and select Nov’ 23, 2023.
- We do not need to add the 25th and 26th as they are normal days off.
Here you can see the two holidays we have added and the confirmation message in the top right:
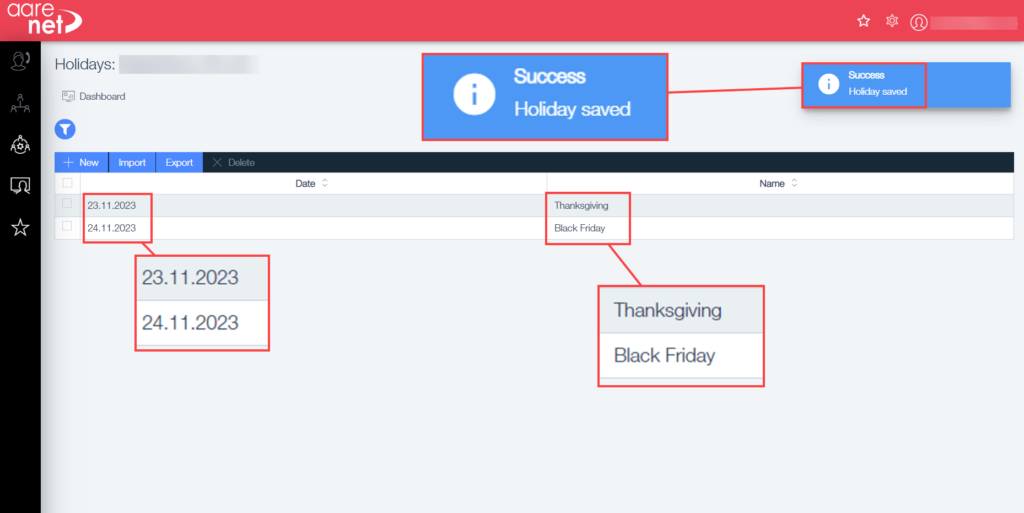
More holidays can be added in the same way as detailed above.
E911 Email Notification
When a 911 call is made using the MaxCloud system an email will be sent out to notify someone or multiple people in the building.
This email will include information such as:
Date/Time – Date and time of the call.
Time Zone – Time zone of the user making the call.
Dialed Number (911 or 933) – Number Dialed.
Emergency Location Name – As set on PBX
Emergency Location Information –
Emergency destination –
Private Number – Extension Number of the caller
Private Name – Name of the caller configured in the extension
Public Number – The extension’s DID number
PBX Name – Name of the PBX.
Tenant Name – Organization Name.
Ip Address – The MaxCloud UC SIP Bridge’s IP address or (SIP device’s public or private IP address.)
Configurating the E911 notification on the PBX
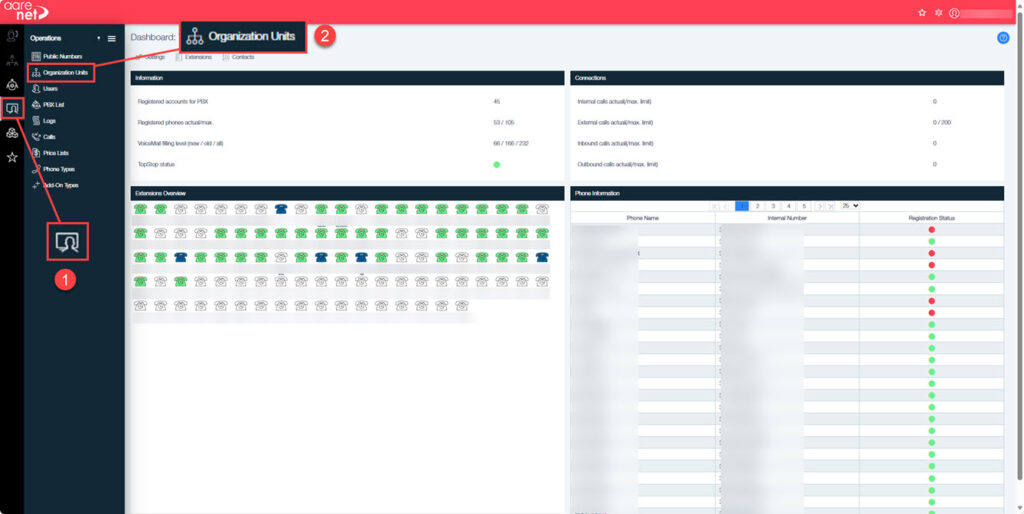
In the PBX navigate to the Operations menu and select the Organization Units:
- Operations Menu.
- PBX List – List of available PBX’s. Select the one that the notification is to be placed on.
When the selection for the PBX is made it will open the Dashboard view. Follow the below to navigate to the Organization unit:
- Chosen PBX name – Displays the name of the PBX that is being used.
- Operations Menu – click this to select the Organization Unit.
- Organization Unit – Click here to access the unit settings.
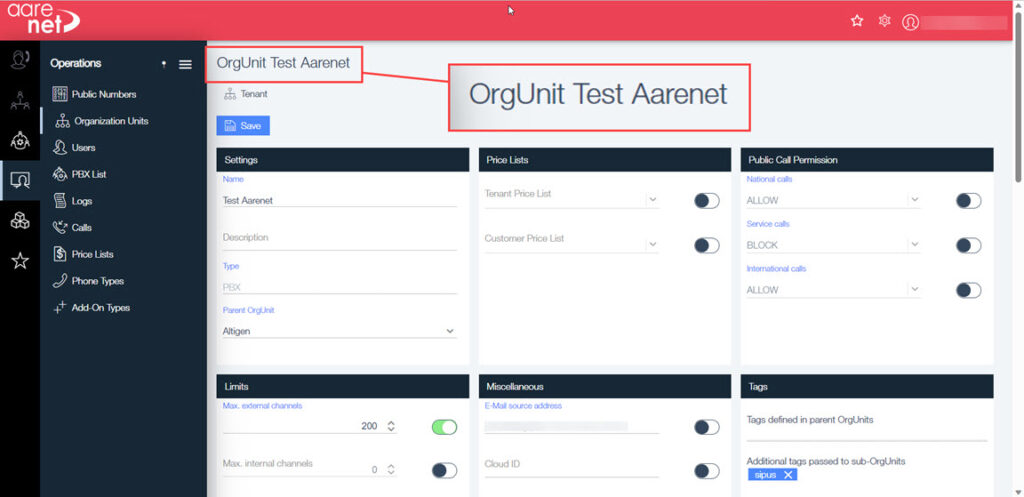
Scroll down on this page to the section that is titled All Attributes.
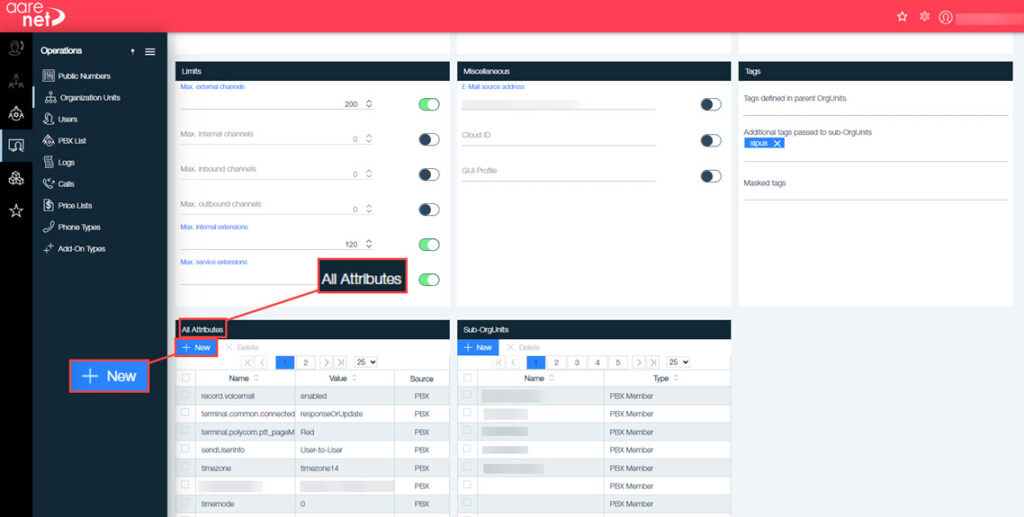
Click on +New:
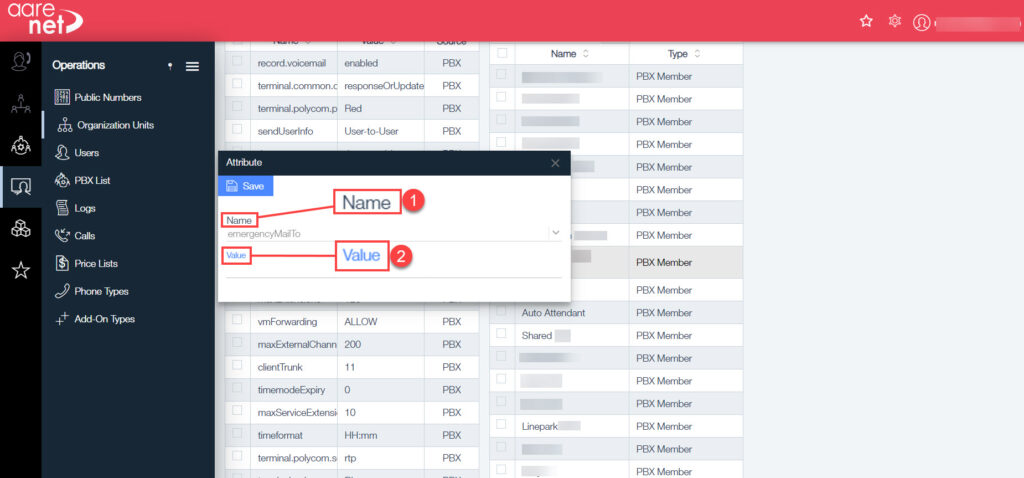
A pop-up box will appear.
- Name – Give the Attribute the name of ‘emergencyMailTo’.
- Important: The Attribute name is case sensitive.
- Value – In here add the email address that the notification should be sent to.
In the value it is possible to add more than one email address. Do this simply by separating the addresses with a comma.
Once completed click save to confirm. This will now be shown on the list of Attributes.
Any time that a user calls either 911 or 933 an email will be sent to the email addresses that have been added.
This should be tested when completed to ensure that the message is received. Do this by calling 933.
Please note that if 911 is called by accident do not hang up the call, please allow it to connect and explain that it is a mistake.
MaxCloud UC E911 Location
If a user has Admin rights they will be able to check the location that has been set for the extensions. This can be done following the steps below:
- Click on the Avatar.
- Select Admin.
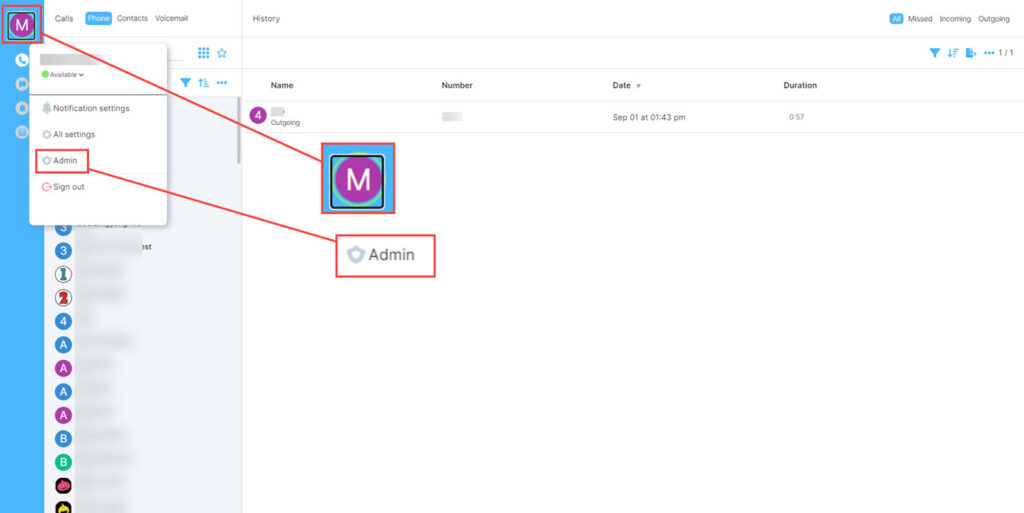
This will open a new Tab where the list of available PBX’s is and the E911 information that is available:
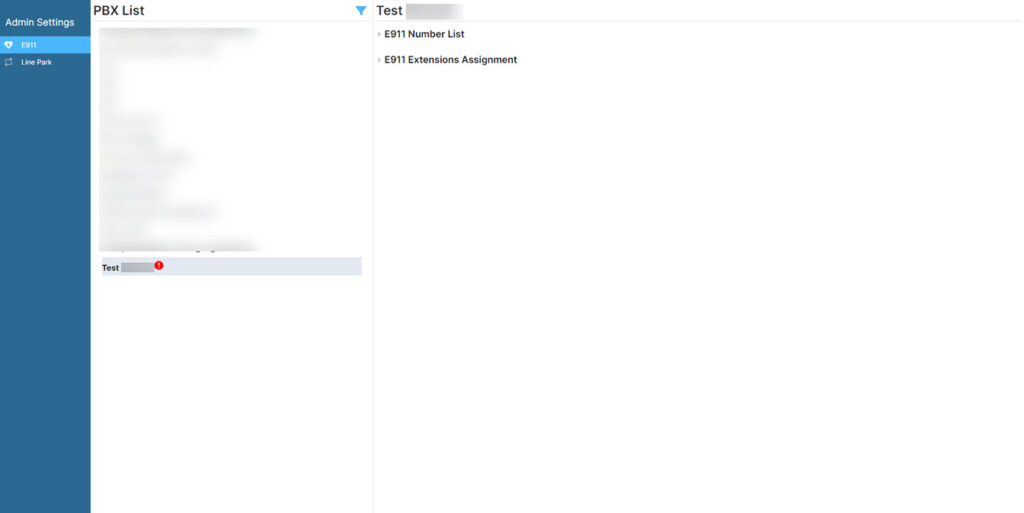
Click the > before the E911 Number List to view the list of numbers and locations:
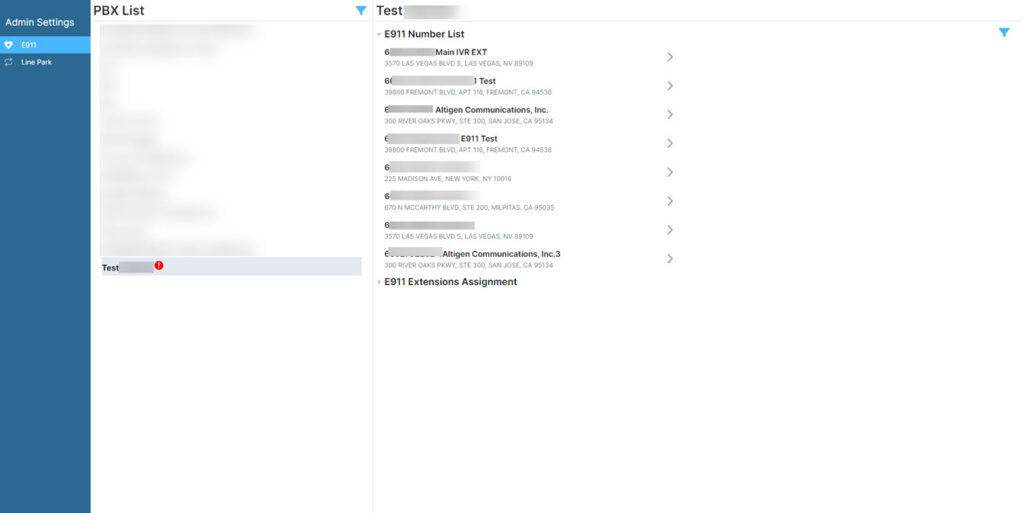
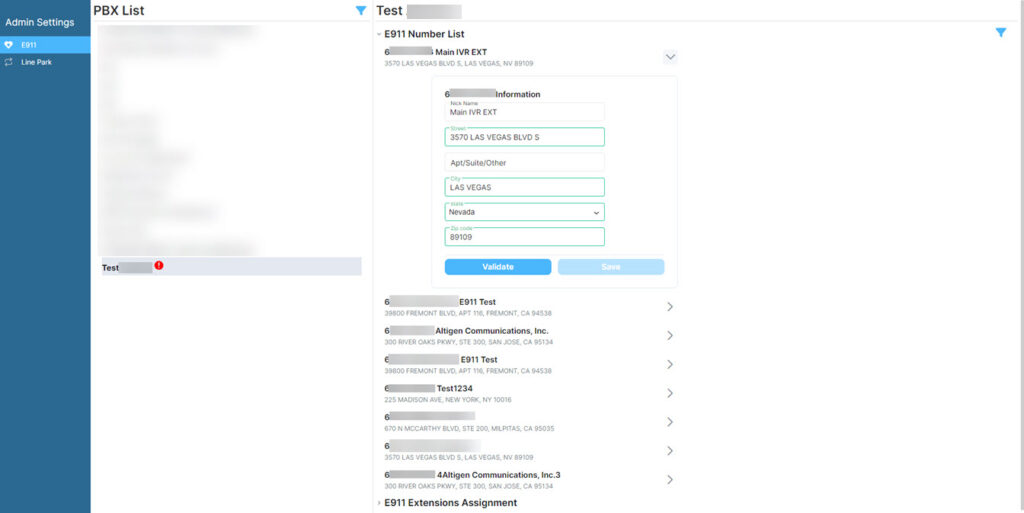
Any of these can be edited by clicking on the > to the right of the list item. This will open a box with the information Including:
- Nickname
- Street
- Apt/Suite/Other
- City
- State
- Zip Code
At the bottom of this is a validation button:
E911 Extension Assignment
Under the list of the Extensions Assignment is a list of users and their locations.
Next to the selection is a drop-down box giving the choice to view:
- All – List of all extensions/users.
- Fixed – Fixed address, this can not be changed by the user.
- Non-Fixed – Gives the user the ability to change their location, this is for MaxCloud UC web only.
- Please note: IOS, Android, Polycom Phone or Soft SIP client will send out non-fixed location.
- Unassigned – Numbers that have no E911 assignment.
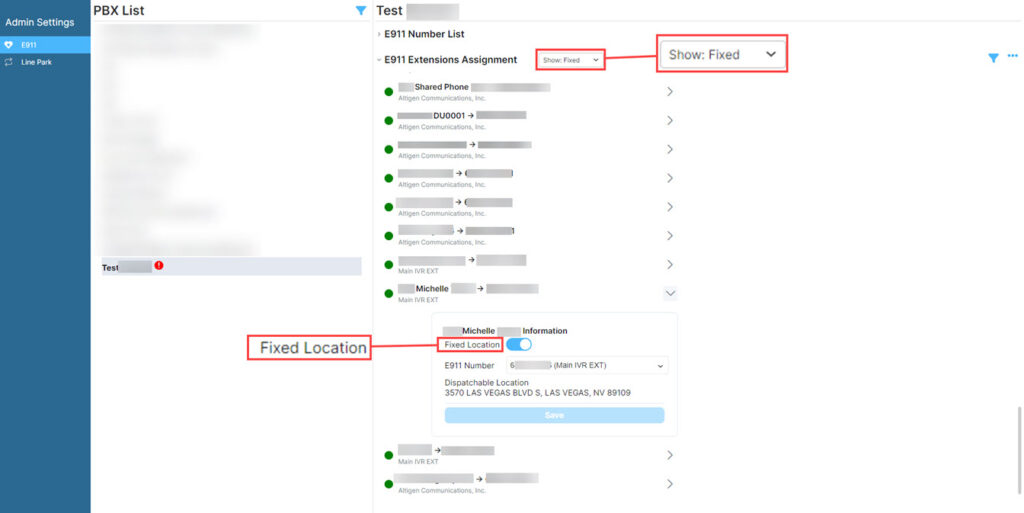
A fixed number will only show basic information and cannot be edited by the user.
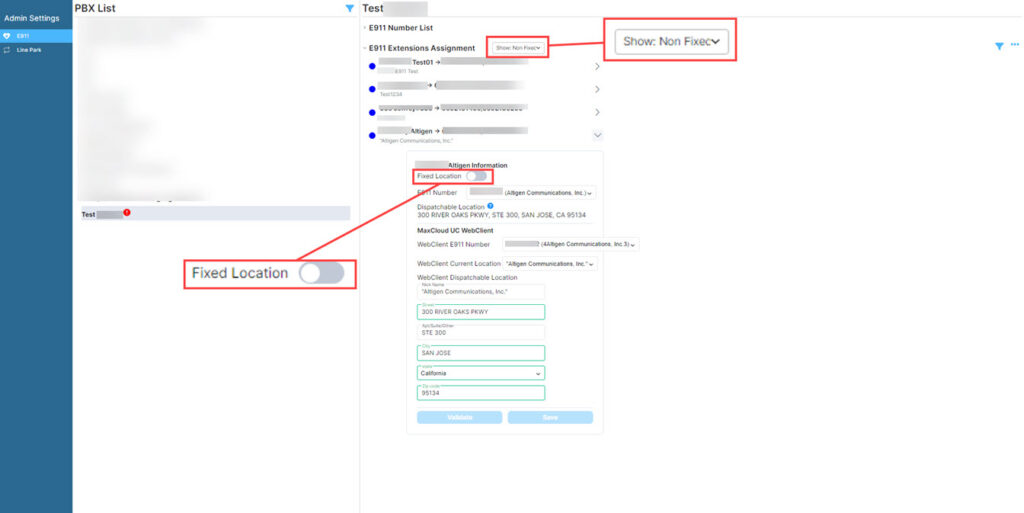
A Non-Fixed gives the Admin more details and the ability to change the address. If changes are made, make sure to click validate and then save:
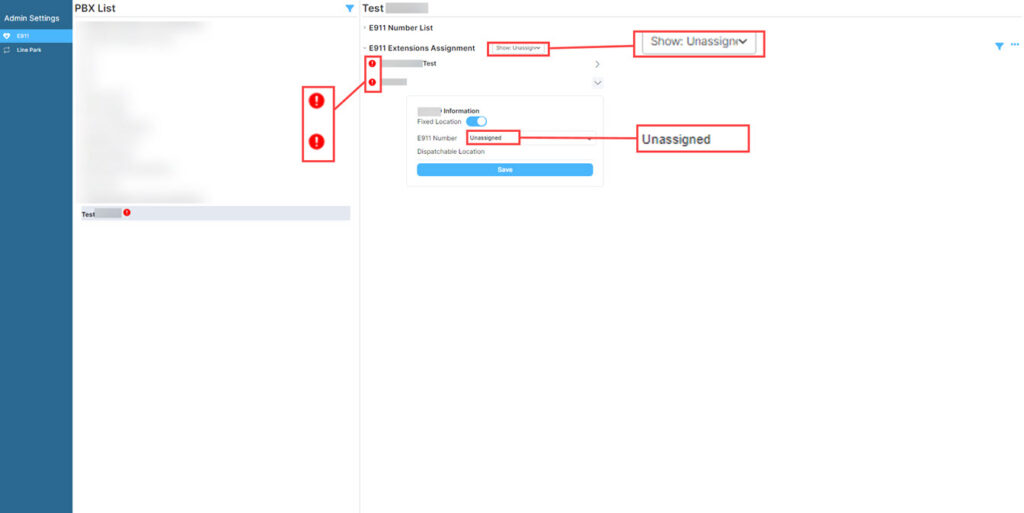
If an extension is unassigned to an E911 location it will show in the Unassigned list.
These are presented with a red circle and an exclamation mark; these will also show as fixed locations. Click on the box to the right of the E911 Number field.
This will open a drop-down menu with the fixed locations available to assign the number to.
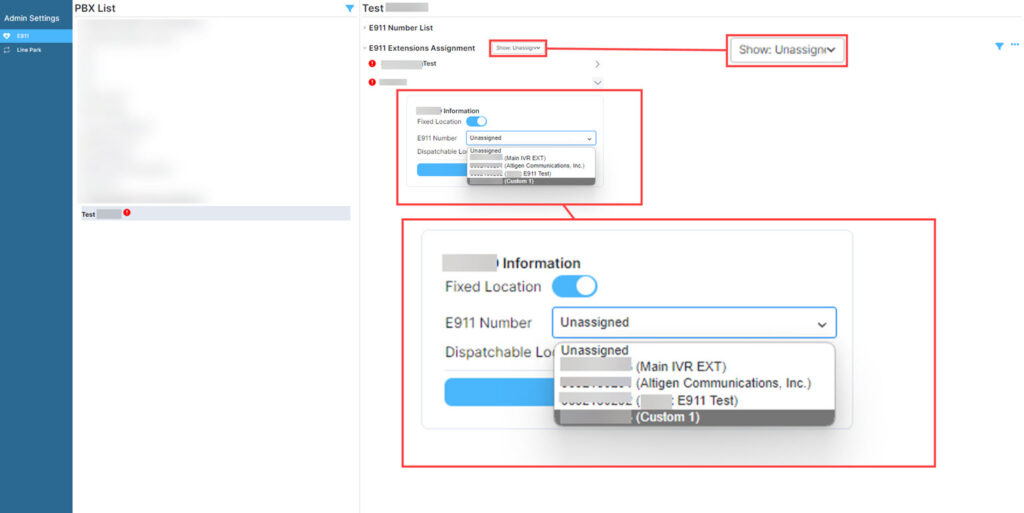
It is the responsibility of the PBX administrator to ensure that the E911 number and dispatch location are correctly assigned to each user.
Users
NOTE: Users must be added first for all intended extensions, ACD’s, and IVR’s or some functionality will be lost
Types of users
PBX Administrator – Highest level of customer admin access. Allowed to add, Modify, or Delete users and assign PBX or Department Administrator access to other users. Able to add phones and make changes to auto attendants and hunt groups.
Department Administrator – Lower-level admin capability. Can see Department settings and make changes to users in departments they are assigned to.
PBX Member – Added automatically to each PBX as the user is assigned to the PBX. Has no system login capabilities.
Adding users
Navigate to the user’s menu by clicking on the PBX menu then choose Users:
This opens the users view where a list of current users (if any have been created already) will be displayed, if this is a new set up then the list will be empty ready for the creation of new users:
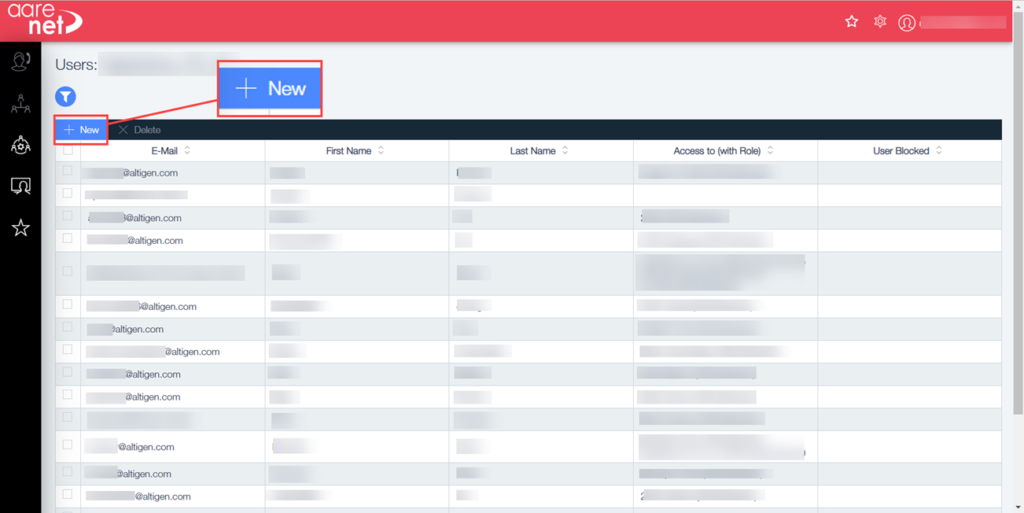
Click on the + New, this will change to the following view:
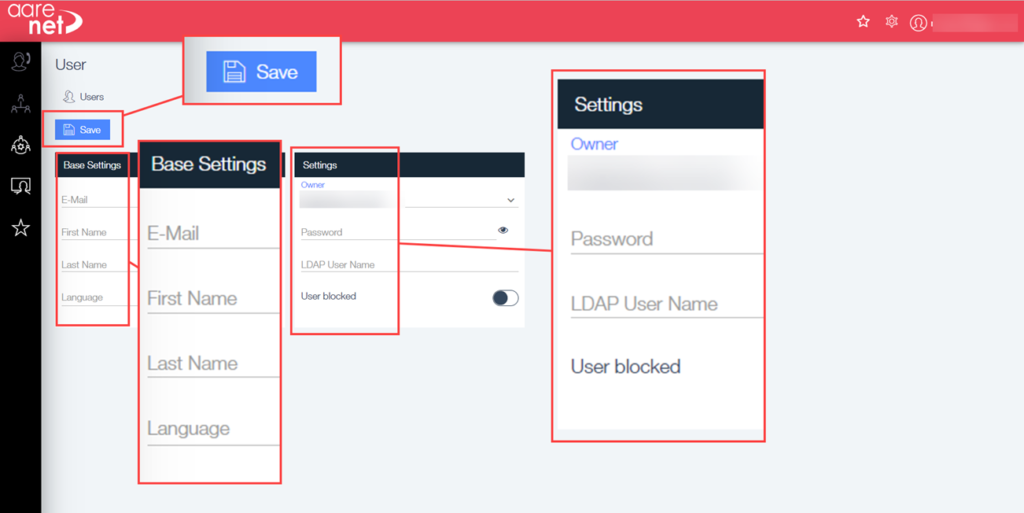
Required fields are E-mail, First Name, Last Name, Language, Owner, Password.
Owner typically assigned to a PBX but could be assigned higher based on need. Only need to put the highest level, typically PBX.
Once the information is added click save. If you need to assign the user to a PBX administrator or higher role, Click new under ROLES. Select the appropriate role from the definitions above and then select the appropriate OrgUnit level that it applies to.
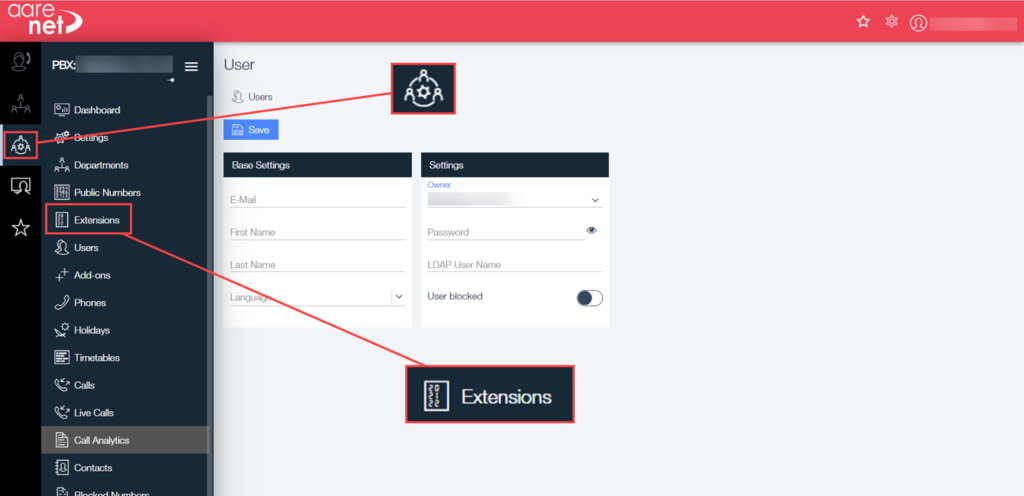
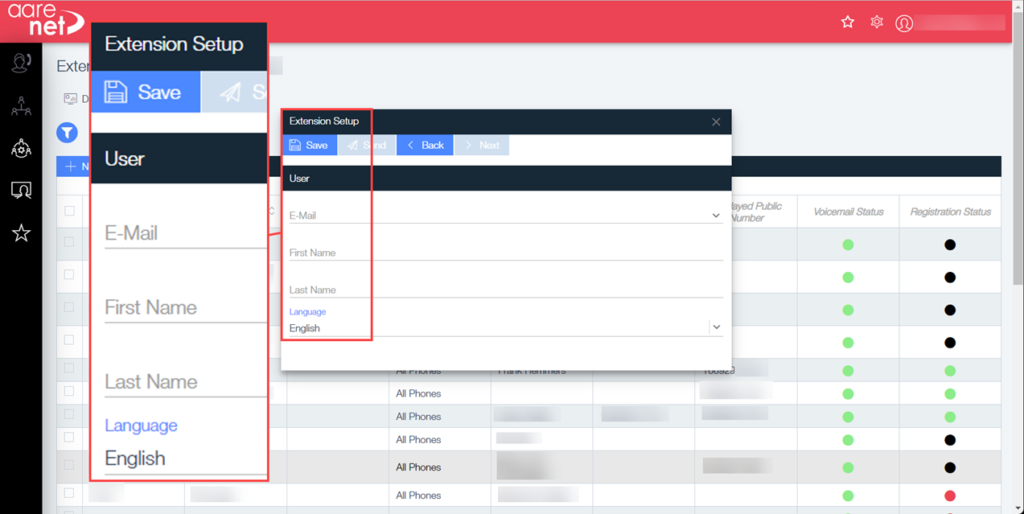
Adding an Extension
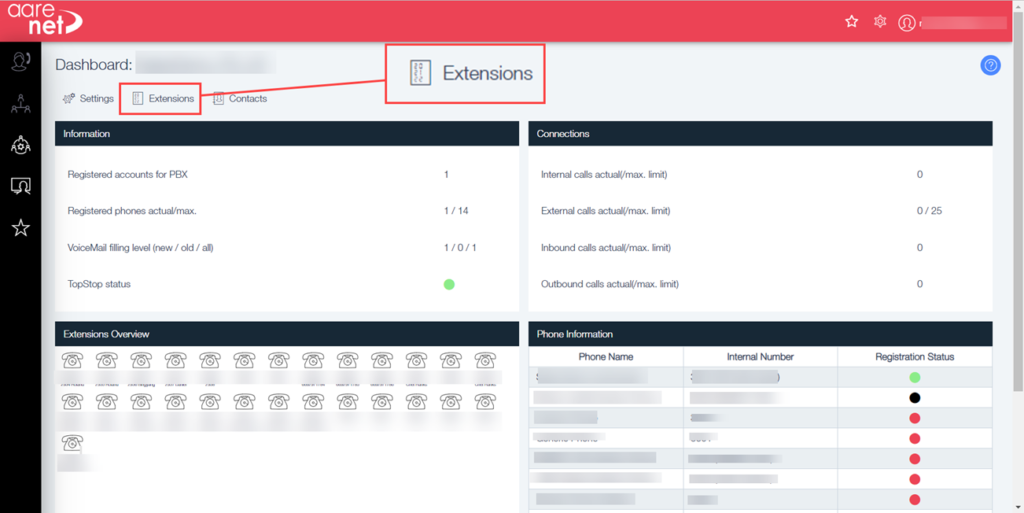
First navigate to the extension setting by clicking on the PBX logo then select Extensions:
This section will go over adding user extensions as well as a basic setup of a Polycom device. Other devices and applications will come later but will follow suit in basic setup and functionality.
Extensions used for basic calls Require outgoing caller ID to be set, or the call will be denied by the carrier entity as well as UCCloud Call Control module. This is due to billing requirements.
Hierarchy for Call Id, Emergency CID, etc covered in another module. Basic concept, most specific.
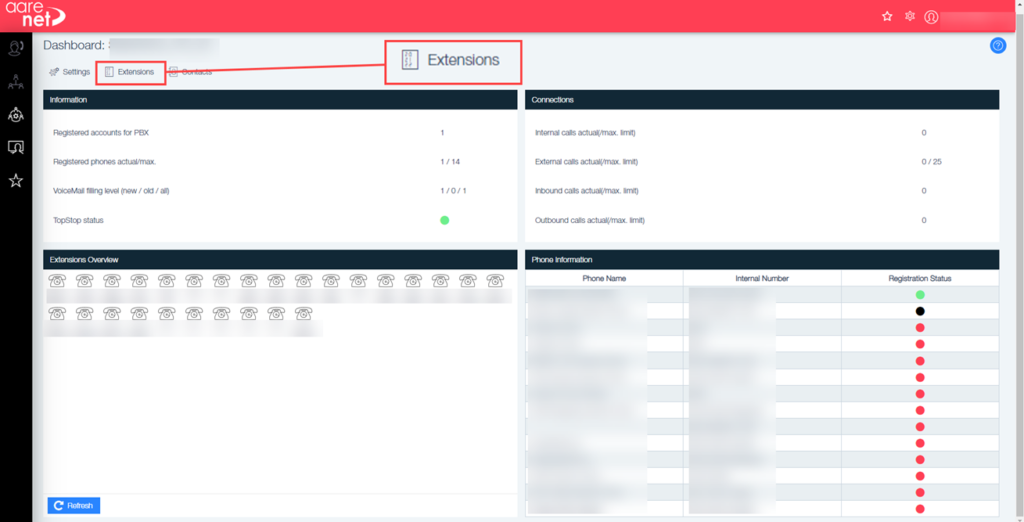
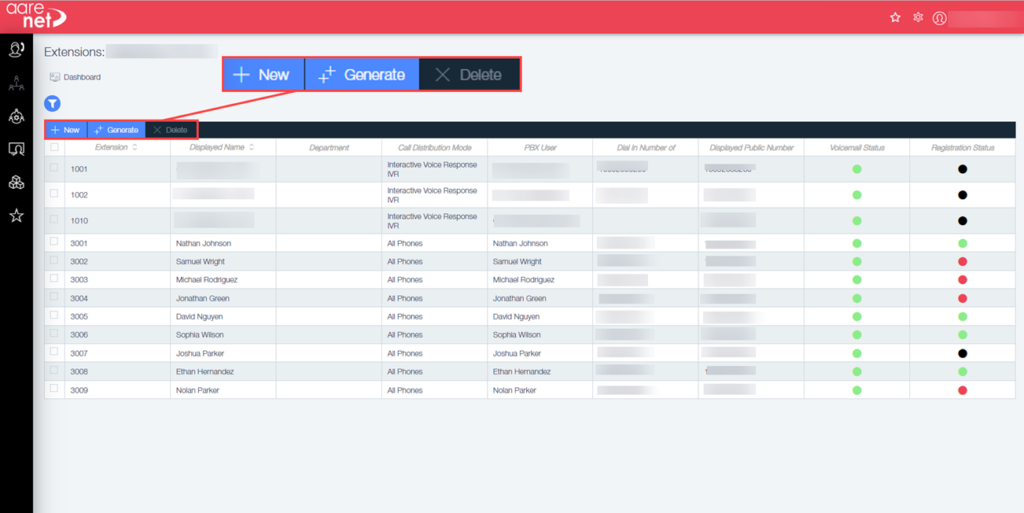
Extension Dashboard
When you enter the Extensions page it will show a list of extensions with the ability to add new. To get to the dashboard view click on Dashboard as shown below:
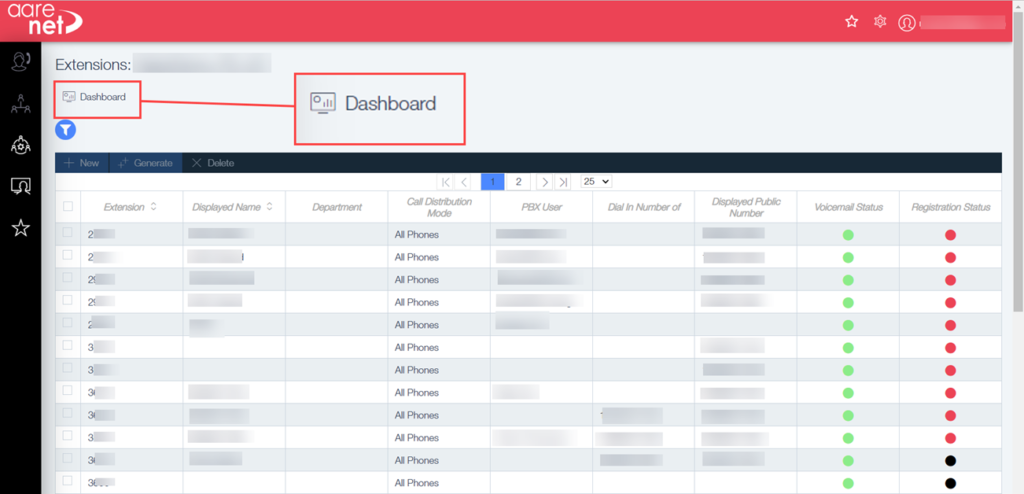
When entering the Dashboard it will show basic information about licensing, limitations, and Phones associated already to extensions. This does not include all possible extensions and could show multiple devices connected to singular extensions.
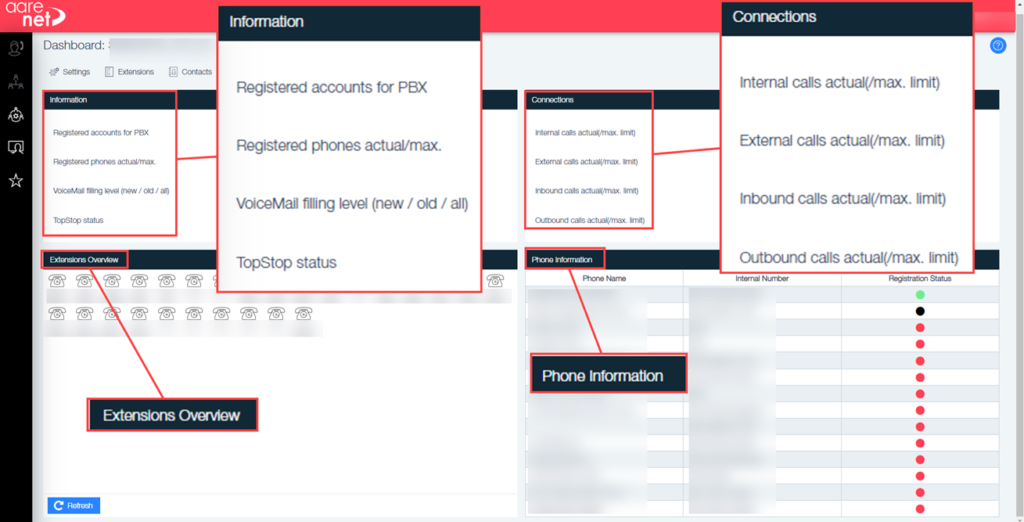
Under the phone information you will see the users associated to the number and their internal number for that phone. The status of the phone is indicated by coloured dots:
- Red indicates that they are not presently registered.
- Black indicates that the device is unfound.
- Green would indicate that the system believes that the device is active and has registered TO the system.
Adding an Extension
Concentrating on adding a singular extension. The below will cover the steps to ensure the extension is set and functions.
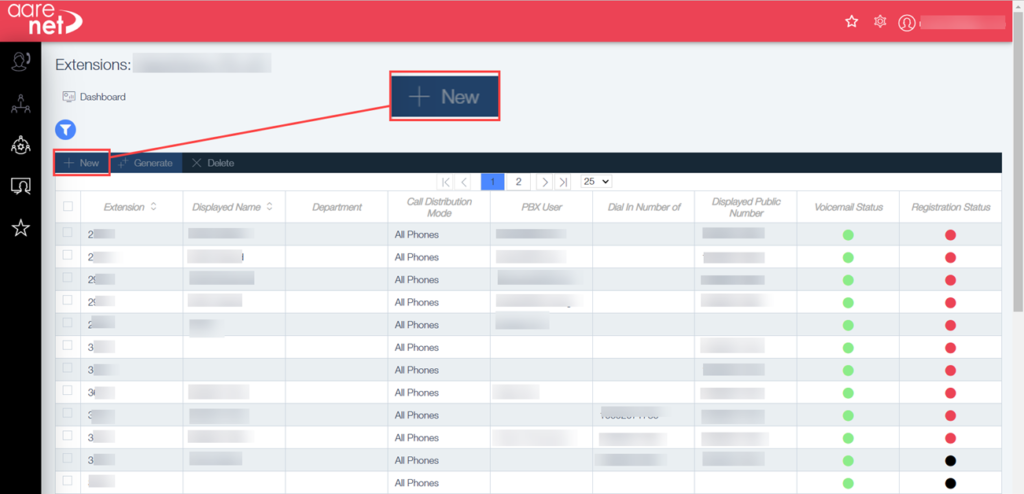
From the Extensions Dashboard as above, Click on Extensions to navigate to the extensions list:
- Click on the ‘extensions’ selection button at the screen top
- Click on ‘+New’:
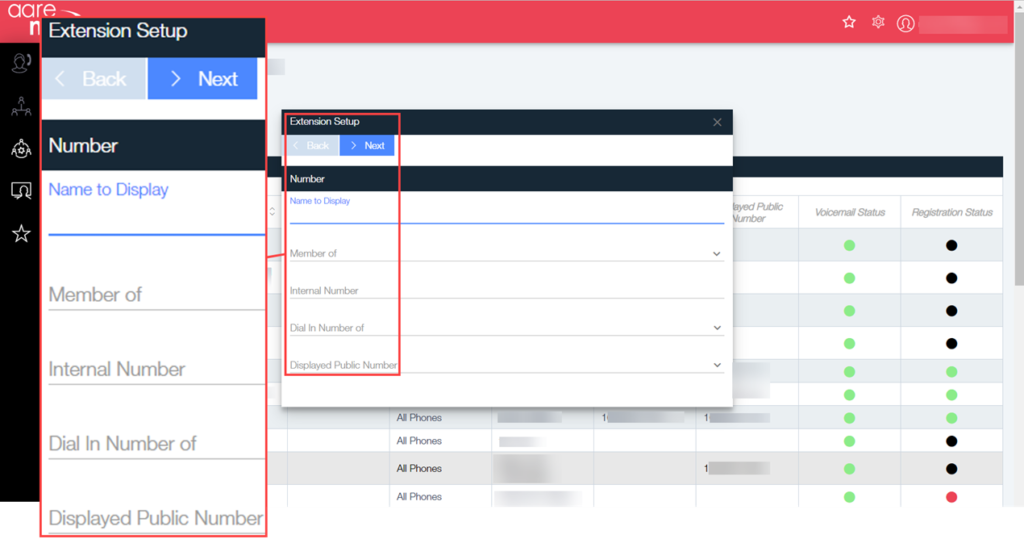
- Enter the name to display. This field is used in CDR’s as well as the button default displayed in the line of a phone
- Select a ‘member’ from the dropdown menu
- Assign an internal number. This will be the extension direct dial string used by others
- Select, if accessible from outside, a dial in number (used only once system wide)
- Select a primary Displayed Public Number
- Click ‘>next’
All of the above fields can be modified later by selecting the extension, then the Extension Setup buttons.
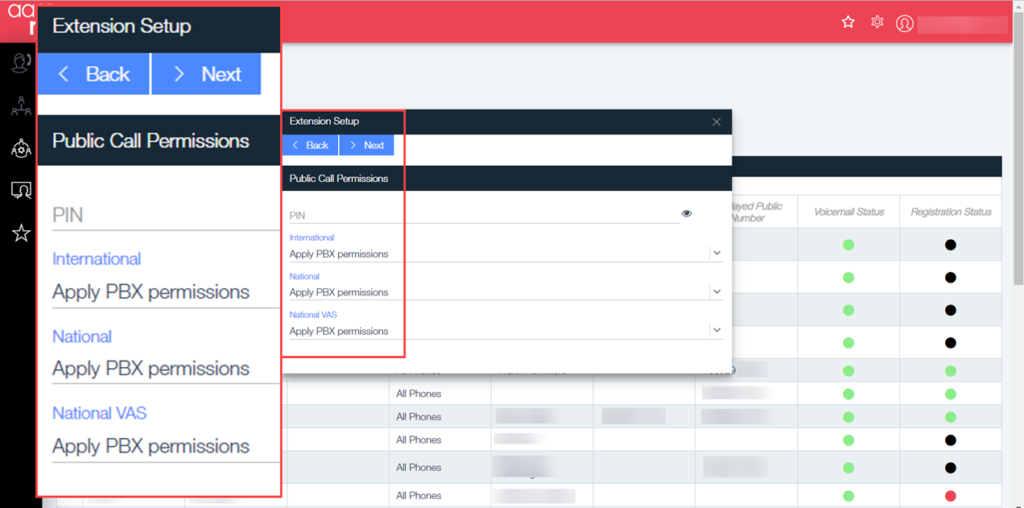
- If required for outbound dialling for the user, enter a PIN number
- If you have specific restrictions, click on and change International, National and National VAS settings. Otherwise, click on ‘>next’
- E-mail (owner) is mandatory. Select an available user within the system, or type in manually an e-mail address. (Manual entry will add this user to the known users in the system)
- Select an existing e-mail/owner for the extension. This is also where the configuration for the extension will be sent to when initiated
- Click on the ‘Save’ button
Extension Related Features

Extension usage depends on options that handle calls. The list of items and how to handle calls when unavailable or distributed is explained in this section. Not all cases will be covered and as we make changes to designs and updates, these can change. Using the ‘Question mark’ (blue circle with a ? inside, see side for icon) regularly is recommended. All items listed are in the Extension Related Features screen.
Call Forwarding
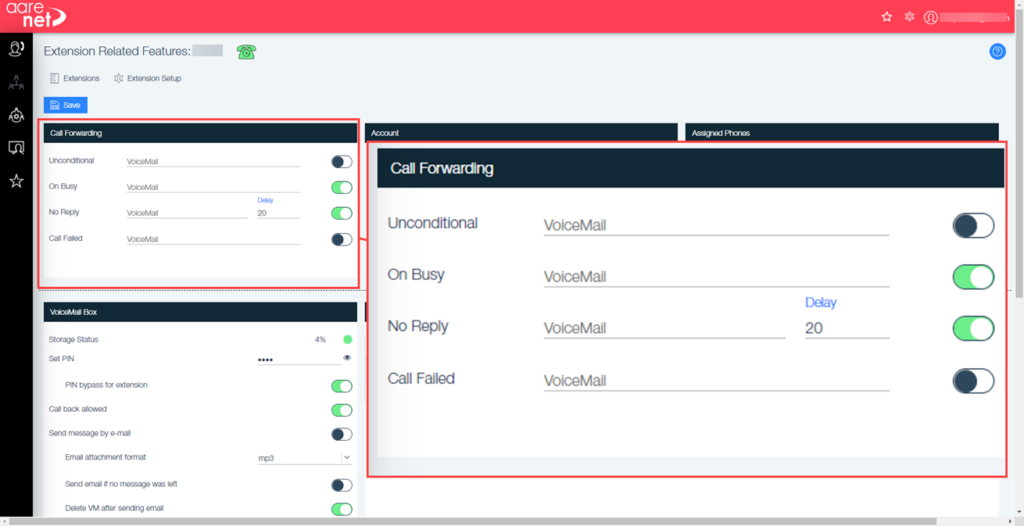
Call Forwarding options are outbound number, voicemail, or extension. If a phone is not assigned these functions might not work. These setting will only function if they are enabled. Multiple types can be enabled.
- Unconditional– All calls get forward handling.
- On Busy– If an extension is in BUSY state (in-call) and unconditional or DND is not set, forward according to selection.
- No Reply—If after provisioned DELAY timer, not handled, forward according to selection.
- Call Failed – If calls fail, they will go to voicemail.
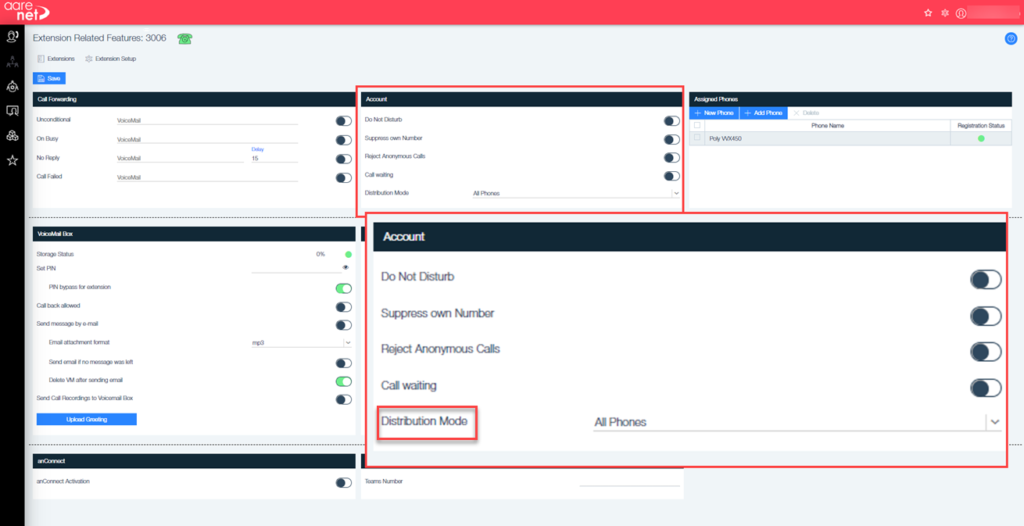
Account
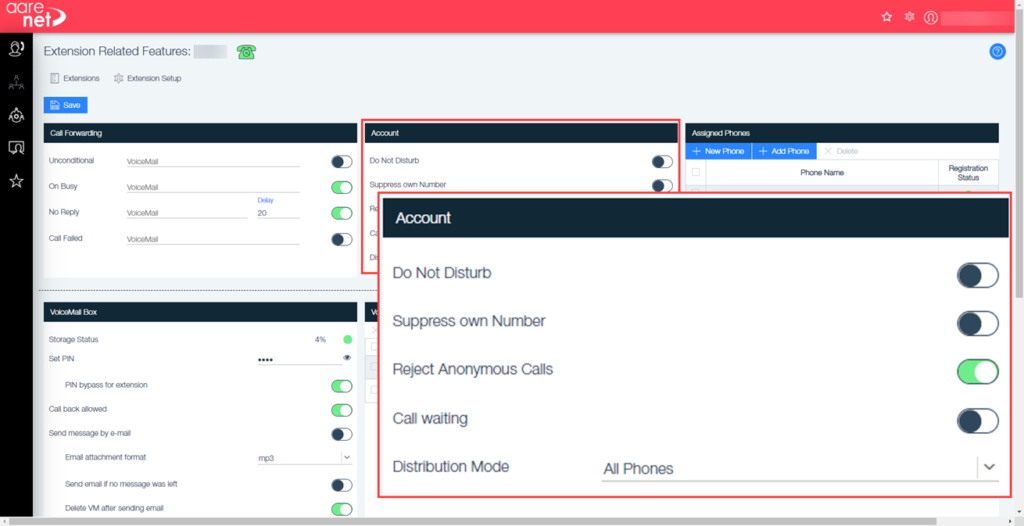
- Do not Disturb—Calls will be interrupted with a message “The subscriber does not want to be disturbed at the moment”
- Suppress own number—Feature to be further modified
- Reject Anonymous Calls–Will reject callers with Anonymous as number
- Call Waiting—Will allow the incoming caller to hear continuous ring, as well as Polycom will beep letting you know a call is waiting.
- Distribution Mode—Needs to be All Phones for User Extensions. (Other Options explained later)
Voicemail
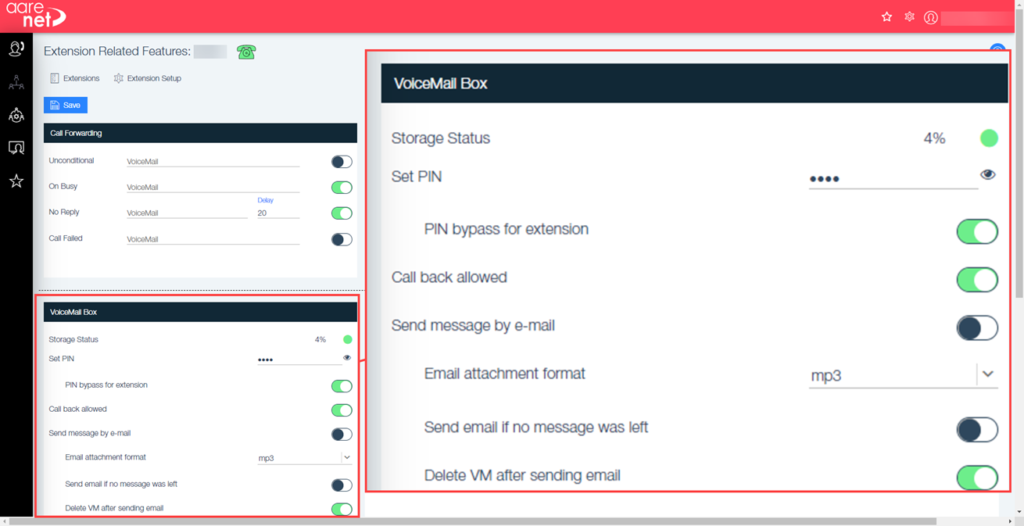
- Storage Status – This indicates the amount of storage that the extension is using for voicemails.
- Set Pin – This is the field that the user would set a 4-10 digit string to enter to get voicemails.
- Call back allowed – when listening to VM, you will be given an option to press 1 and return the call.
- Send Message by e-mail – If selected, and valid email associated to extension, VM sent on receipt of VM.
- Send email of no message was left – Decide if you want to still get an email if no message is recorded.
- Delete Voicemail after sending email – This is an effective way to keep the voicemail storage down, once the email is sent thee voicemail will be deleted.
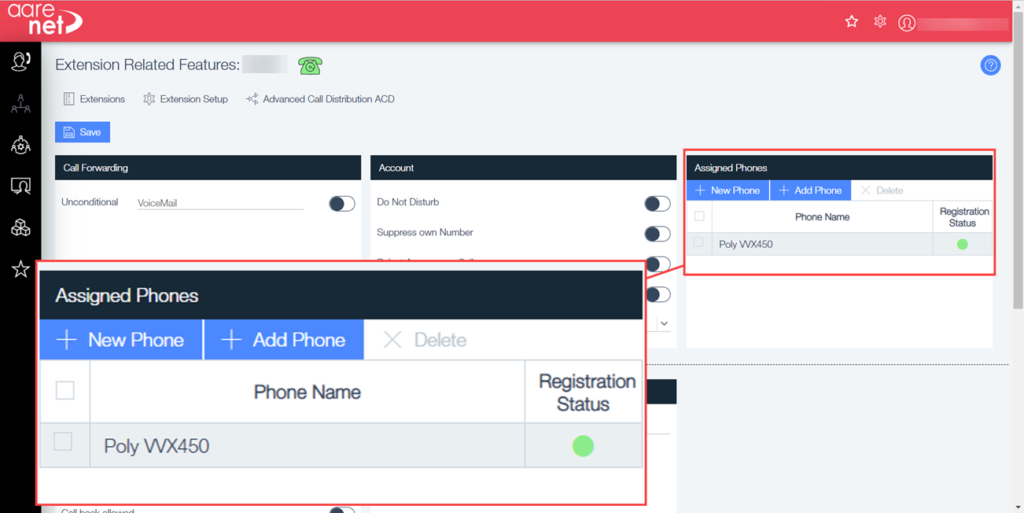
Assigned phones
This section shows any phones that are registered to the system for this user.
Voice Mail Box Features Extended
The range of features of the Voice Mail Box has been extended. New Features include:
- Message Storage Status.
- PIN Bypass for Extension:
- If the VM is accessed from an extension phone, no PIN needs to be entered.
- Audio File Format MP3 Or WAV.
- Send E-mail if No Message Was Left:
- Enables e-mail notification or call back to the caller even if no message is recorded.
- Delete VoiceMail Box after sending email:
- Enables a “No Limited” VoiceMail Box as no messages remain stored in the VoiceMail Box.
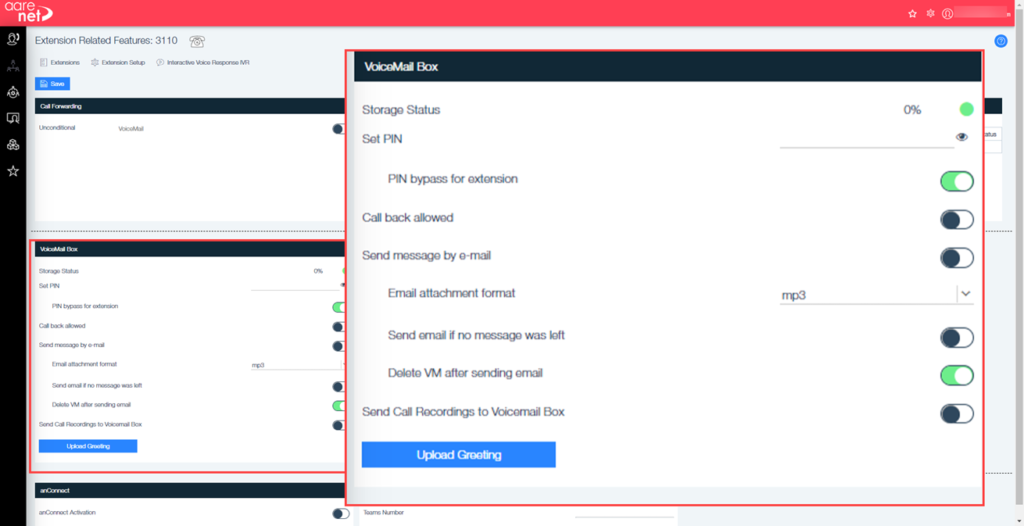
To access the Voicemail Box Settings, first go to the AS7 then select your PBX by clicking on the Icon in the left menu as shown below:
Click on the PBX of choice then, click on Extensions:
This will open the list of available extensions, select the extension that requires changes by clicking on it. This will open the Extension Related Features:
In here is the current voicemail settings for that extension:
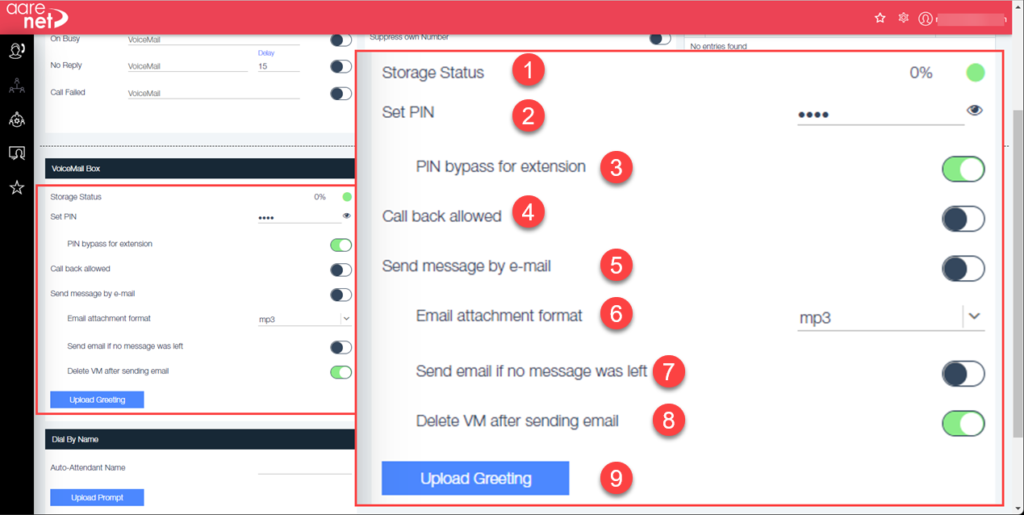
- Storage Status – Shows the percentage of storage being used
- Set PIN – Allows you to type in a PIN number for access to the voicemail, the eye icon will show the non-encrypted view.
- PIN Bypass for Extensions – A switch to turn on or off the feature.
- Call Back Allowed – Choose if you wish to allow call back using the toggle switch.
- Send Message By Email – If this is activated the user will receive an email when they are left a voicemail, the email will contain the message for the user to listen to.
- Email Attachment Format – Choice of MP3 or WAV file for the email.
- Send Email if No Message Was Left – Allows the user to receive an email even if no message was left.
- Delete Voicemail After Sending Email – This feature will keep the voicemail storage down as once the email is sent the voicemail will be deleted.
- Upload Greeting – Click on this to add a greeting.
Clicking on the Upload greeting will open a pop out asking you to choose new greeting file:
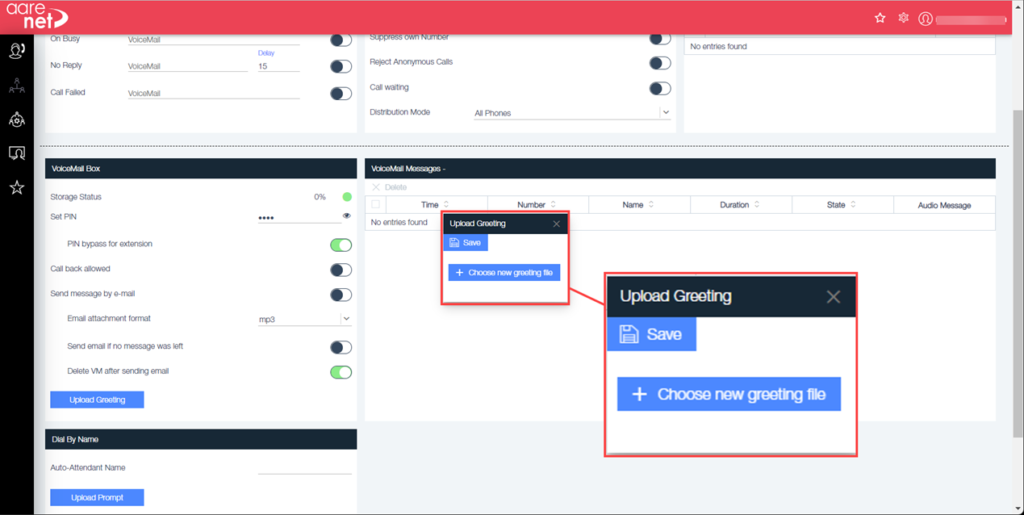
Clicking on this will open files on the machine that is being used, where you can choose the file to be used for the voicemail. Once selected click Save.
Setting up a Voicemail Center in AS7
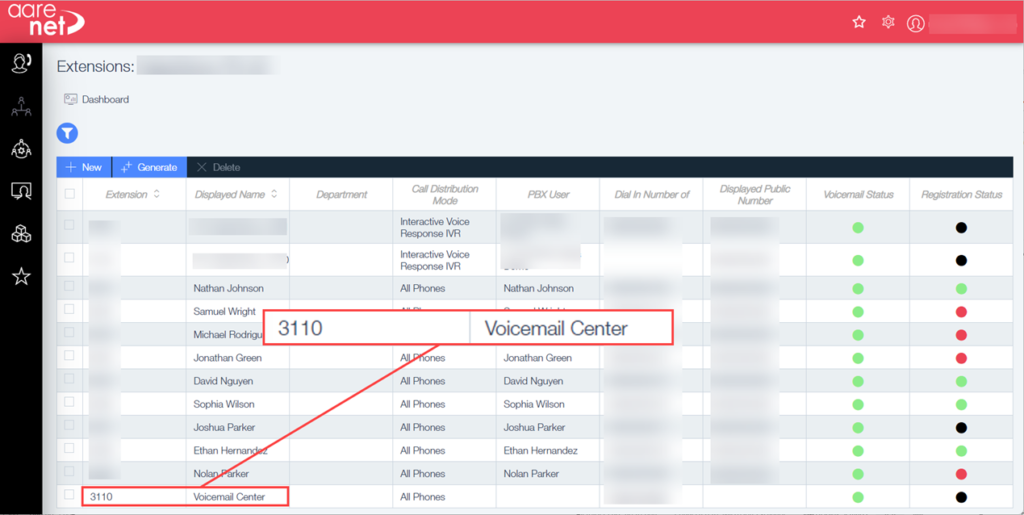
For agents in the AS7 that wish to be able to access extension voicemails from the trunk by dialing into a public number, a dedicated IVR extension will need to be created within the AS7 portal.
To set this up firstly go to the AS7 portal and Navigate to PBX – extensions:

Select the extension that will be used as the voicemail center extension. Set a Dial in Number to allow trunk calls to this extension.
Next click on the Extension that will be the Voicemail Center Extension:
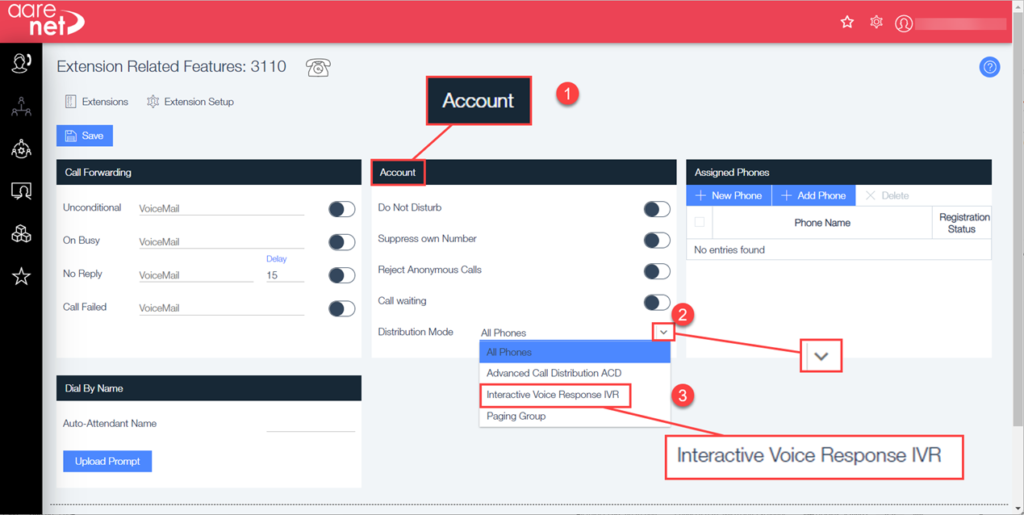
- Account – This is the section that the changes will be made in
- Drop down menu – Use the drop down to open the menu.
- Options – Select the Interactive Voice Response IVR.
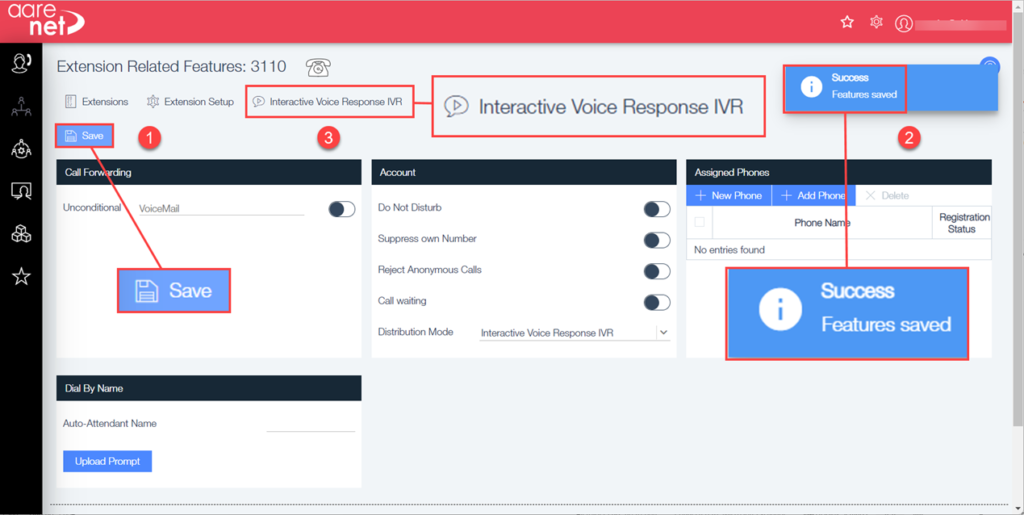
- Save – Click here to save the change.
- Success Message – Shows that the changes have been made.
- Now click on the Interactive Voice Response IVR section at the top of the page:
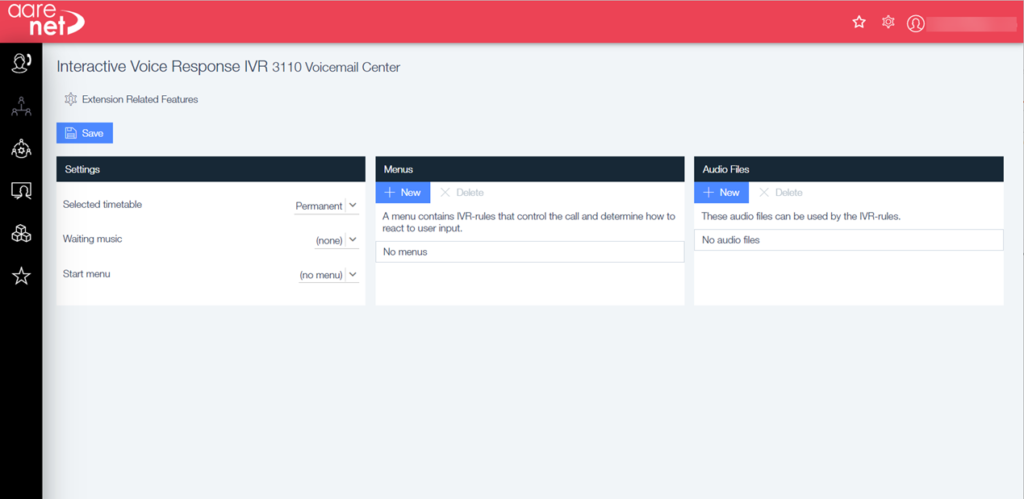
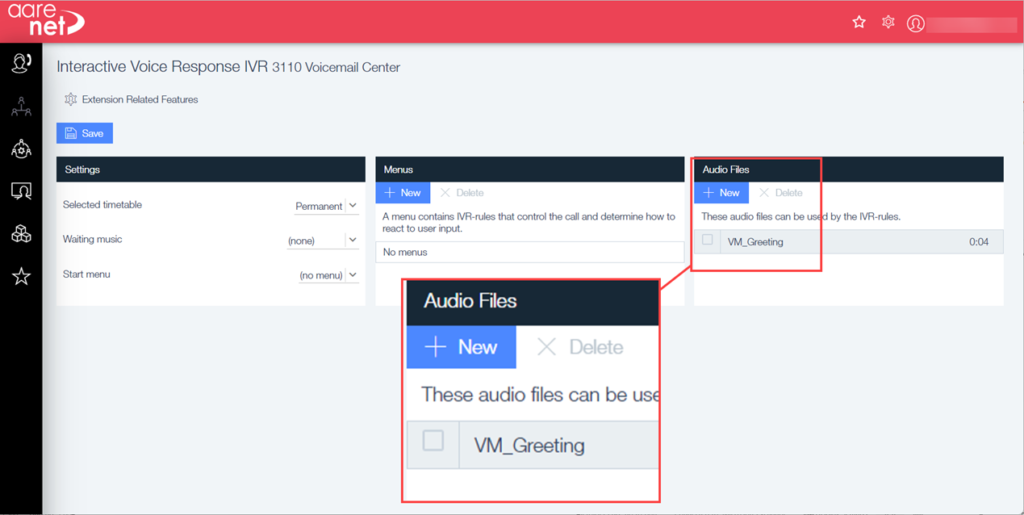
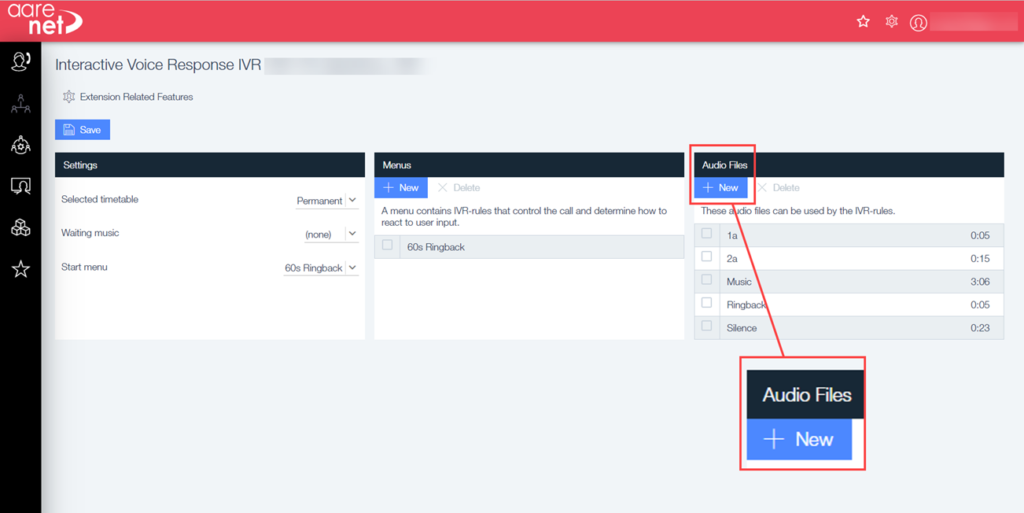
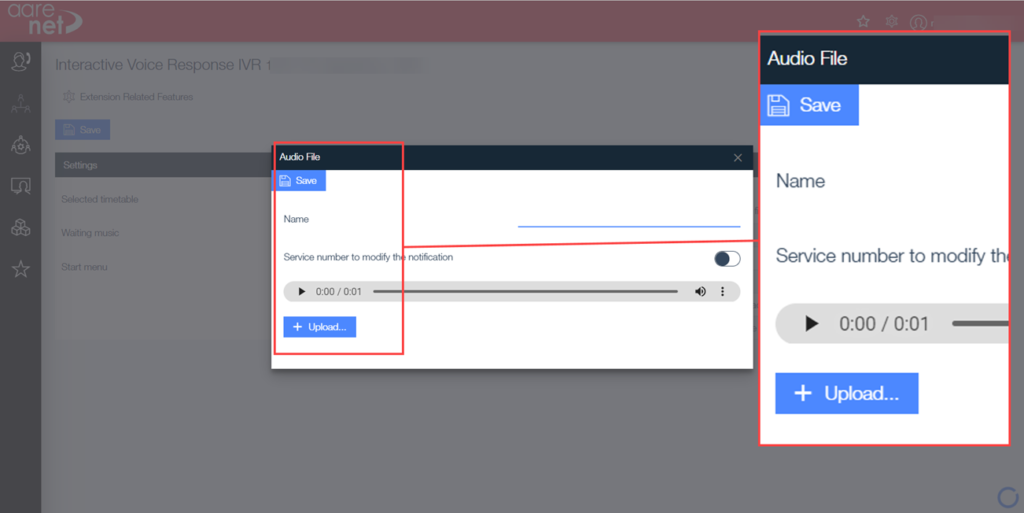
Within the IVR menu, upload an audio file to be used as a greeting message for the Voicemail Center. To do this Click on the +New button on the Audio Files menu:
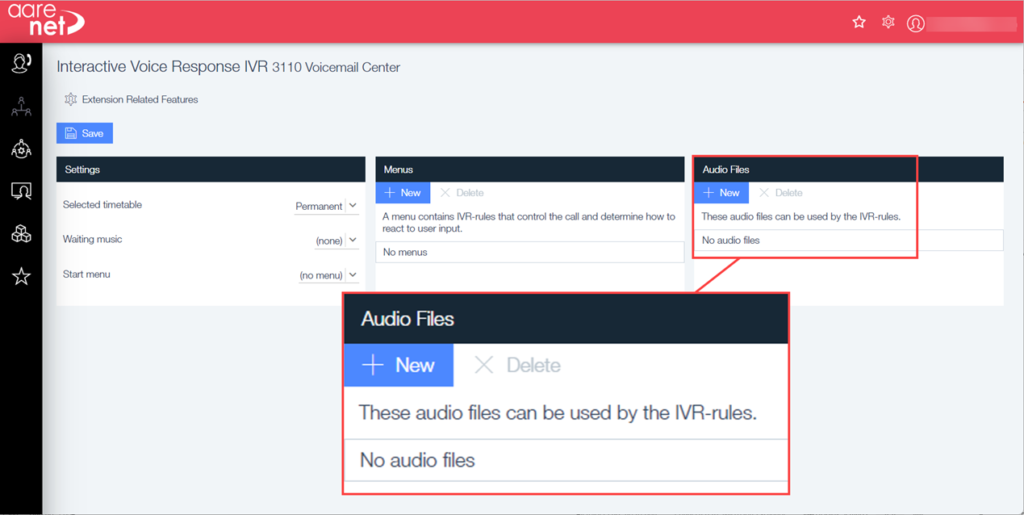
This will open a pop-up where a greeting can be added:
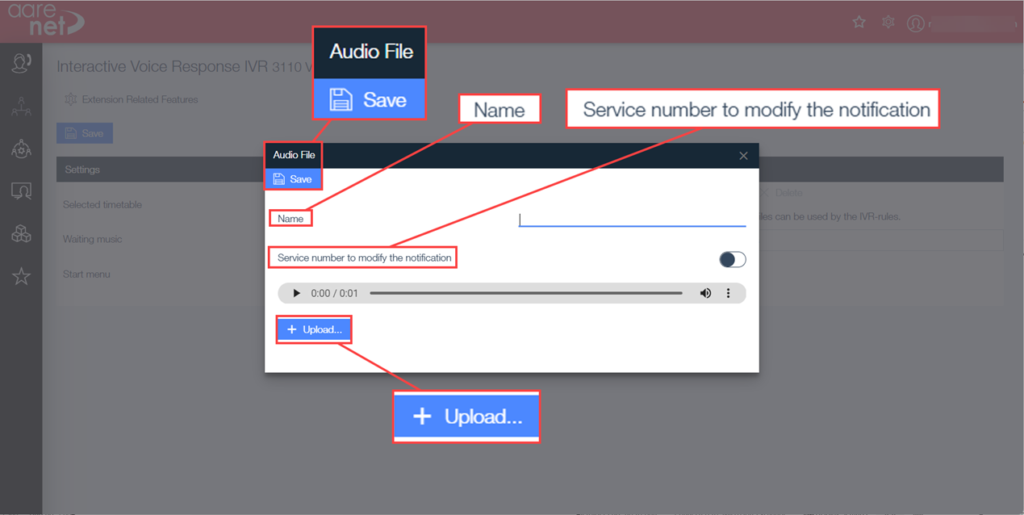
You will need to have a file in your storage for this, click on upload, this will open your file storage. From here click on the file that is to be added. Now click on Save at the top left of the box.
The greeting should be something like “This is the Voicemail Center. To check the voicemail of an extension, please dial the extension number followed by the * key.”
The audio file can be a .wav file. Do not forget to give this file a name.
When this is successfully added it will show in the list under the Audio Files menu:
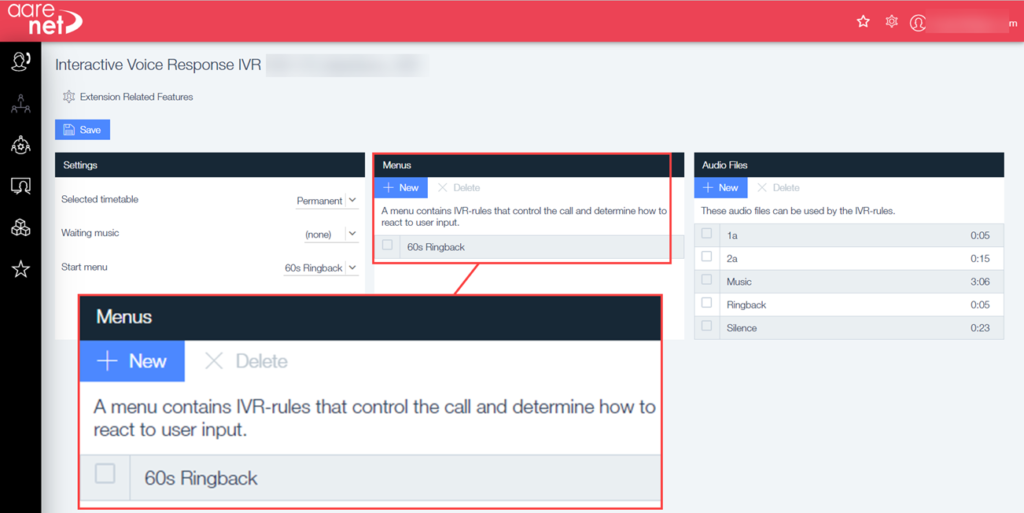
Now a new IVR rule will need to be set.
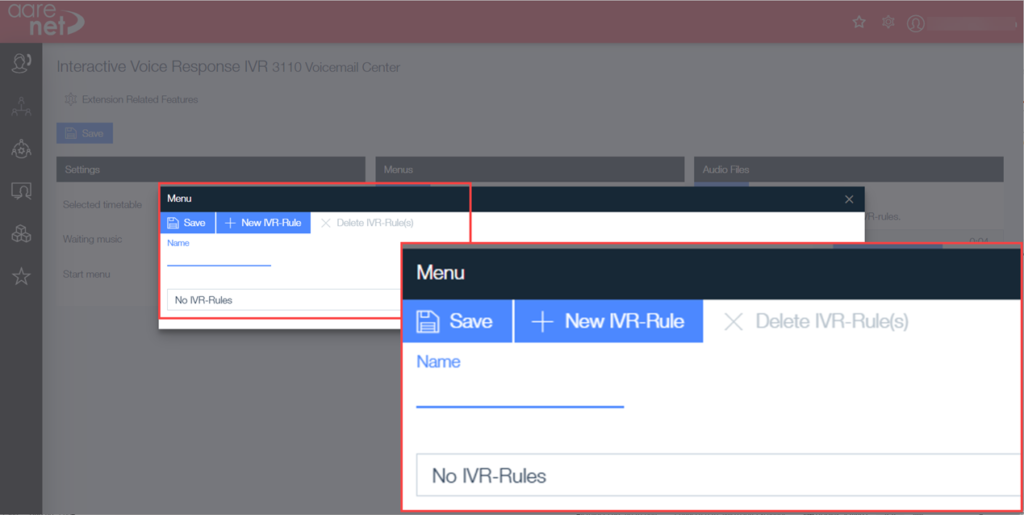
To do this click on the option labelled Menus (center box on the page we added the audio file) and click on +New this opens the settings for the menu, click on +New IVR-Rule:
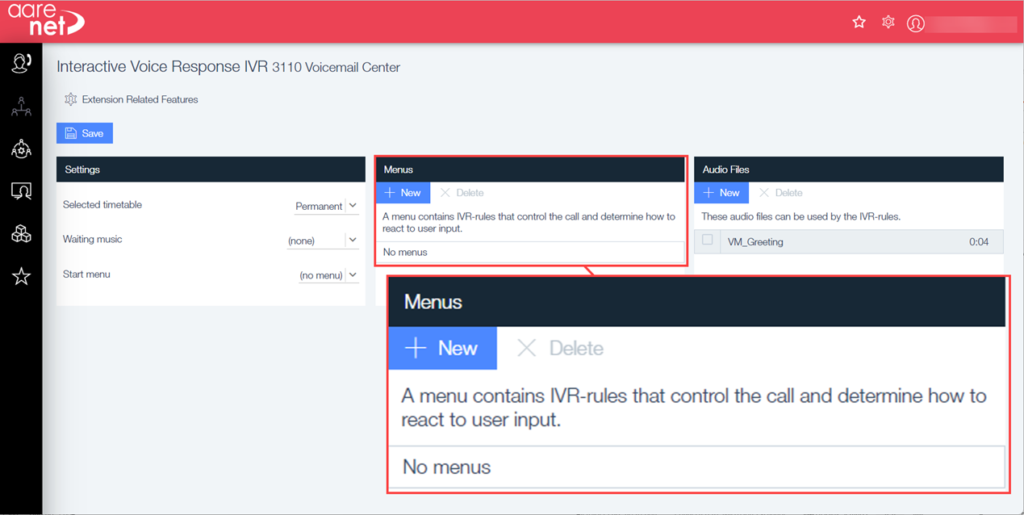

Firstly, give the rule a name, then click on +New IVR-Rule.
The new IVR-Rule will need to be set with the following specifications:
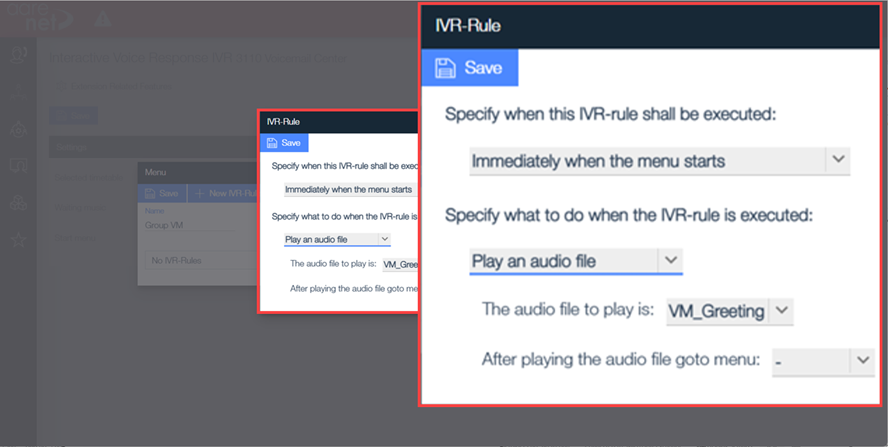
This rule will play the uploaded Audio File immediately when the menu starts, and after playing the audio it will go to the next step. Save the rule when done.
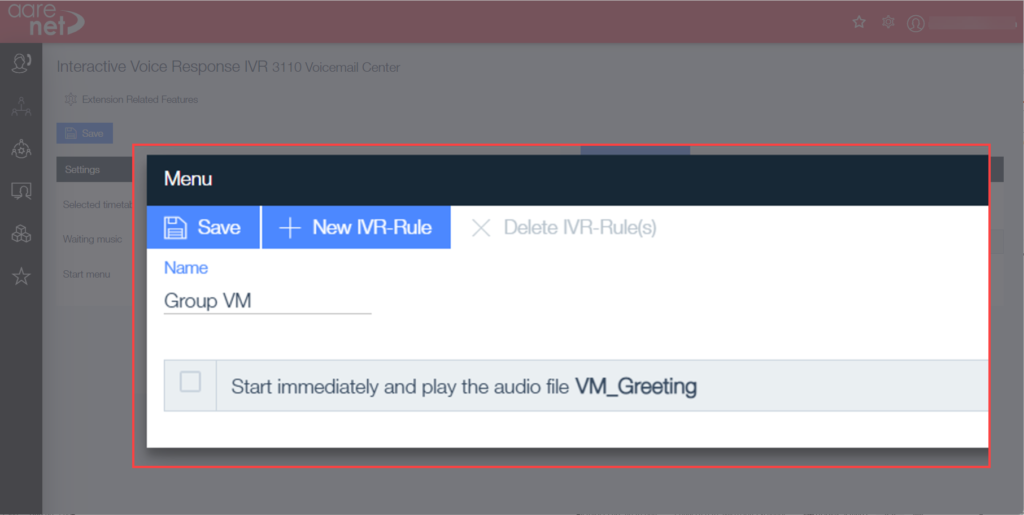
This will now appear in the menu:
Once this is added, another IVR-Rule with the following Specifications will need to be created:
Click Save.
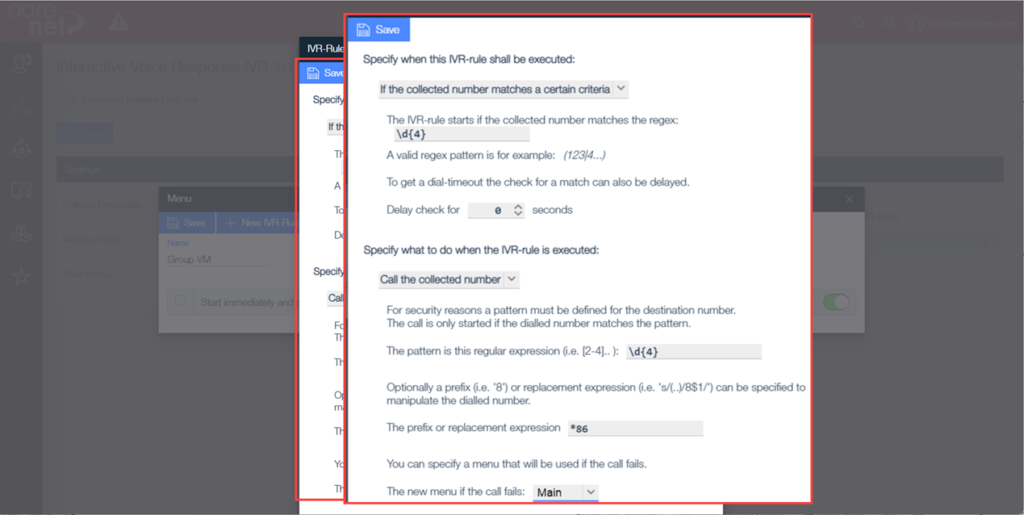
This rule will collect 4 digits from the caller. It will then add the *86 (voicemail) prefix and call the collected number with the prefix. If the call fails, it will route back to the start of the menu.
Note: After the caller dials the digits they will still have to enter * to get to the voicemail inbox of the extension, if they miss this step, it will just leave a voicemail on that extension.
In the Rule Menu again create another IVR-Rule with the following specifications:
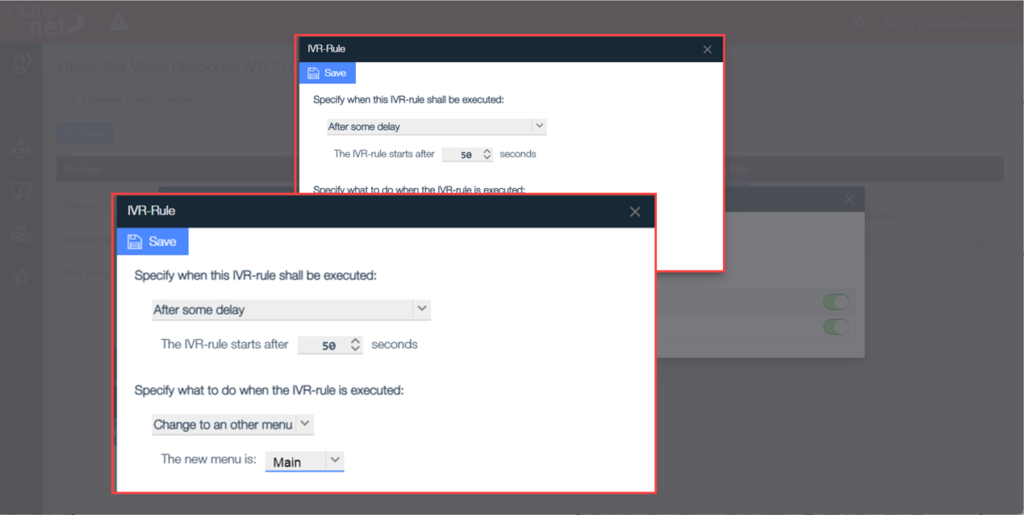
This rule is to replay the main menu if there is no activity for the set amount of time. In the IVR settings, change the Start menu to the menu that you just created then click on save.
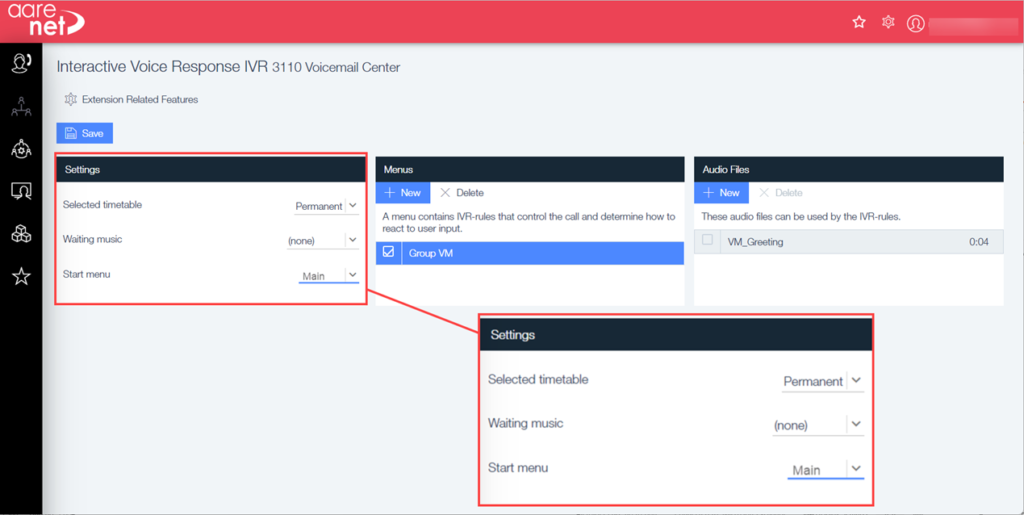
Note: In order for an extension to have a voicemail, an email address needs to be configured. An extension with a voicemail will have a Voicemail Box setting box in the Extension Related Features page.
From the IVR page click on Extension related Features:
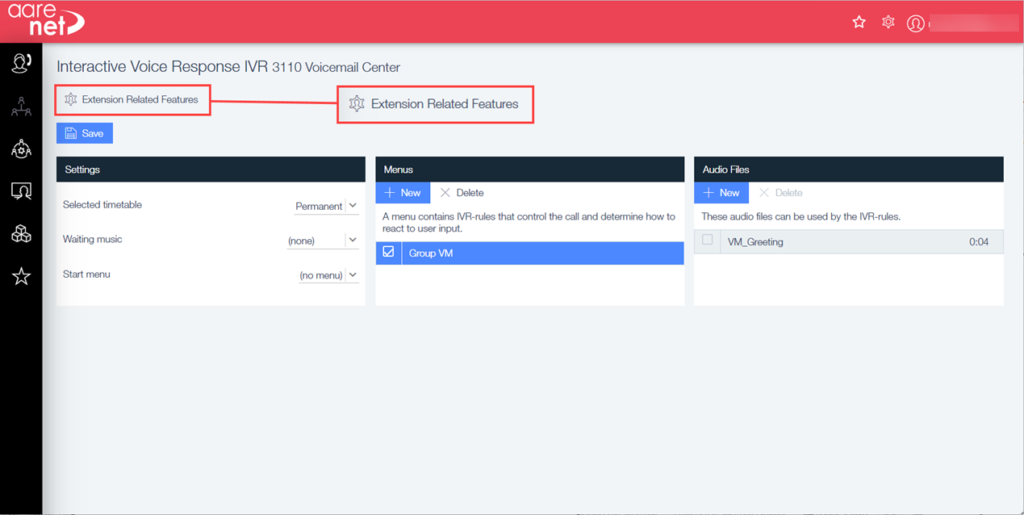
This will open the menu screen for that extension.
To directly access another extensions voicemail from a phone, dial *86<extension number> then, when the voicemail prompt begins press* to enter the PIN.
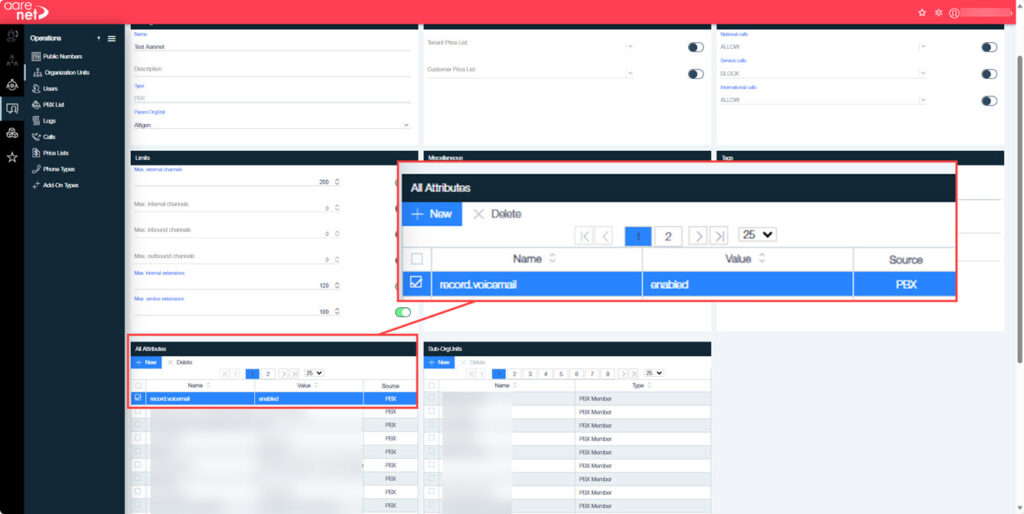
Call Recording
Inside the PBX the administrator will have the ability to turn on the call recording to voicemail feature.
Firstly, from the list available select the required PBX.
Now click on the Operations icon on the left-hand menu:
- Operations icon.
- Organizational Units
Once in the Organizational units screen there is an option for All Attributes:
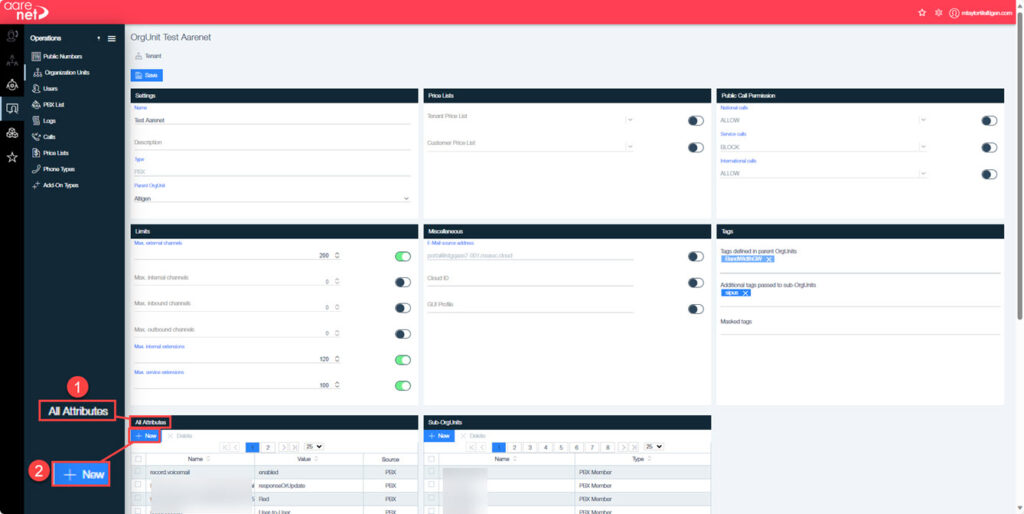
Choose + New (shown above as item 2) this will open a pop-up box:
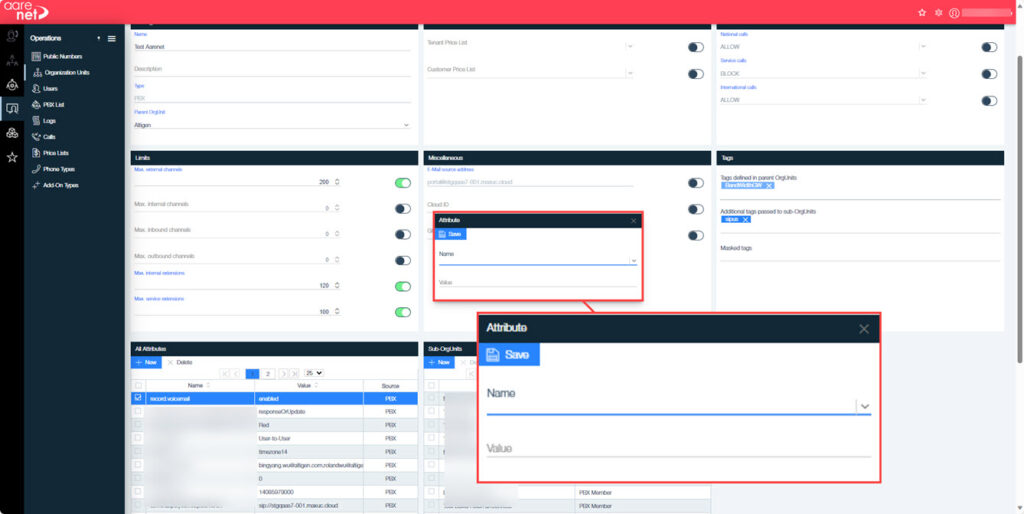
Type the name in here as record.voicemail and type enabled in the Value field then click Save.
This will now show under the attributes:
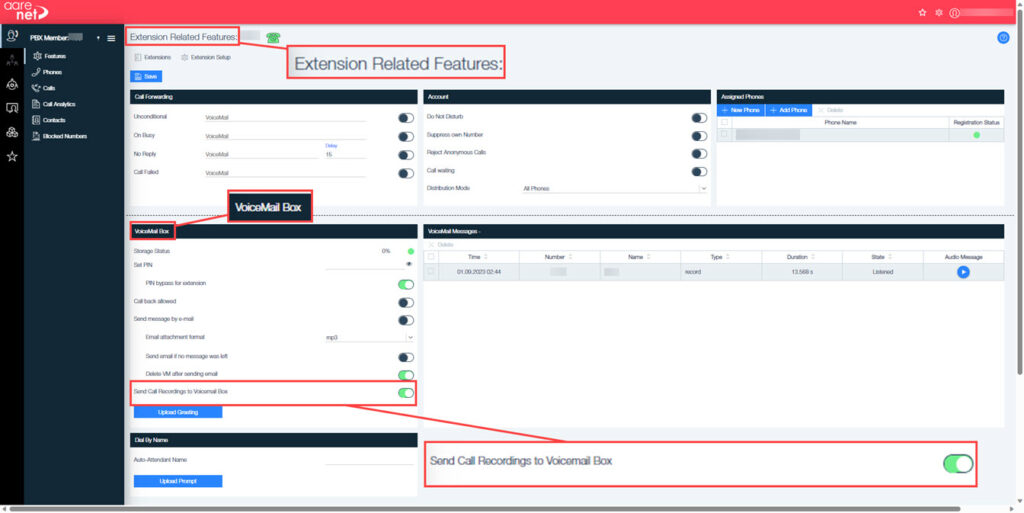
It is also possible to turn on/off the ability to record calls per extension. This is done using the below steps on the users extension number
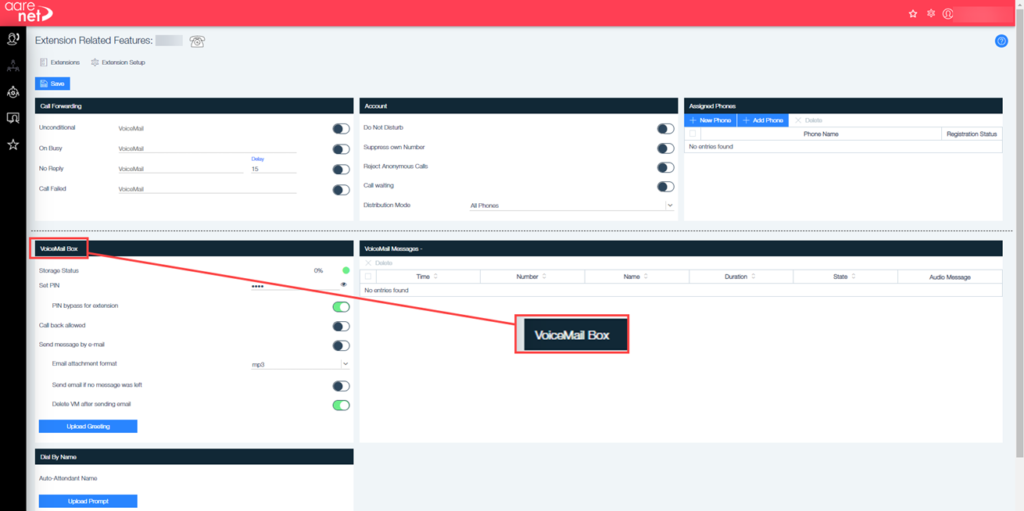
Under the extension related features there is a box titled VoiceMail Box.
On this list there is an option to: Send Call Recordings to Voicemail Box, toggle the switch to the right to enable (it will show green when it is enabled)
Assigning a phone
Polycoms
There is more than one way to setup a Polycom phone to the extension, for best service the end user should factory reset the phone before this process.
IMPORTANT:
Please note that the minimum firmware version for a VVX is 5.9.6.2996.
Also, please note that a Polycom phone can only be registered to one company.
Factory Resetting A Polycom
- Have the user, on their Polycom phone:
- Press the button on their Polycom that looks like a house
- Using rotary dial, just right of 3 buttons, scroll right and down till on Settings
- Press Center button on rotary dial for select
- Type 2 for Administrator
- Press 4,5,6 on dial buttons, unless you have modified their admin password
- Click on enter key at screen bottom
- Have them type slowly 1,5,5. Screen should say at top reset to Factory. Are you sure? have them click on Yes
Provisioning with ZTP
If you have licensed and provisioned for Polycom’s Zero Touch Provisioning, this next section is for you.
- Have the user gather the mac address from their Polycom
- Method 1: Is to read the label on the bottom of the phone. It will begin with either 0004f2 or 64167f
- Method 2:
- Press the button on the Polycom that looks like a house
- Using rotary pad, scroll right and down until on settings
- Click center button to select
- Type slowly on dial pad 4 1 1
- Your phones IPv4 address and mac (S/N) will be provided
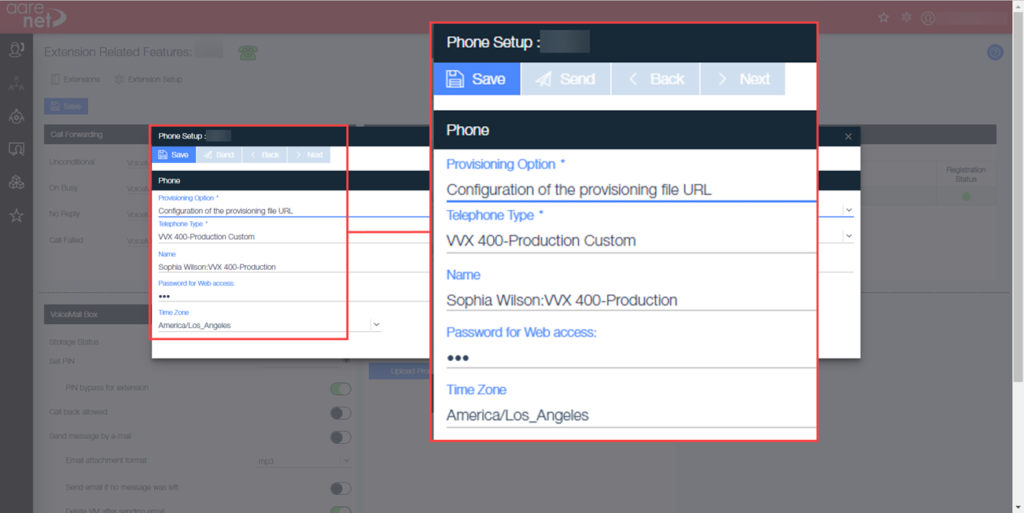
- Within your MaxUC administrator client, in extension related features, click on ‘+New Phone’
- For provisioning type, select Auto-provisioning
- Select the appropriate Telephone type
- For name – keep as is, or manually enter what you wish to display in line on Polycom display
- Enter password for Web Access. This should be 456 unless your IT admin has changed this value
- Enter the phones mac address in MAC address field. (Gathered in previous steps)
- Select appropriate Time Zone
- Click on ‘Save’
- Have end user factory reset phone
Config using Provisioning via URL
Much like the process for setting up a phone with our legacy system, you will need to access the device GUI and enter a string manually that is provided via this method. As well, your network DNS will need to be able to be able to locate the server via FQDN.
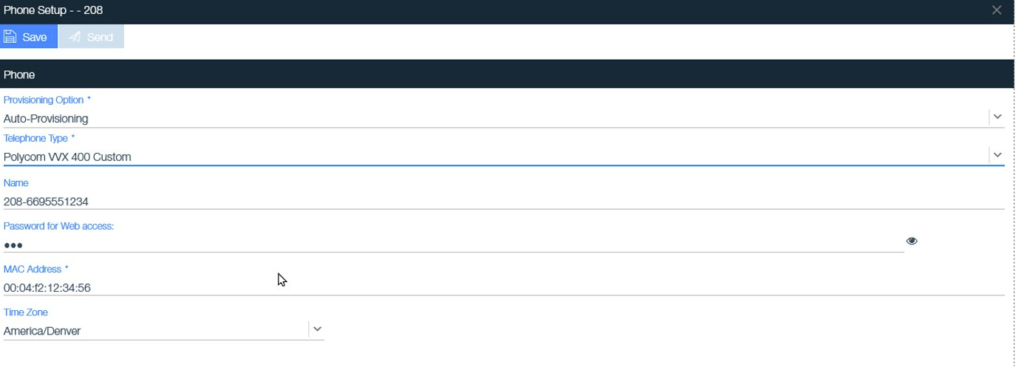
- Click on ‘+New Phone’ (Add phone does not add a device to the extension)
- For provisioning option – select “Configuration of the provisioning file URL“
- For Telephone Type – select the Polycom type that closest represents your phone
- For Name – keep as is, or manually enter when you wish to display in Line on Polycom
- Password – should be 456 when factory resetting a phone, unless that has been changed previously. It must be the same as is set for Administrator access to your phone
- Select your Time Zone
- Click on ‘Save’
- Clicking on the ‘Send’ button will send an email to the user’s password that is setup in the Extension Setup e-mail field. This information will be the same instruction that you will be provided with when you click on the ‘>next’ button
- Click on ‘>next’
- Save the information provided to a text document
- Factory reset the Polycom (Covered in a later section)
- Open the web-Gui. Hover over the settings, then Provisioning Server
- Left click with Mouse
- Change the server Type fields to HTTPS
- Paste the string provided in the server address field
- Reboot phone
If there are no restrictions in your network, and the device can reach the server, provisioning will occur.
This section is for systems that are licensed, setup, and ready for AnConnect browser.
Handling VM
From within the screen there is a dialog box Called VoiceMail Messages. Messages can be played/deleted, etc.
From a Phone or device, dialling *86 for your extension or *86 + extNum while ON-Hook, then going off hook will put you in the VoiceMail menu.
Following the voice-prompts, you can Record/Modify your Greeting, listen/delete Voice mails, or call the caller back, if the option Is enabled for your extension.
Extensions as IVR
IVR within the MaxCloud system is done via Extension. So, once you have added an extension in the system that you wish to utilize as an IVR, you will begin setup.
Go to the PBX menu, in here you will see extensions. Click this:

A list of extensions will now show, either alter one already there or create a new one:
If creating a new extension, complete the information requested. For this example, the extension used is already created.
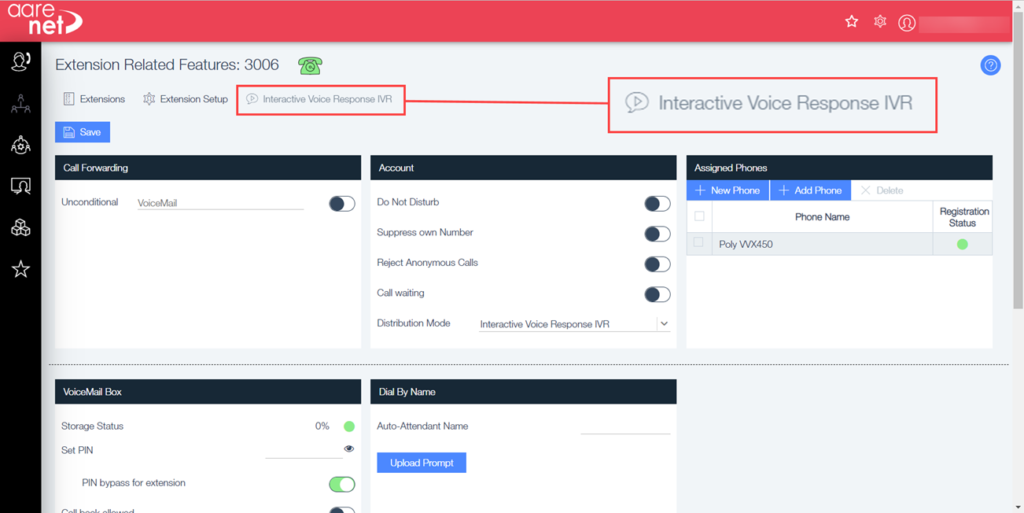
In Extension Related Features, under the account setting box is Distribution mode:
This needs to be set to Interactive Voice, to set this click on the drop down and select the Interactive Voice Response IVR option:
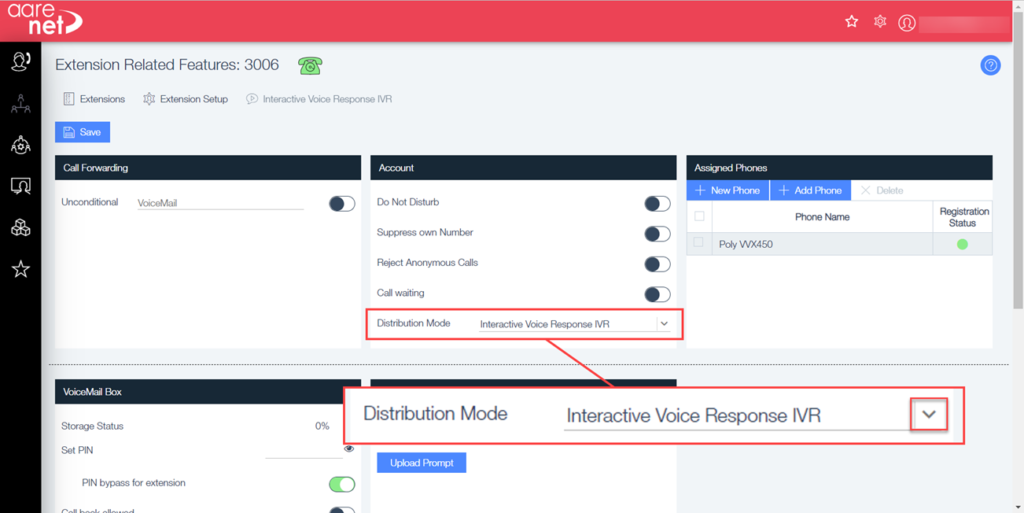
Click Save. Now an IVR feature will show below the phone at the top of the screen:
IVR functions:
- Use timetables
- Can have prompting or music
- Can start at specified timing after call start
- Can perform function on key press
- Can match on data entered by the user
- Can release the call based on input or by setup
- Can forward to another AA/Queue/Extension
- Can function as a Park Key
- Most importantly, can do any/all above in litany of combination
Adding an Audio file to the IVR
Click on the IVR option on the top of the page in Extensions, this will open the view of the settings for the selected IVR:

- Under Audio Files heading, Click ‘+New’
This will open a window where the audio file will be added:
- In the new window, name your audio file
- Now, you can either dial *81294 on your phone and go off hook, recording your own custom phrase, or you can upload an audio file. (MP3 or Wav-Ulaw) This will open your file storage for you to choose a file.
- Click on ‘Save’
- Repeat for as many files required
IVR Rules
Next you need to create some rules for the IVR so it knows what to do with these audio files.
- Under Menus Block, Select ‘+New’
This will open a pop up asking for the name the rule. Once named click on + New IVR-Rule:
- Name the Menu Action (e.g., business, group, expected action, park 2)
- Now click on ‘+New IVR-Rule’
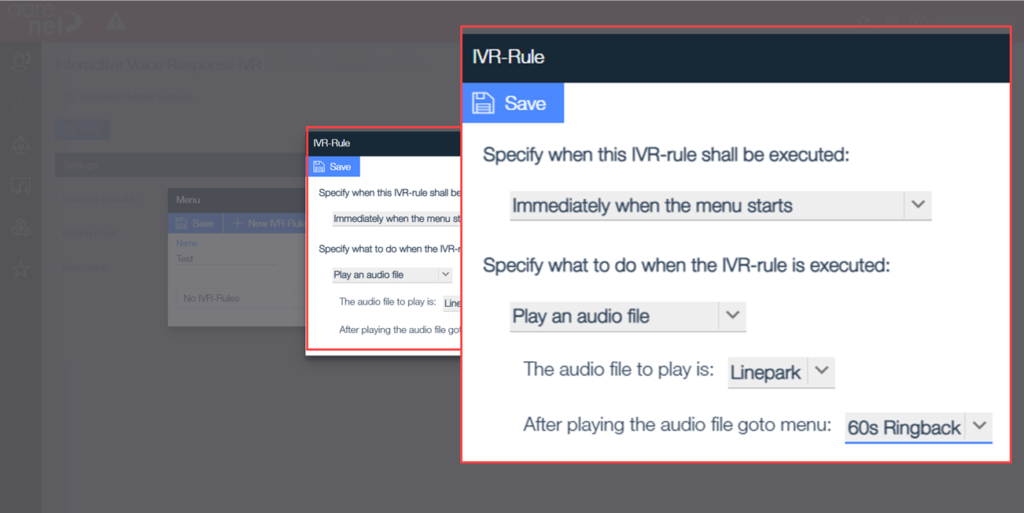
- First specify when the IVR Rule is executed. This example is set for immediately.
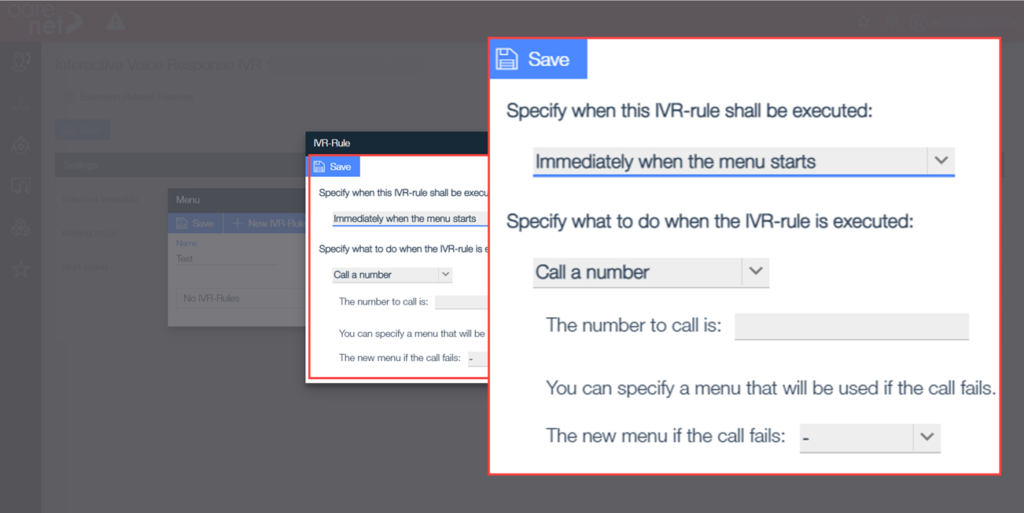
- Then specify what to do when executed. This example is a Park Key, so it will play an audio file.
- Since this will be playing an audio file, an option becomes available to select the audio file. For this example, the audio file that was just imported is being used.
- The last option is to select what to do when done playing. In this example, let’s get the system to repeat the action, therefore looping the music, so I will go to the menu, and select the menu option that was created.
- Now click on ‘Save’
- Many more layers can be added here layers, depending on how in depth the customer requires this feature or actions to take next.
- Click on ‘Save’
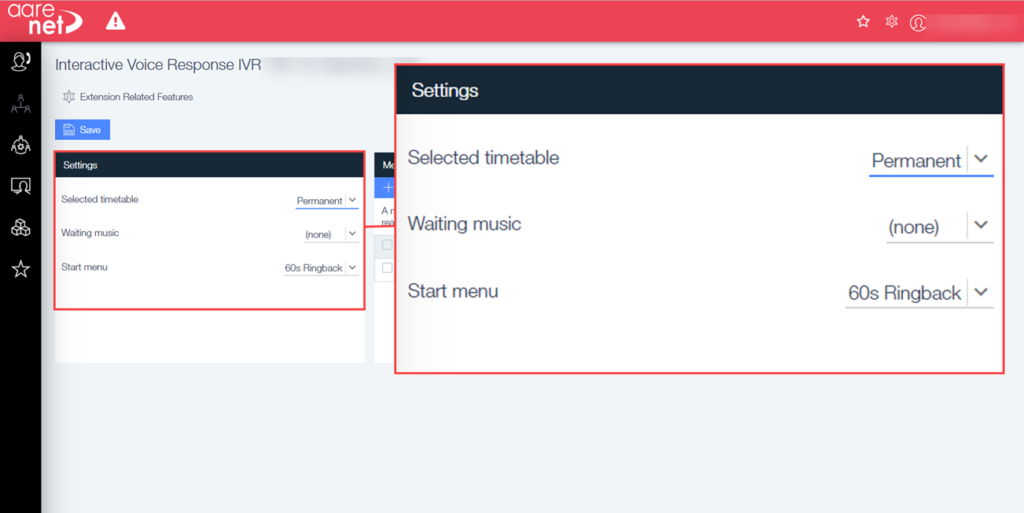
- In the Settings Block, Select a timetable that this IVR should function in. Since the example is a park key, it should always be available for users so, simply select Permanent.
- As this setting requires Waiting music to be an option, A music file will also be added.
- Selecting a Start Menu item is Mandatory. Any of the menu items created can be selected here just ensure they are relevant to the plan. In this example, since there is only one, the selection will be park 2.
- Click on ‘Save’
- TEST and Adjust.
Extensions as call distribution
To add an extension as an advanced call distribution, choose the PBX then navigate to extensions in the menu:

- Add the extension – See adding an Extension. (You could also choose an extension already created)
- In the Account block, change Distribution mode from All Phones to Advanced Call Distribution ACD:
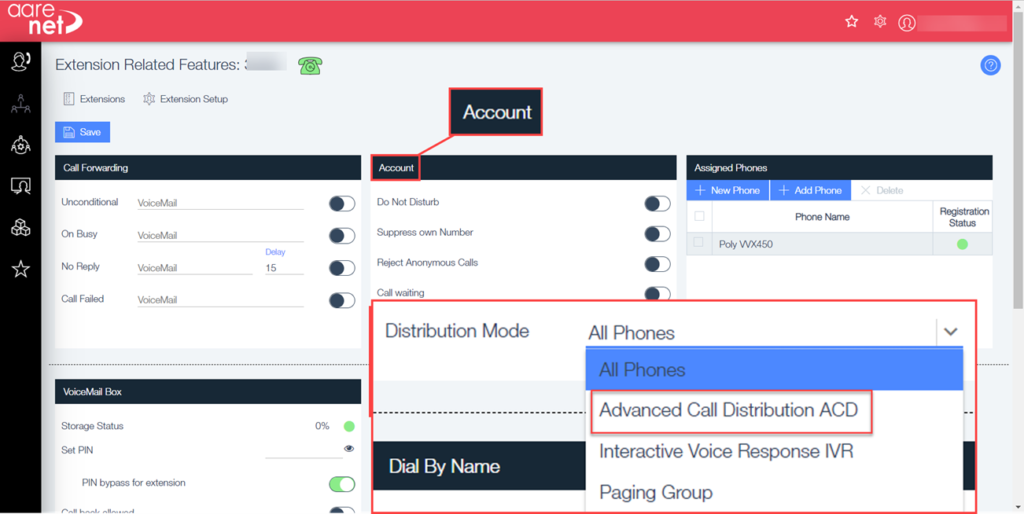
When this is selected, the top menu should change to include the Advanced Call Distribution ACD:
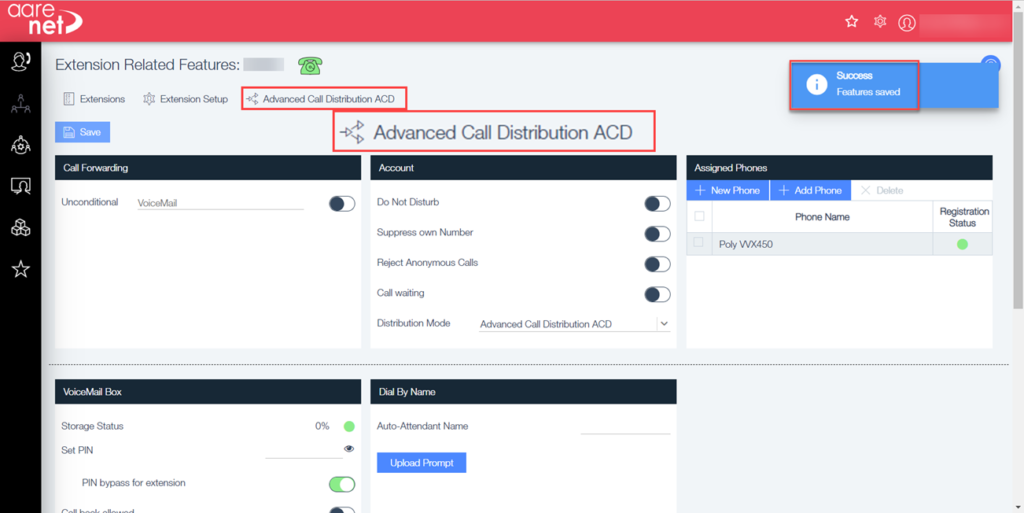
- Click ‘Save’
- Click on the newly created Advanced Call Distribution ACD button near screen top.
Remember when making any changes to press Save. Above you can see that it was saved as the success message is in the top right of the screen.
- To add audio file(s) in the Audio Files block of the screen click on ‘+New.’
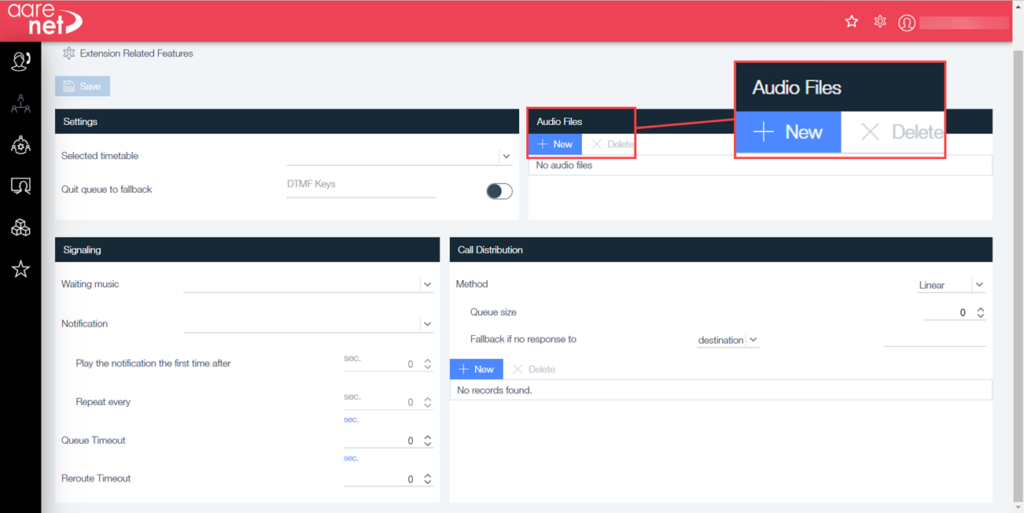
This opens a pop-up box for the addition of the audio file.
- Name your audio file as you intend to use, such as “call important to us”
- Either dial in the code presented in the screen and go off-hook to record an audio message or click Upload to import a file. (MP3 or Wav-Ulaw.)
- Click on ‘Save’
- Repeat for as many audio files as needed by your distribution list
- In the Settings block, select a timetable that you will use this Distribution ACD in
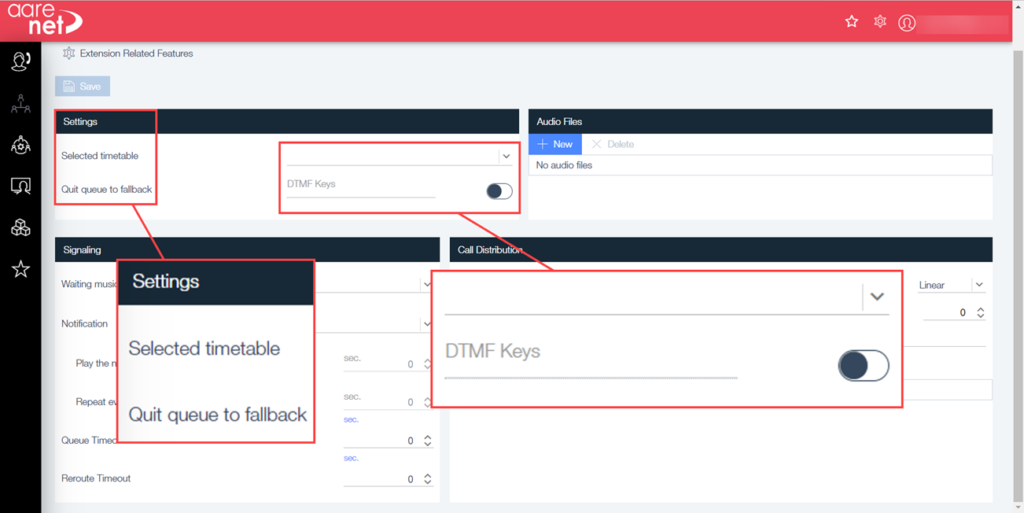
- Now we action items based on the multiple Time-bands that we built earlier in Timetables. If you forgot to add some and need instructions, check the first section of this guide.
- For the Off hours, the system can be set to simply play a prompt stating that the office is now closed. For courtesy if they did not hear it, or are holding the line, this can be set to repeat every 15 seconds
- Optionally, within the call distribution block, click on New and forward to an outside number or extension, which could be an IVR for handling
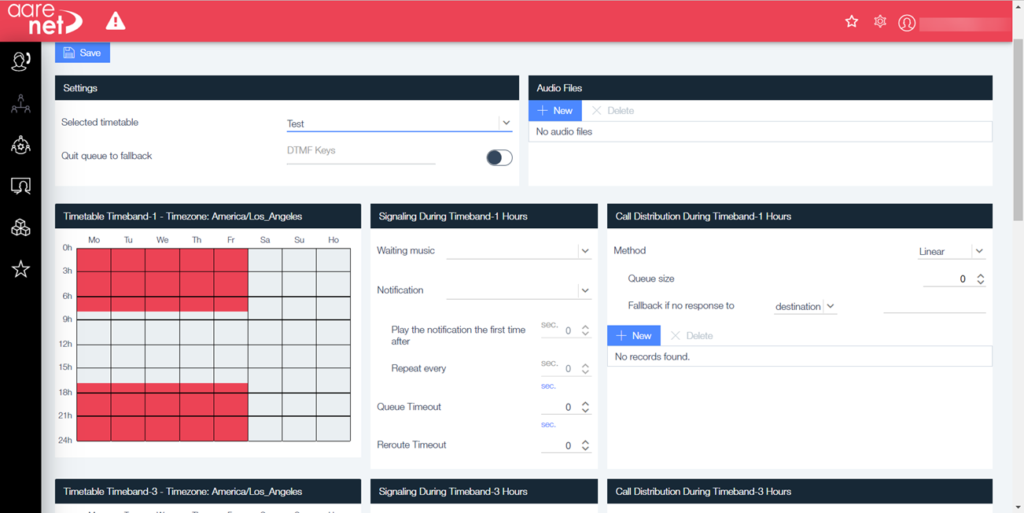
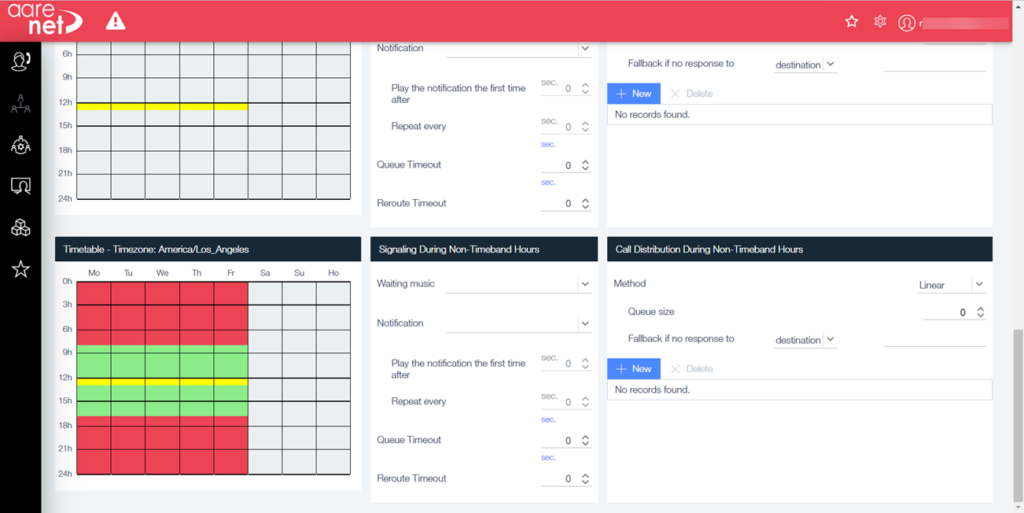
Each time band that you set will have a section in this page. On this view only see the closed hours are visible but, if you scrolled down, you would see the other two- time bands that were set earlier.
14. During Business hours- The system can be set to play waiting music, play a notification to the user that their call is important after 30 seconds, and repeat every 60 seconds that they are in queue. This example uses a linear hunt method for ringing users. In this example there is only one operator present, but they have 2 different phone types logged in, so the system can even ring one phone for the user, then try their other, then their cell phone, in that order by setting the order to linear. Add the numbers to use by clicking on +New in the Call Distribution Menu for the Time Band requiring the action.
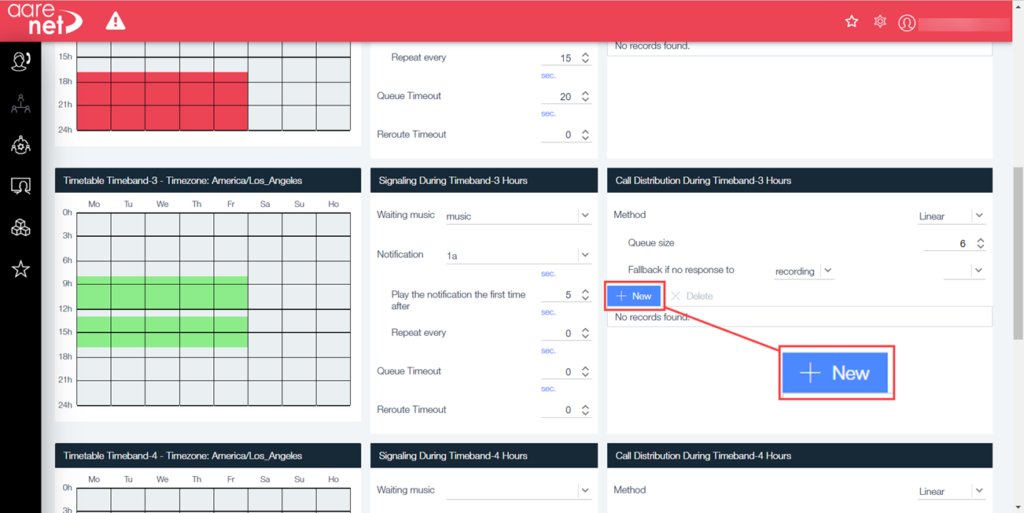
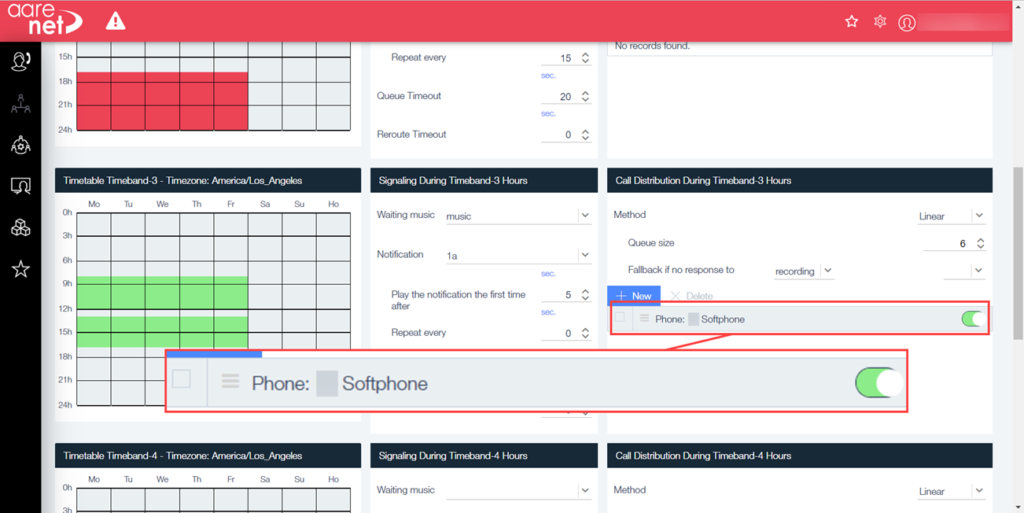
This opens a pop up asking for a number or a phone:
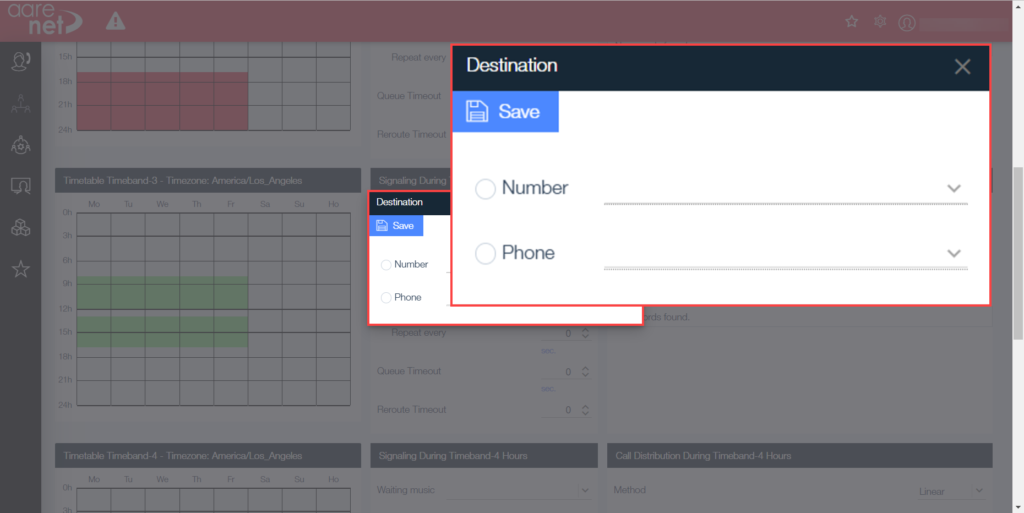
Choose between calling a number or a phone then click save. It will now show in the box with a toggle to turn it on/off:
15. Now we account for what to do with any timeline that we did not account for, grey areas. — The recommendation here would be simply playing a message that it is the weekend, and we are not available. (Remember you can upload Audio files following the steps as before)
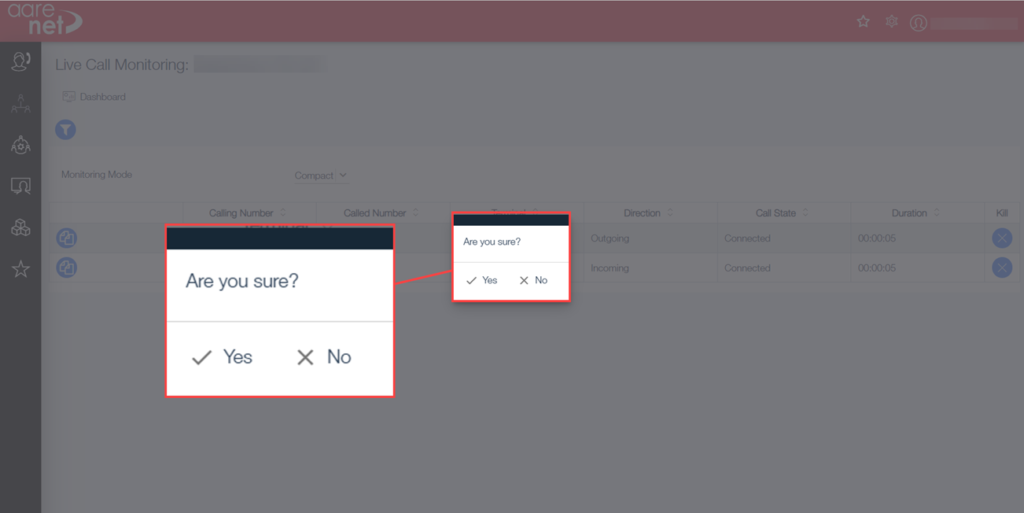
Kill command
Within portal UI, system and Tenant Administrators can kill any PBX call whether it is active or hanging and release its resources.
To find the live calls, use the left-hand menu and in the PBX, menu click on Live Calls:

This will open the list of live calls.
NOTE: Only an answered call can be killed. If the call is unanswered, it will still ring after clicking Kill.
There is an option to the right in the columns to Kill. This will disconnect the call:

A pop up will appear asking if you are sure:
Breakout of an Advanced Call Distribution ACD Queue as a Caller
A caller that is held in an Advanced Call Distribution (ACD) queue can breakout to the fallback destination of the ACD by pressing defined DTMF digits.
This needs to be enabled to allow this an appropriate audio file uploaded to tell the caller how to fall back to the menu.
Under the extensions look for the ACD that this feature is going to be placed on then click on the line (from the list view of extensions). Next click on the Advanced Call Distribution ACD in the top left of the screen.
This will open the extension related features for this number:

In Settings, toggle the switch to the right to turn on this feature.
Select the timetable that is to be used with this feature.
Next select the keys that will be used to return to the menu. These should be the same as described in the audio file that will be used in conjunction with this option.
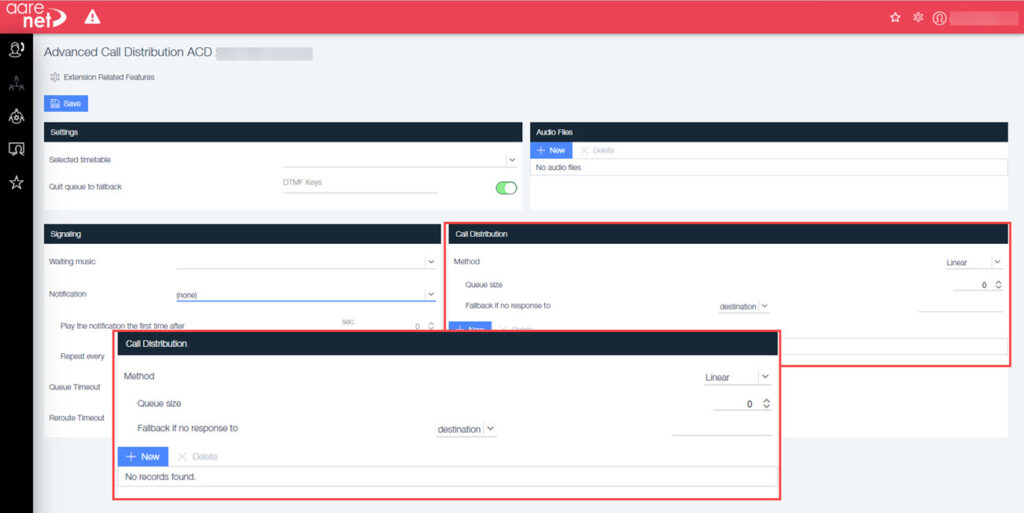
Add the audio file to be used, then under Call Distribution choose if the ‘fallback if no response to’ should be a destination or a recording.
Once this is all completed click save.
The caller does not have to wait until the queue timeout has expired to leave a message
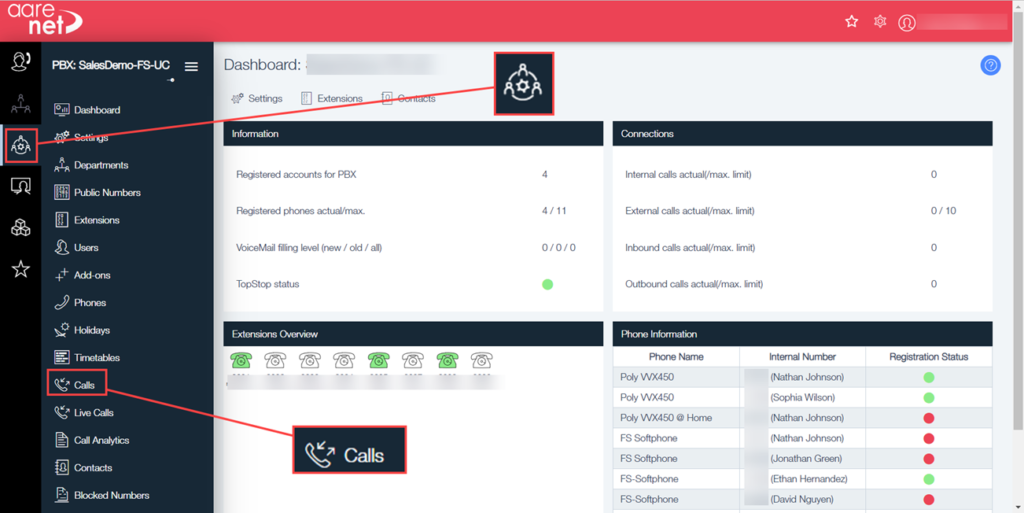
PBX Calls Logs
Navigate to the Calls menu, to do this click on the PBX menu icon then click on calls:
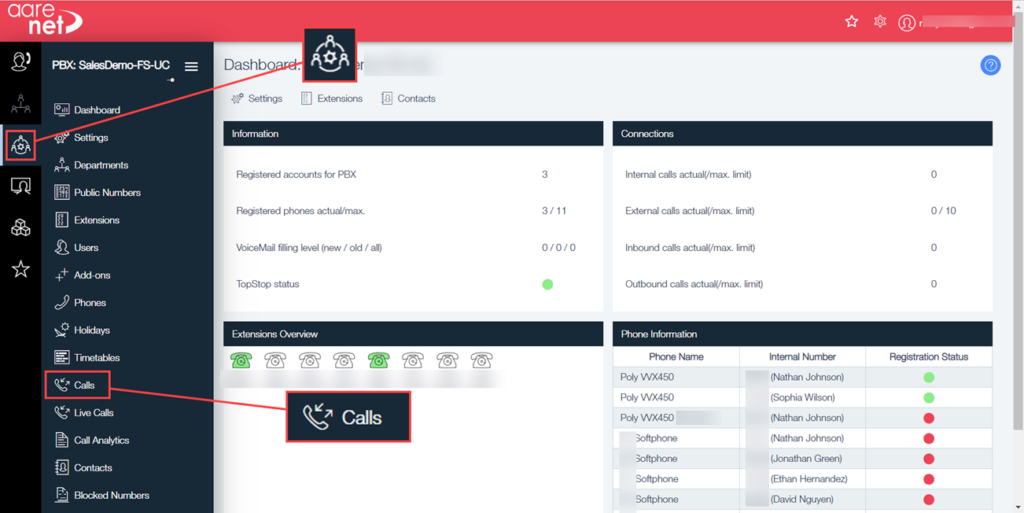
This will open the calls list:
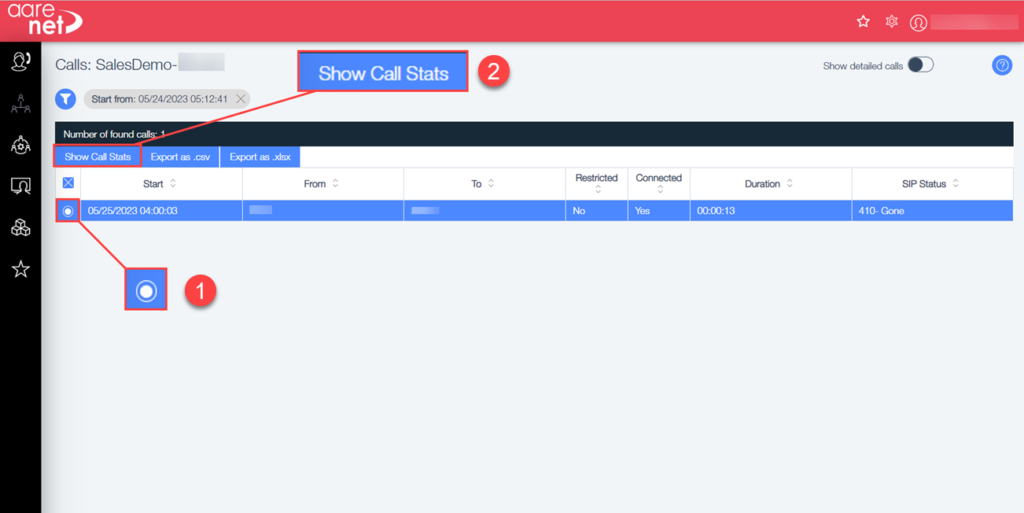
- Click on the box to the left of the number that the logs are required for.
- Click on show call stats.
A pop up will open showing the Basic info for the call followed by the technical info, then the quality info:
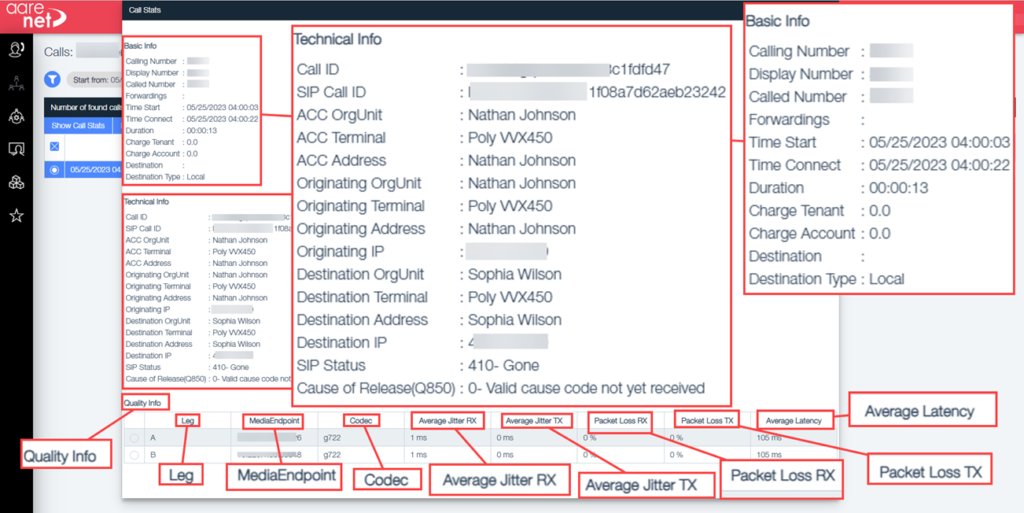
Information provided:
- Calling and Display number
- Called Number
- Start/Stop Duration, charges if applicable, Destination Type
- Call ID – This information is organic to the system and is searchable within logs
- SIP Call ID — This would be the same as the information provided within pcap
- Originating/Destination Ips if applicable
- Sip Call release status and Cause (Q850) if applicable
- Codec/Jitter/Loss as the leg provides.
Use the filters to help find the call if you have a large set of logs, you will need to know at least the number that the call was routed to or the number it was from.
There is also an option to do a SIP Trace, follow the steps below:
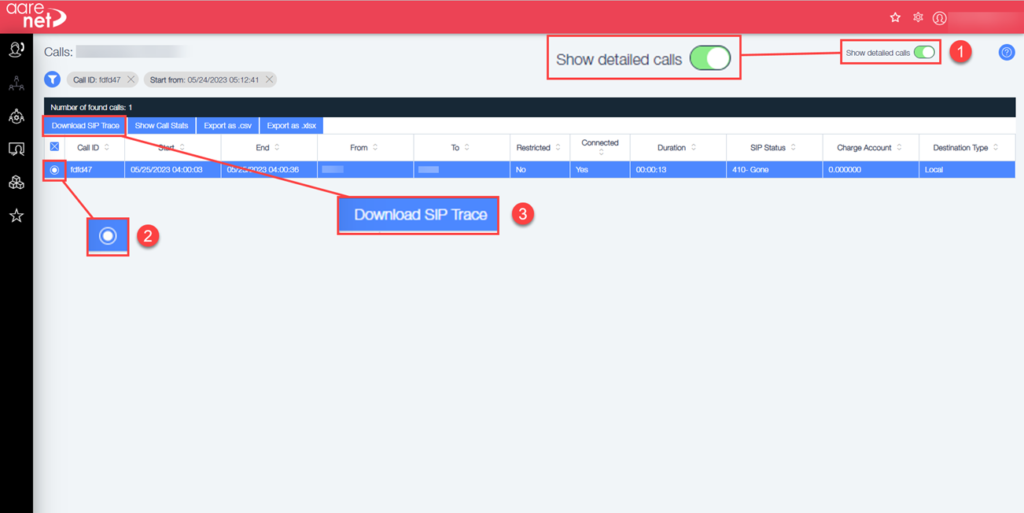
- Switch the toggle to show detailed calls by clicking the toggle.
- Click the box to the left of the call you want to check.
- Click on download SIP Trace.
This will download a trace.pcap file:
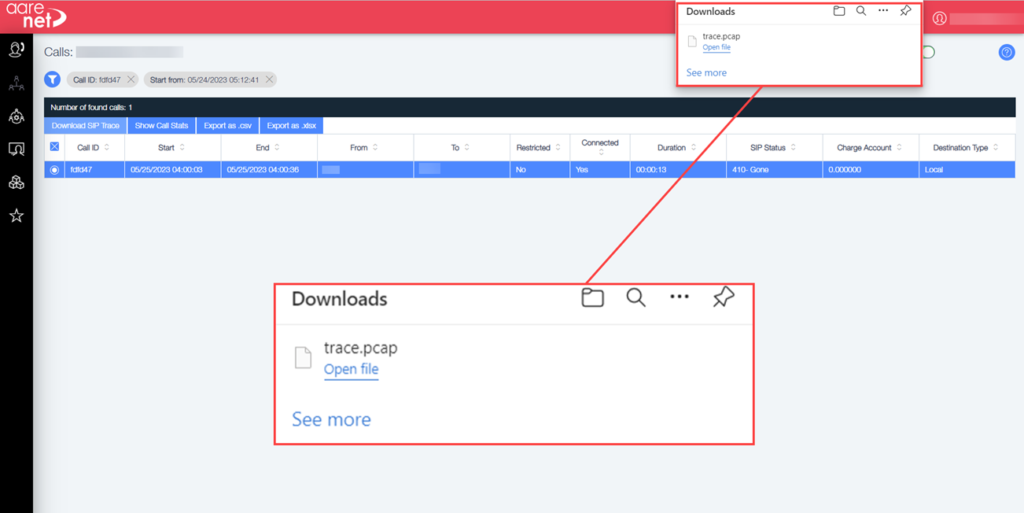
Click on open file then choose an app to open it in. Now these logs can be reviewed.
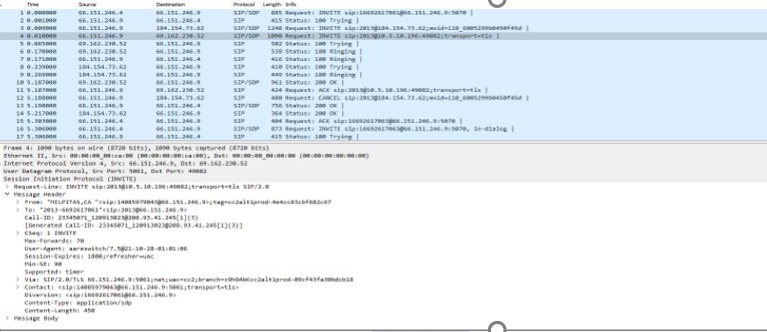
Note:
The PCAP does not include voice packets, but does traverse the entirety of the call. As well, note that the Call-ID matches with the pcap ID provided in the PBX Logs.
Call Reports
Call Lists
Within the PBX setting you can now view more detailed information on the calls logs. To do this go to your PBX then click on Calls:
This opens the list of calls, to the right of the screen at the top is a toggle to show detailed calls. The basic view is as below:
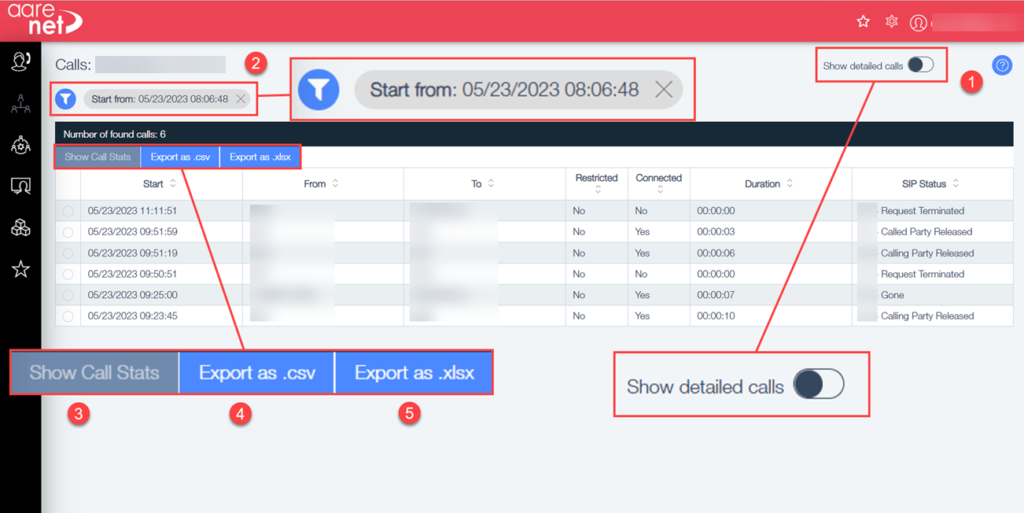
- Show detailed calls – Use this to get a more detailed report.
- Filters – Filter the dates for the report.
- Show Call Stats – This is the view you see when you navigate too here.
- Export as a .csv – Option to export the report once you have run it as a .csv file.
- Export as .xlsx – As above just a different format.
The view when the option of Show detailed calls is selected:

On both of these views there is an option to use filters.
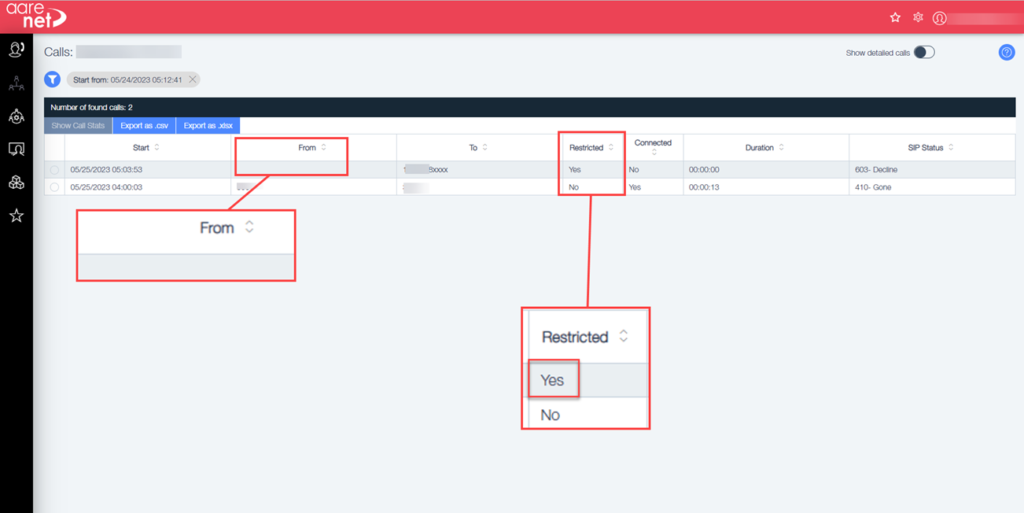
Anonymous Caller
Restricted Column
In the call view there is a new column that shows ‘Restricted’ , these are calls by anonymous callers, they will show with no information in the ‘From’ column and a ‘Yes’ in the restricted column:
Reporting
Go to the PBX menu and select Call analytics:
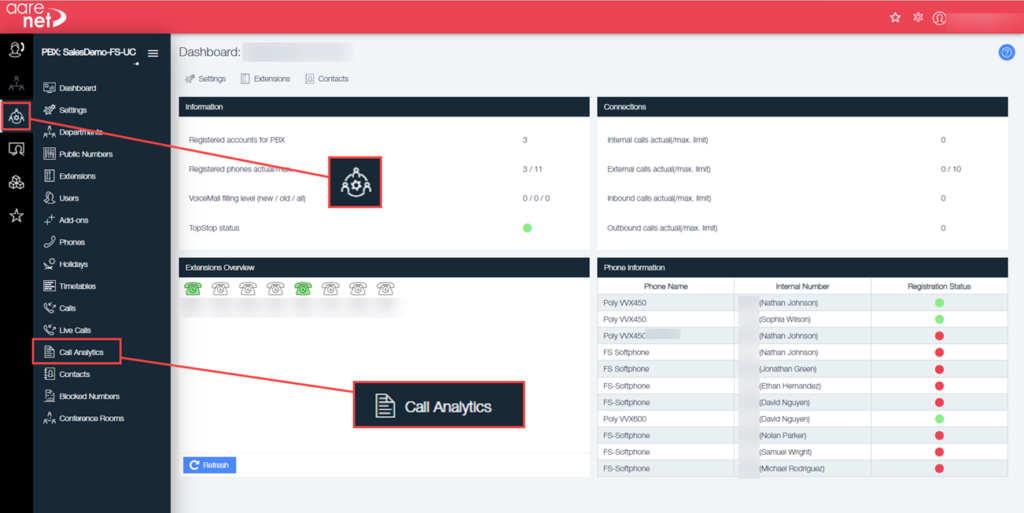
Now a screen will appear with filters for the report:
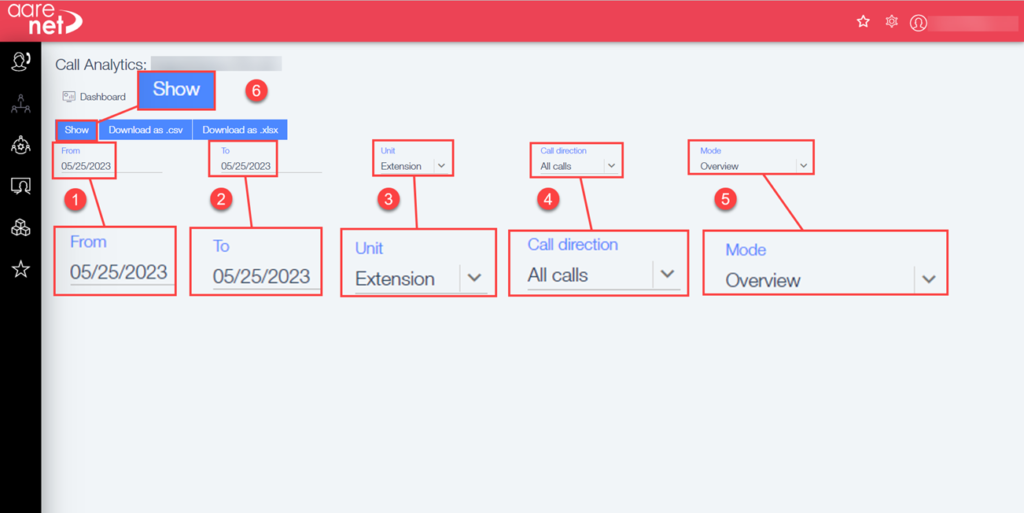
- Date From
- Date to
- Unit – Extension – Department or PBX.
- Call Direction – Incoming – Outgoing – All Calls
- Mode – Overview – Connected Summary – Connected Hourly – Not Connected Hourly.
- Show – Runs the report
Any of the available reports can be downloaded as a .csv or .xlsx file. They can also be viewed in here.
MaxCloud UC Outlook Add-in
With this feature enabled users can schedule a MaxCloud UC Meeting through Outlook.
These steps will only need to be followed once.
- Open an incognito window. input the URL: https://login.microsoftonline.com/{domainname}/adminconsent?client_id=5e814480-6cab-45c4-8fc3-19cb2e84a2b5&redirect_uri=https://uc.maxuc.cloud (replace {domainname} to your domain name.)
- Input Admin username
- Input Admin user Password
- Click Accept to consent
- Redirect back to the login page. Check the URL: https://uc.maxuc.cloud/?admin_consent=True&tenant=35af6c32-bbbf-477e-9014-2bd83802cac2#/welcome You can find the result of admin consent and your tenant id.
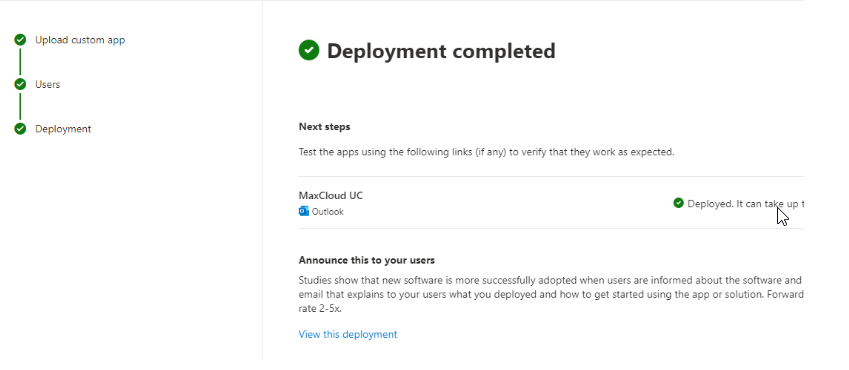
How to install – Please note that after installing it may take up to 24 hours for the add-in to appear in Outlook.
- Go to https://admin.microsoft.com/
- In setting/integrated apps
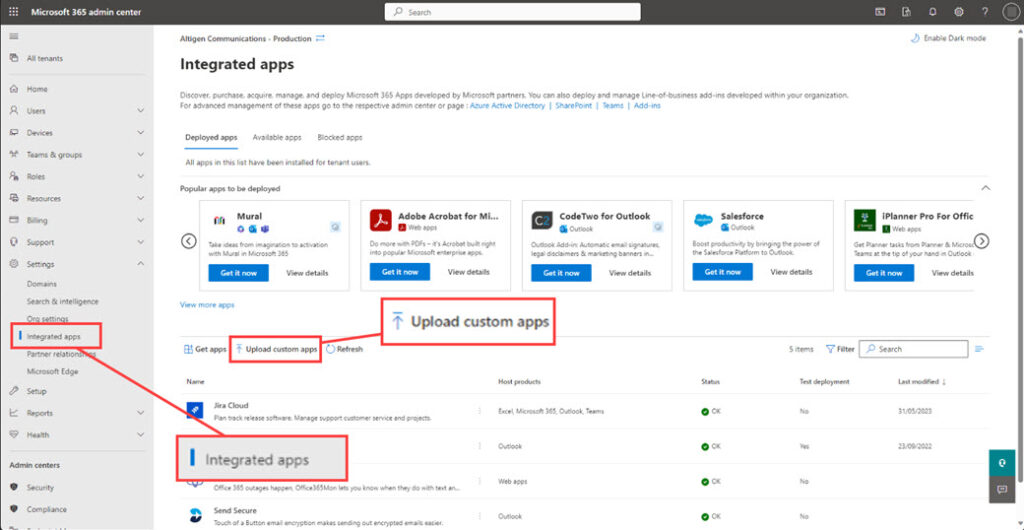
- Click on Upload Custom Apps
This will open a new window.
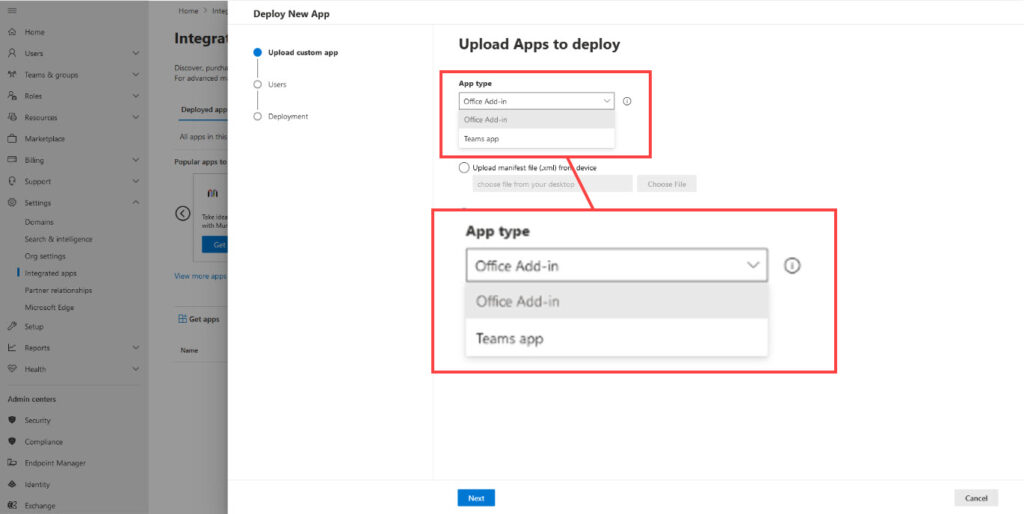
- Use the drop-down options in App types to select Office Add-in:
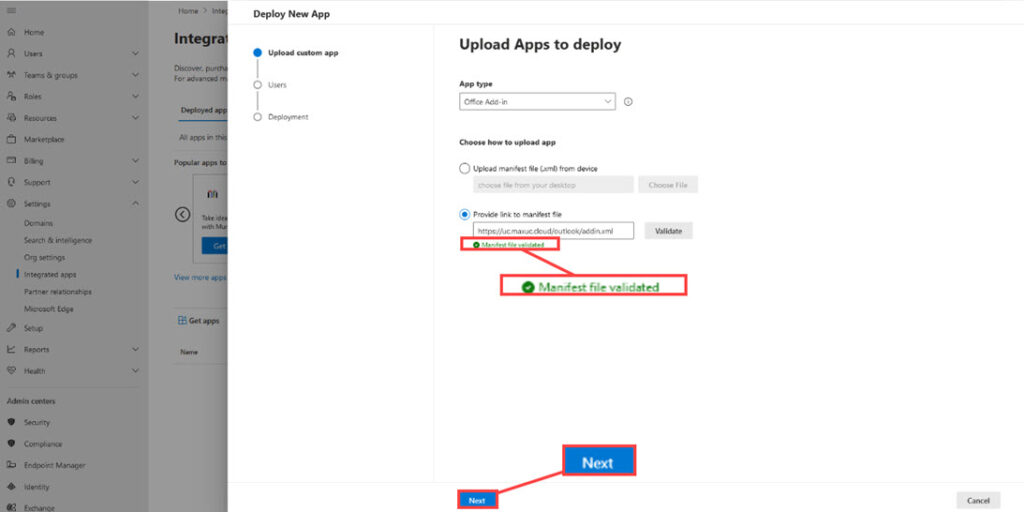
- In the box Upload Manifest file, type in the following:
https://uc.maxuc.cloud /outlook/addin.xml

- Click verify, green text should appear below the box to show that this has been successful.
- Click Next.
- Add users
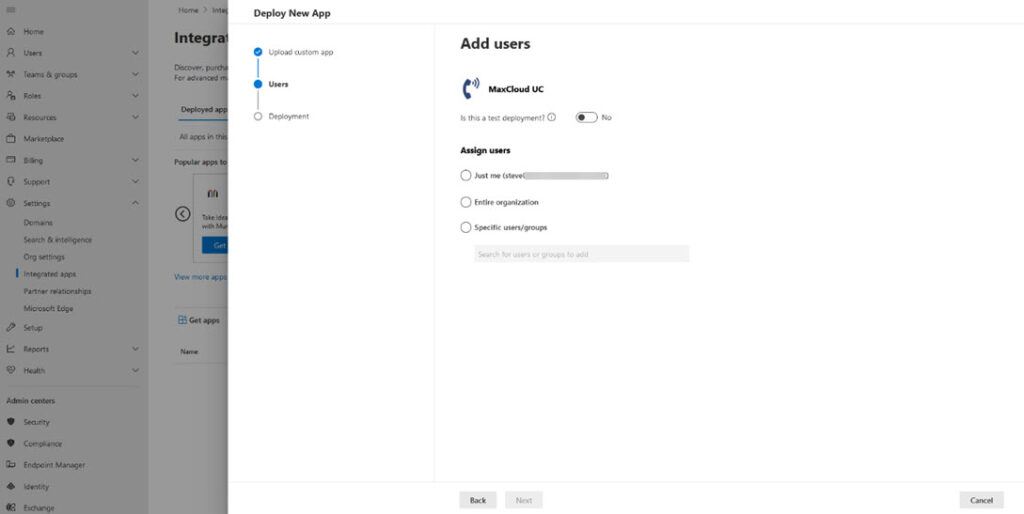
- Accept permissions
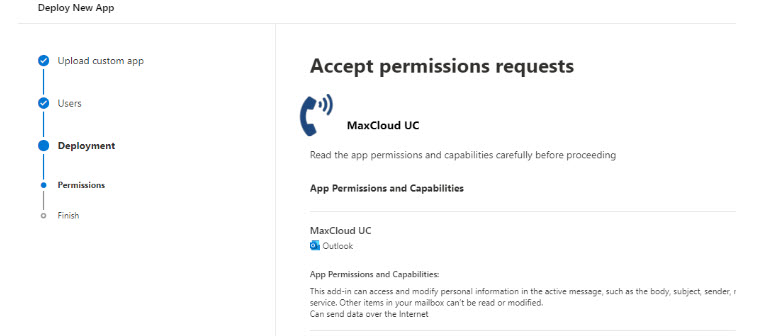
- Review and Finish
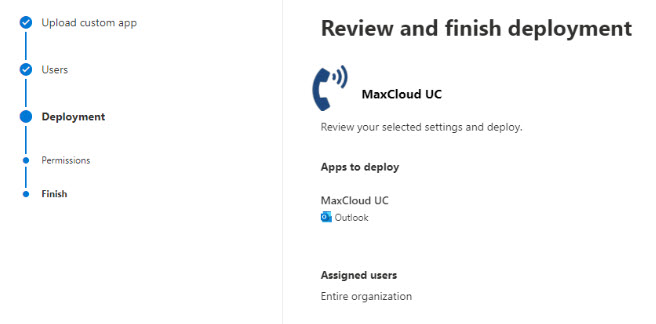
- Deploy the app
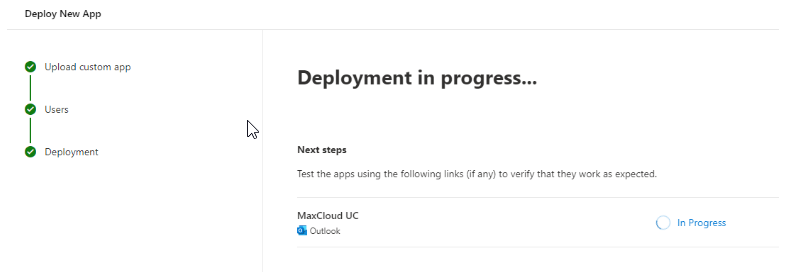
- Deploy new app
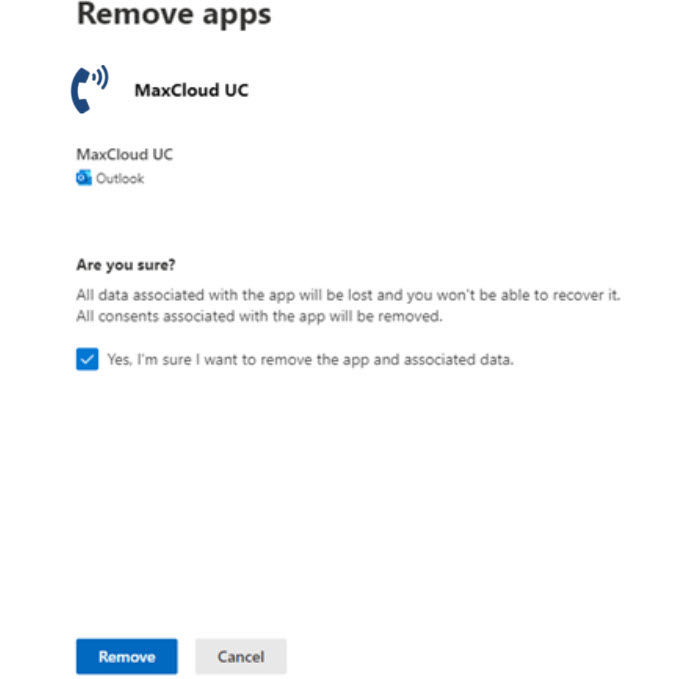
Uninstalling the MaxCloud UC Outlook app
Open Admin Centre and follow the below steps.
- Go to Settings->Integrated apps
- Click on MaxCloud UC to open the setting page
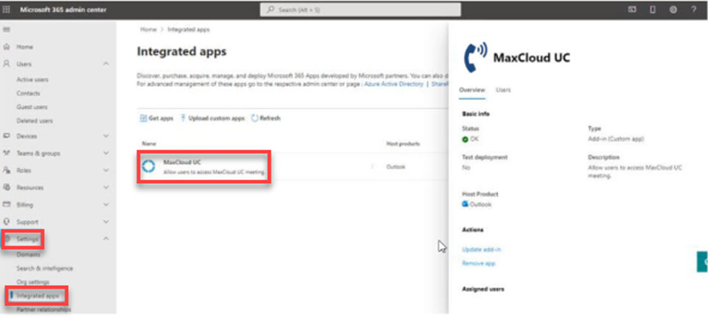
- Click on Remove app – Indicated with the arrow in the above image
- Select the checkbox
- Click remove