MaxCloud is the platform for the client MaxCloud UC. A hosted service that provides telephony features.
Logging In
To begin using MaxCloud, firstly sign in using the provided link and verify the account.
The below screen shots show the process:
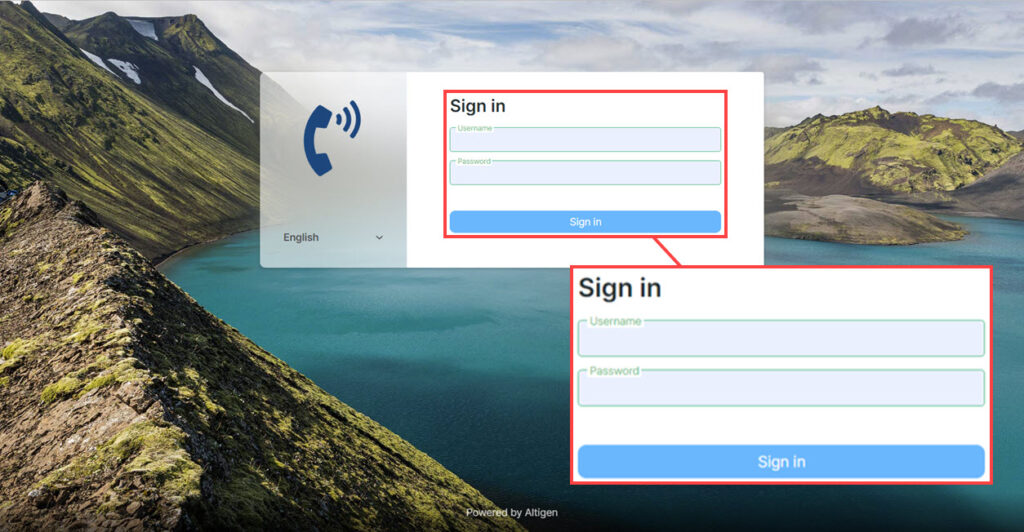
Add the username and password then click on Sign in.
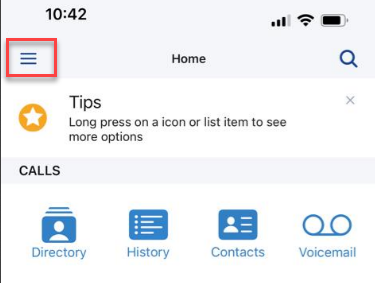
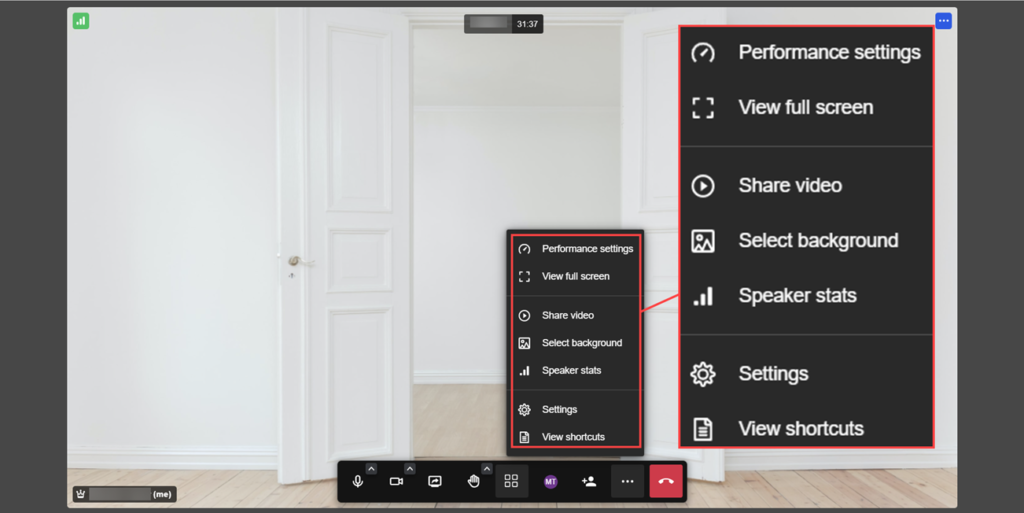
Main View
MaxCloud UC main screen provides navigation with ability to view and communicate with contacts.
Within the main view there is a menu running down the left side. (see Menu image below)
Top of the list is the avatar, clicking on here opens the presence and settings options. Please note this will contain an initial of the users in this circle or an avatar picture if one has been uploaded.
The below image shows the availability settings that are available:
Below the status option is the setting menu.
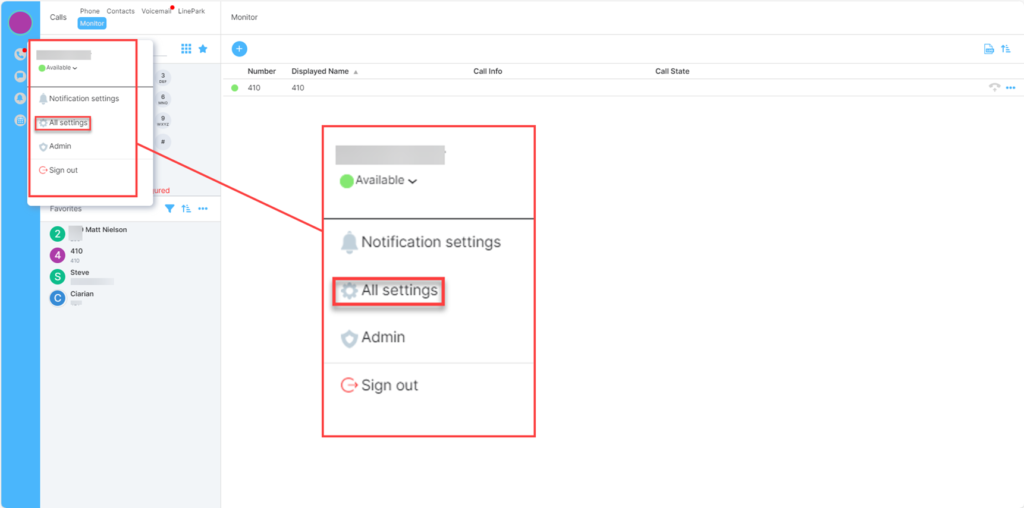
Within the account setting you can:
- View the users name (Display Name)
- Choose what notifications are required to be set.
- Alter the preferences
- Select the audio and video source
- Access to a help and support page
- View or change the MaxCloud settings
- Call Forwarding options
- Voicemail
Menu Icons
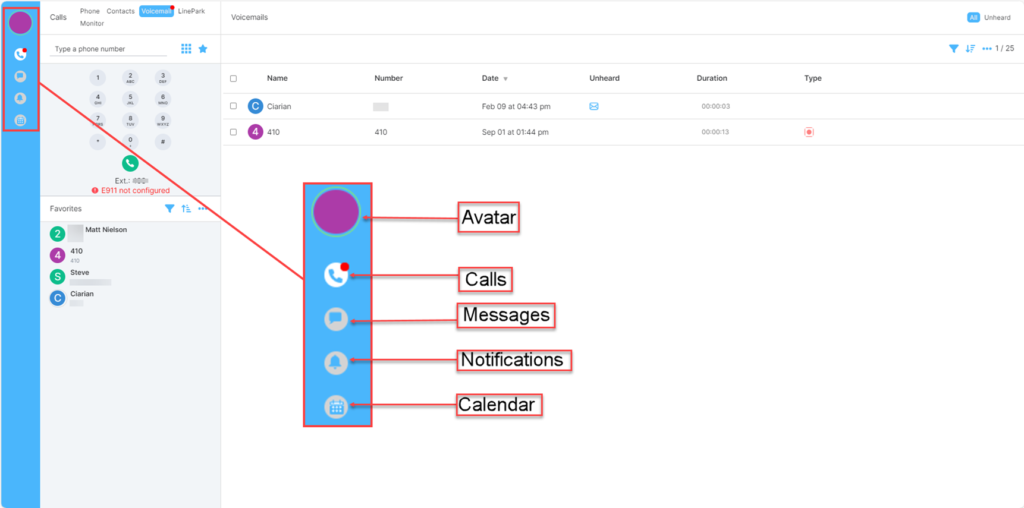
NOTE: The user avatar will be the users ID or Photo if they add one.
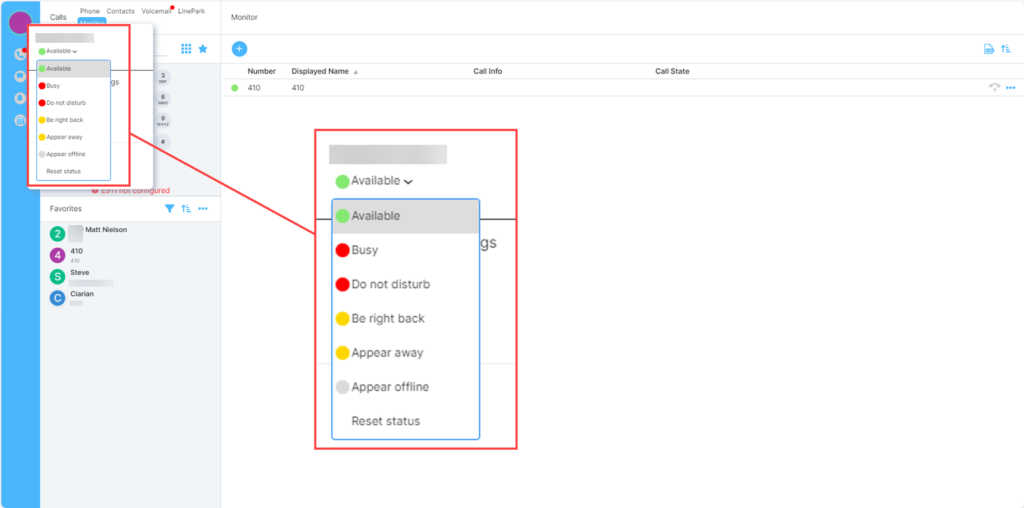
Presence
NOTE: MaxCloud UC presence works with Teams but only for the available or busy status. Other options such as presenting and away will have to be set manually on the MaxCloud UC client. If it is a Polycom phone on a call, it will not change, this will need to be done manually.
MaxCloud gives the option to set an availability status, this can be found by clicking on the avatar on the top left of the screen. Click the drop-down arrow next to the Available status to see the other options. Along with the manual settings of these statuses MaxCloud will also see a user as busy when they have a meeting in the outlook calendar (so long as the Outlook plugin has been installed by an administrator) MaxCloud will also now show any Out Of Office notifications that are enabled.

Settings
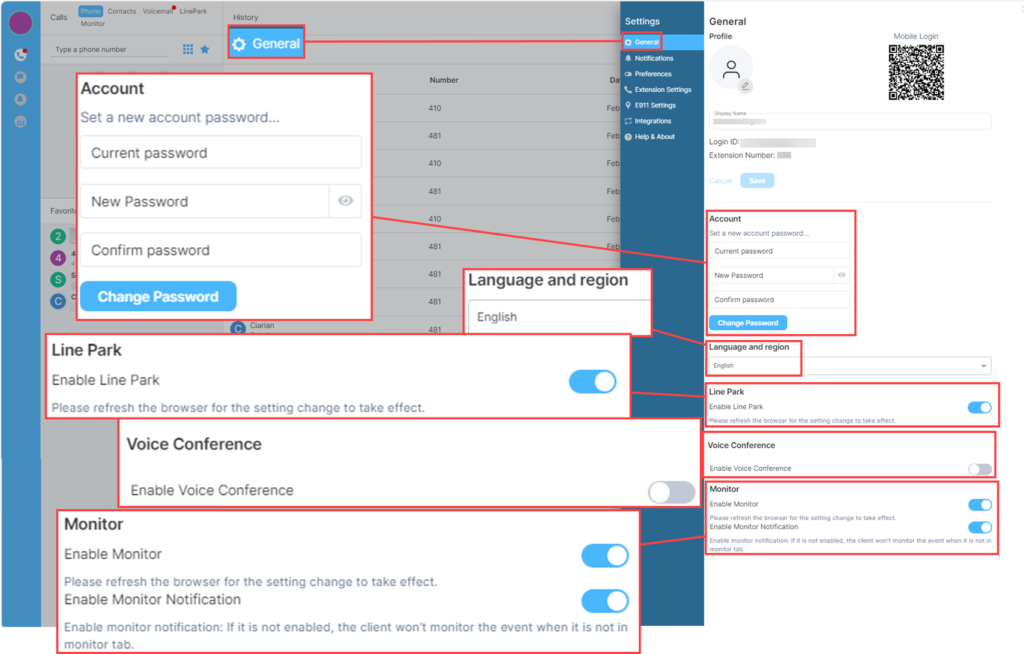
General
Under the General settings tab is the ability to add a photo to the avatar, if no photo is uploaded the avatar will show the initial of the user’s name. In meetings it will show both initials.
To the right of this is a QR code for the mobile application.
Below this is the option to change a password.
Language and Region can be selected in here.
Line park, voice Conference and Monitor are also enabled from inside the general settings. (Some of these need to be first added by an administrator)
The below image shows the settings magnified:
Mobile Login
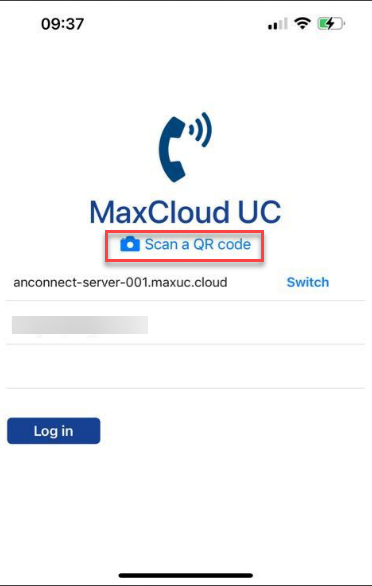
Download the application from the store on your device from the link that appears after scanning the QR code.
If you already have the mobile application you can open it then scan the code:
IOS image.
Android images.
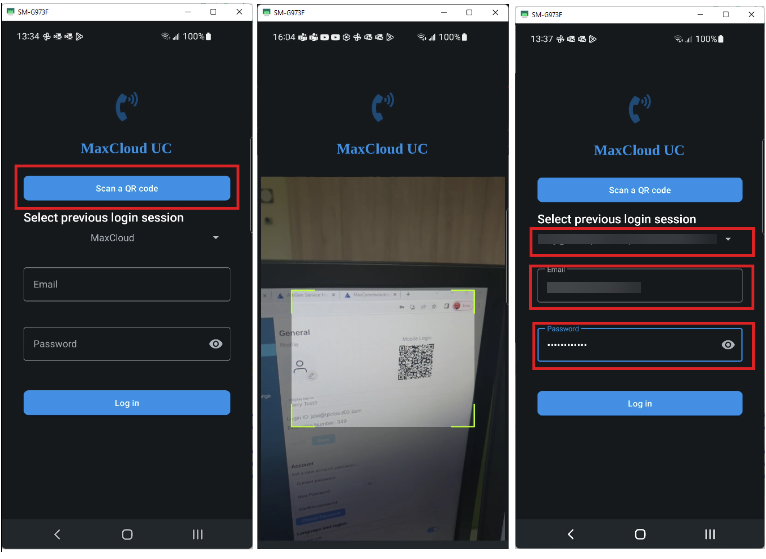
Once the QR code is scanned it will log you in and open the application:
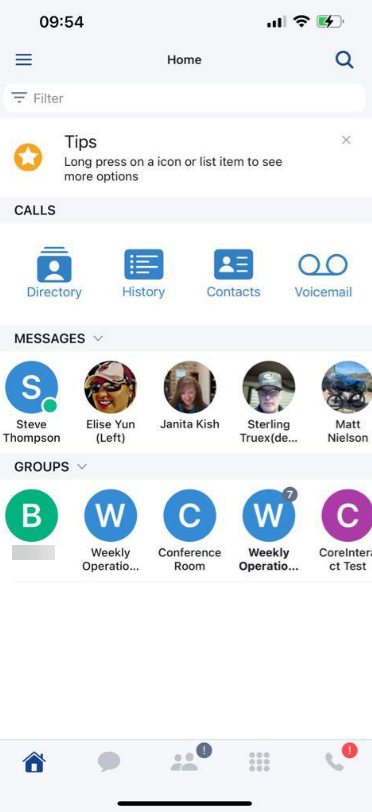
The first section shows the following:
- Directory – List of contacts found in the company directory.
- History – Call history of both incoming and outgoing calls.
- Contacts – List of contacts from your phone and the desktop application.
- Voicemail – Shows any Voicemails that have been received.
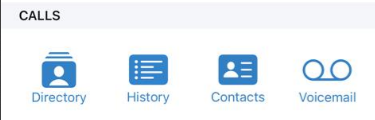
The second section shows Messages:
This is where a message can be started or continued with a contact.
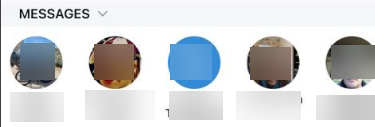
The third section shows the Groups that you are associated to and the information from these.
Lastly quick link icons for the following listed from left to right:

- Home – Takes you back to the home screen.
- Messages – shows your recent messages.
- Groups – Shows the groups you are in.
- Dial Pad – Used to make calls.
- Calls – gives you the same information as the first section.
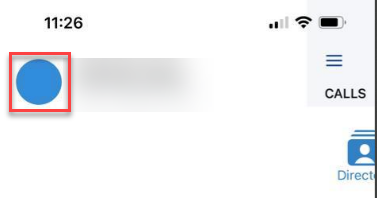
To access settings on the mobile app, click on the icon of three lines at the top of the screen:
There are a limited amount of setting options in here:
From top to bottom:
- Profile Picture – Option to Take a Photo or choose from Library.
- Display Name – This will be the same as the name used on the desktop application.
- Email – Again the same as is set on the main application.
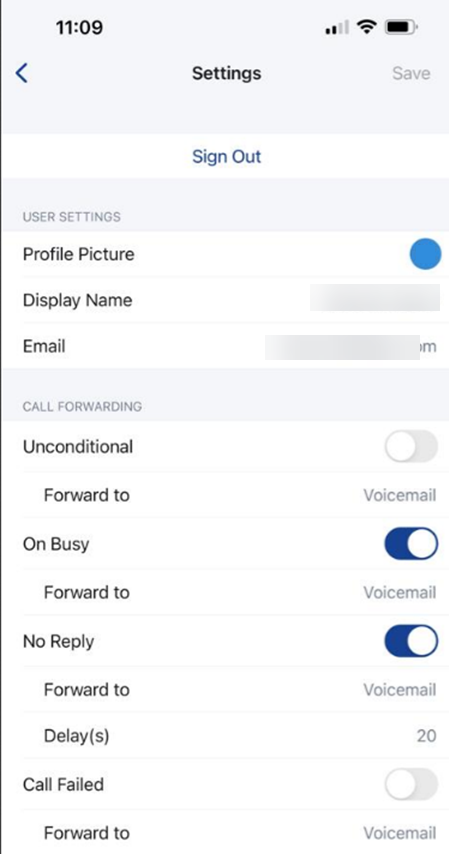
- Call forwarding – Options on the way that call forwarding works, for more information on this see the user guide.
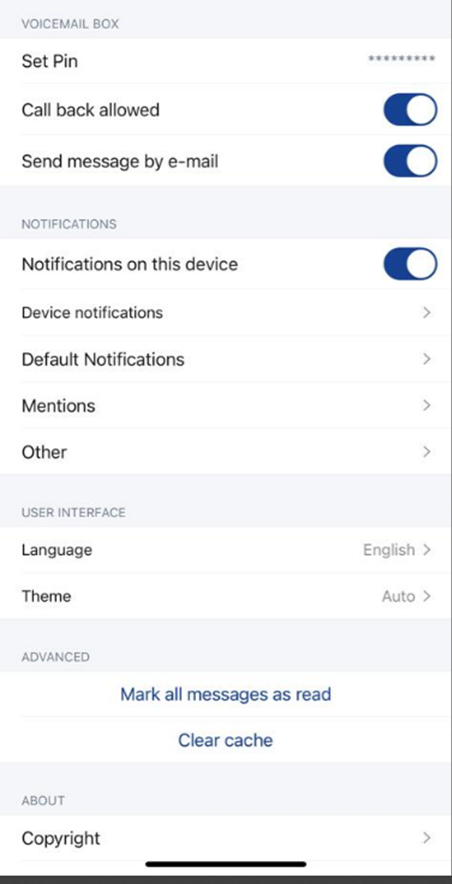
- Voicemail Box – Set PIN, Pin can be changed in the mobile app, Call back allowed and send message by e-mail options can be turned on or off.
- Notifications – Device Notifications – Takes you to the settings option for this application on your phone.
- Default Notification – Notifies you of Direct messages and Group messages.
- Mentions – Notifies if your display name or @room is mentioned.
- Other – Notifications for Room and call invitations.
- Language – Allows choices of different languages.
- Theme – Options are: Auto, Light, Dark and Black.
- Mark all messages as read – Click to mark all as read.
- Clear Cache – Click to clear cache.
Password Reset
To reset the password that has been provided go to the avatar on the top of the menu bar and click ‘all settings’ this will open a menu on the right of the screen, under ‘General’ there is an option to change the password.
The new password should be at least eight characters long and contain both upper/lower case characters and digits.
Type in the existing password and then the new password, confirm the new password then, click save.

Line Park
To begin using line park it must first be set on the back end by a system admin.
Once it is set up the user will need to open the settings menu (located in the Avatar) and select All Settings.
This will open the menu to the right of the screen, select General and scroll to Line Park:
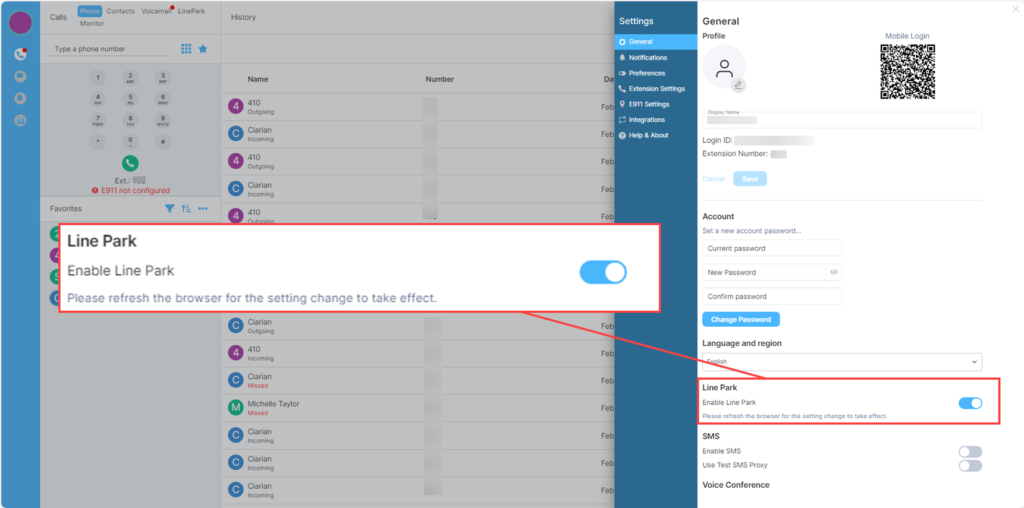
Make sure the toggle is set to the right (on). the screen will now refresh and redirect to the calls screen where Line Park is now an option.
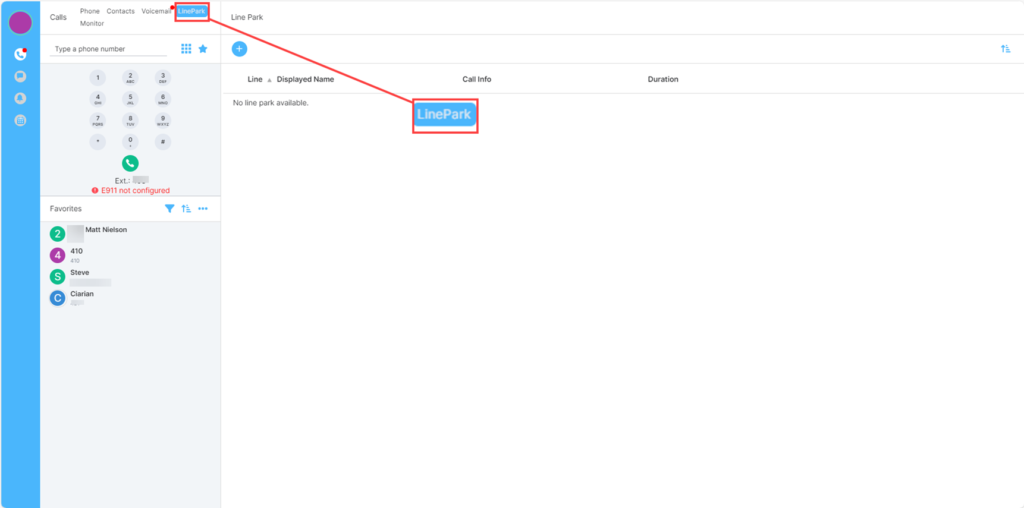
Now this is ready to use.
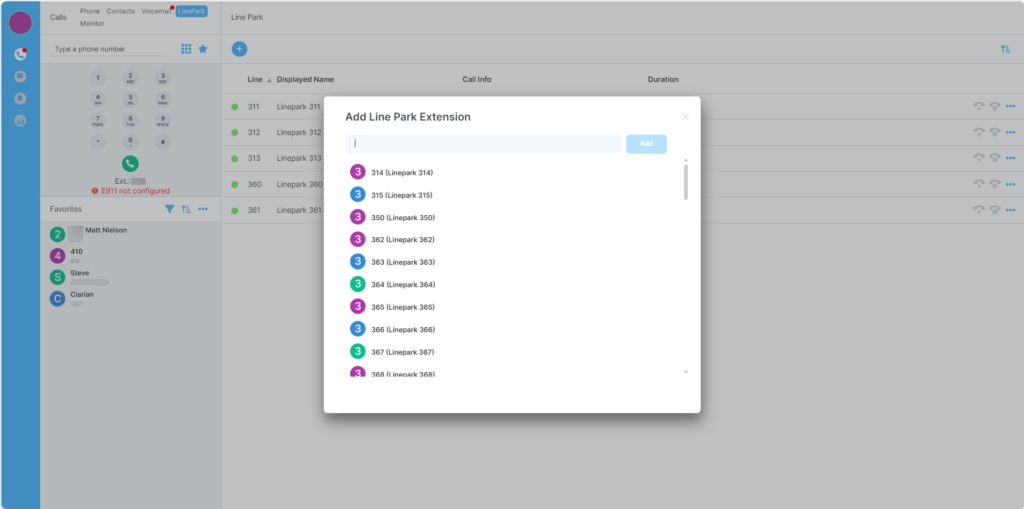
Click on, line park, then click the + to add a new line, or use one that is already listed.
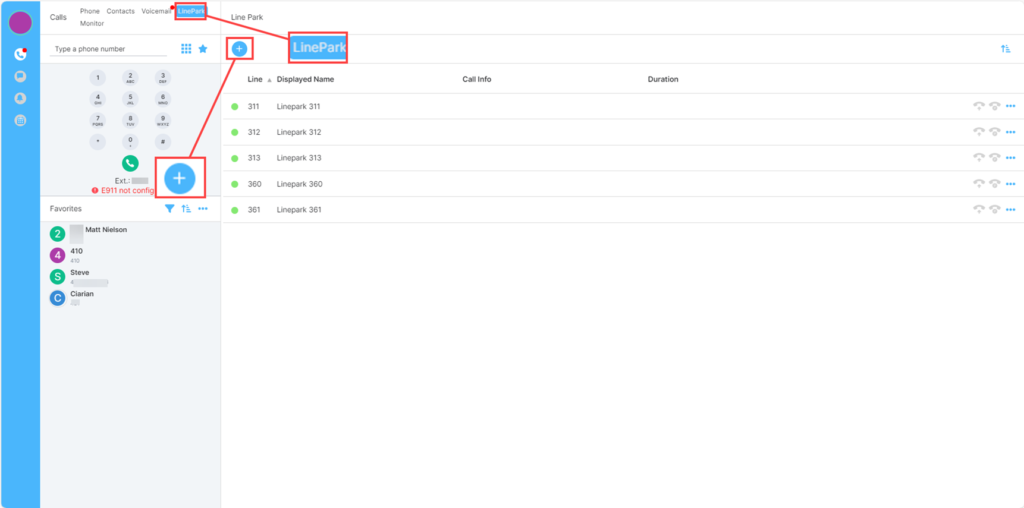
Adding a new line park extension will bring up a pop up showing the available lines, click on one then click ‘Add’ to the right of the text box:
This will close the pop-up and show the available extensions for Line Park on the screen. Each line has a selection of options at the end: Pick up call, Park Call and delete.
- Pick up call – This button will enable when there is a call parked in the slot and the client is not in an active call.
- Park Call – If a client has an active call and the park slot is empty then the button will enable.
- Delete – Allows the client to remove the extension from the list.
If an Extension is available the circle around it will be Green, if it shows Red then a call is already parked there.
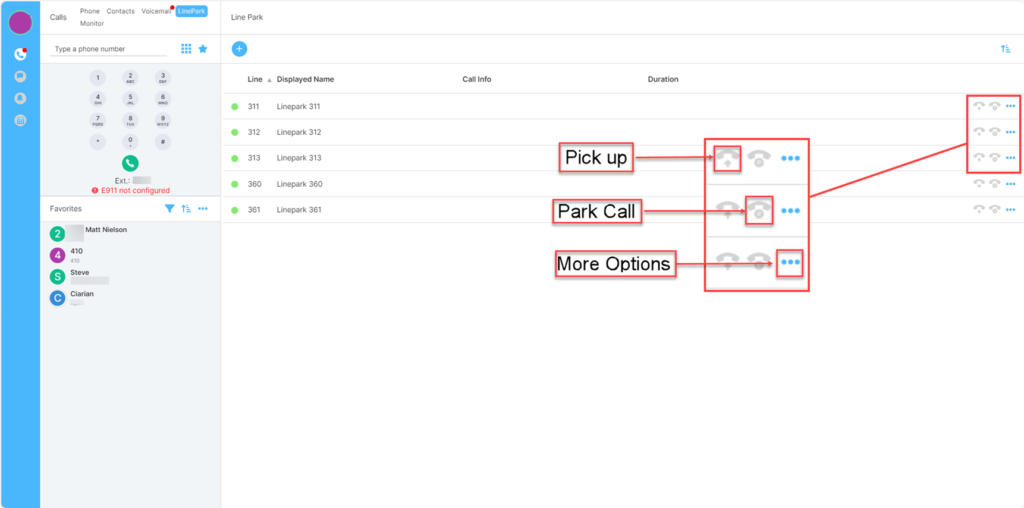
A slow blinking Red dot indicates there is a call parked on the Line Park extension slot. The below shot only shows the side menu and the Calls menu for an example.
Office 365 Login
If using the Microsoft login, it will ask you to authenticate using the credentials used for signing into Office 365.
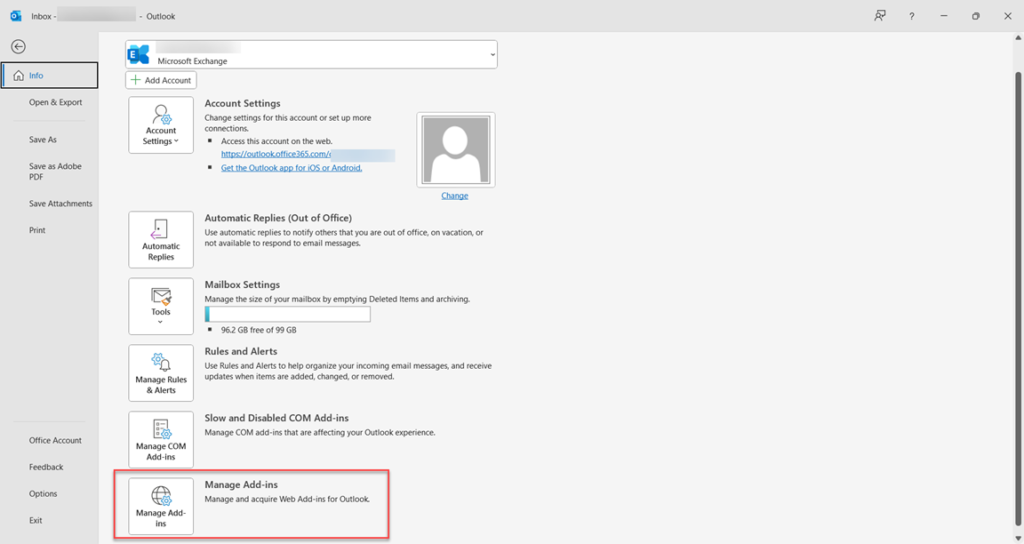
To check if the add on is installed on your outlook use the steps below (outlook application):
- Open outlook.
- Click on file.
- Click on manage add-ins.
This will open the webmail client:
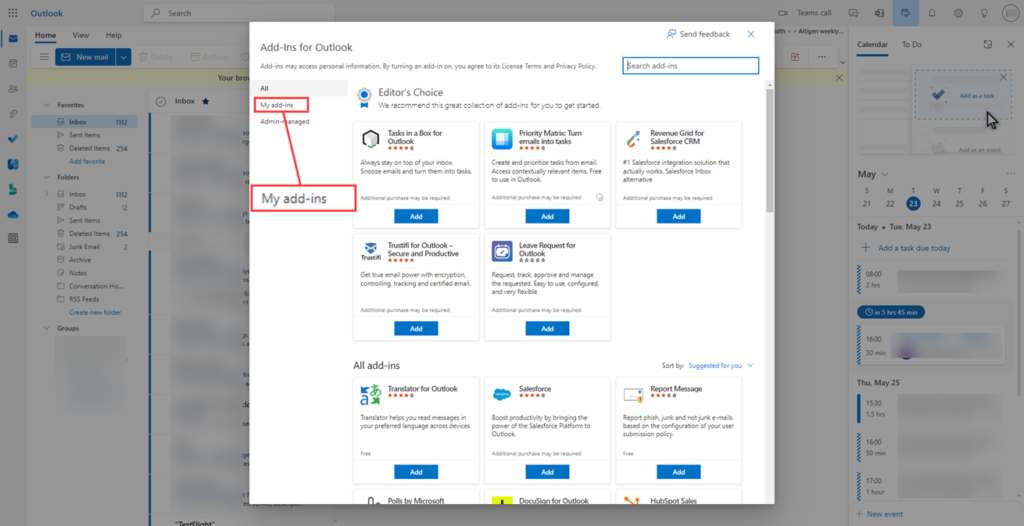
- Click on My add-ins.
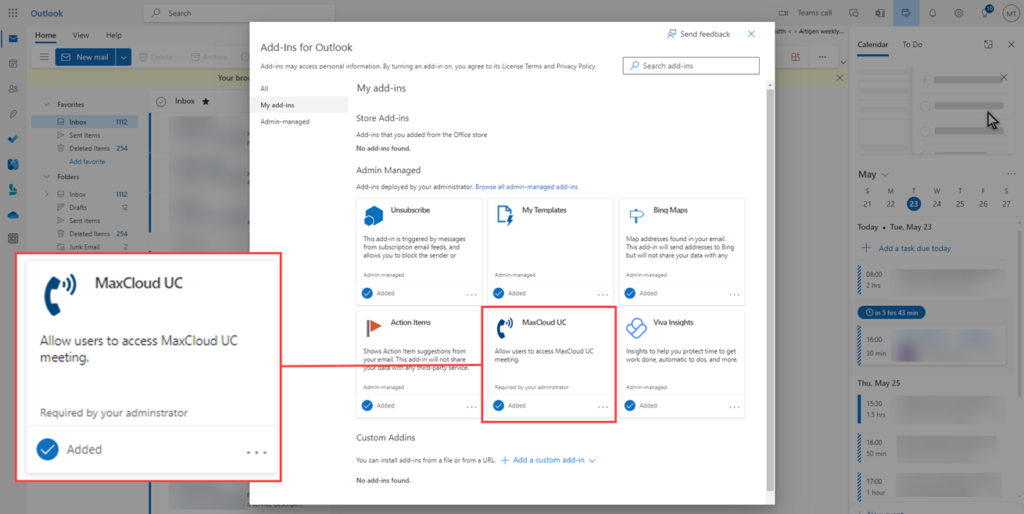
If the add in is installed it will show here.
How To See The Apps In Outlook Web Mail.
Open the mail in the browser then click on the icon shown below:![]()
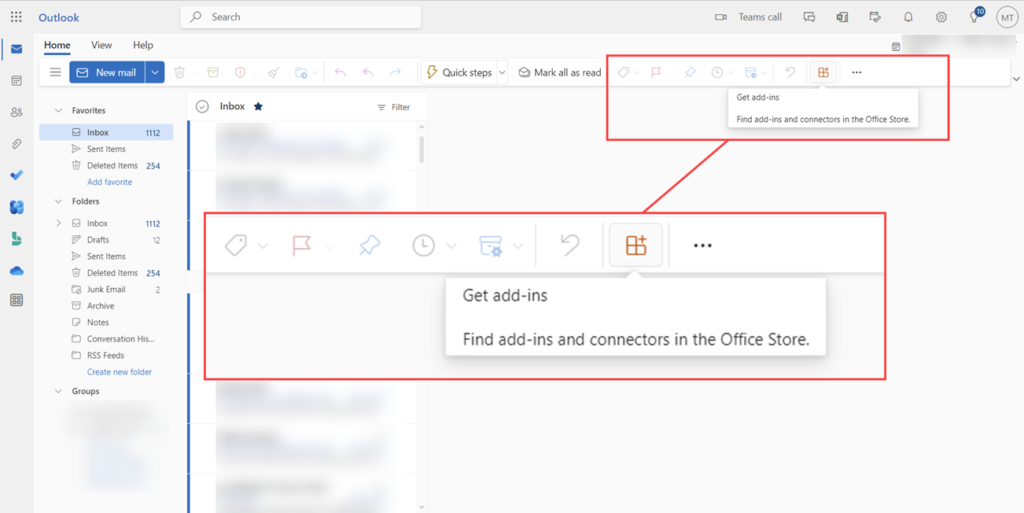
Now as above, click on my add-ins and follow from there.
Outlook Public Contacts
Under the username and password settings are the options to enable contacts from Outlook to be used in MaxCloud. Check that Office 365 is connected and enable the two options once this is done refresh the browser for the change to take effect.
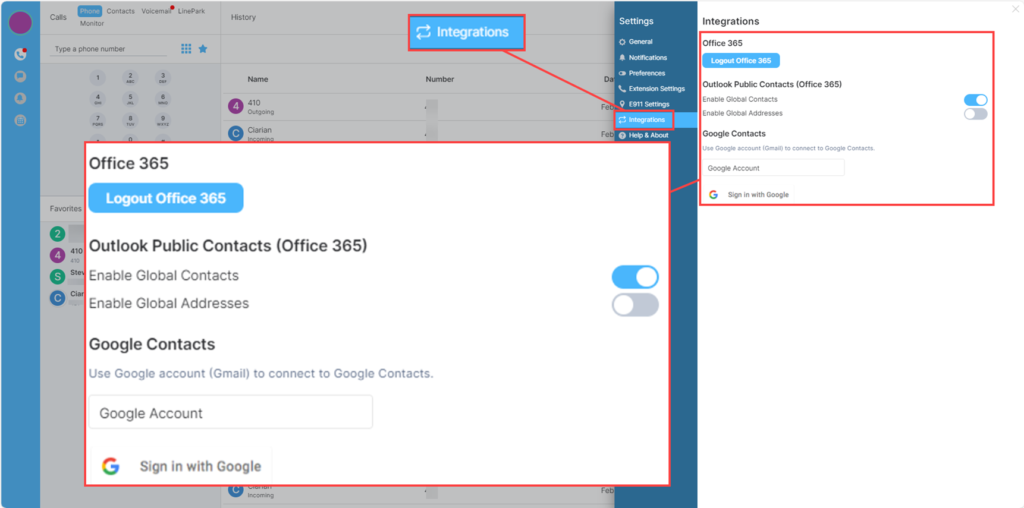
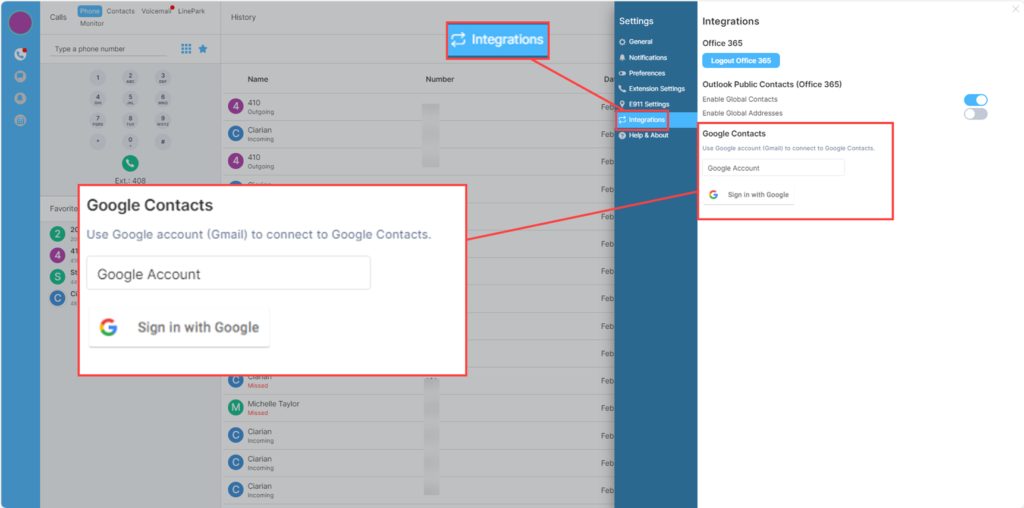
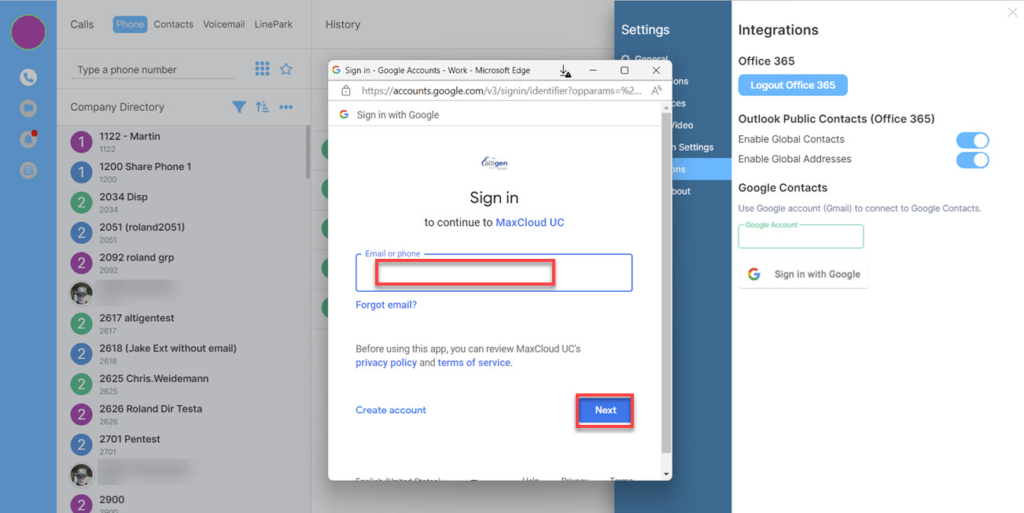
Google Contacts Integration
To add Google contacts into MaxCloud UC, type in the Google account email in the “Google Account” box then click on Sign in with Google:
When sign in with Google is clicked a pop-up will open to the left of the menu:
Enter the email address in here again then click next required then click Next:
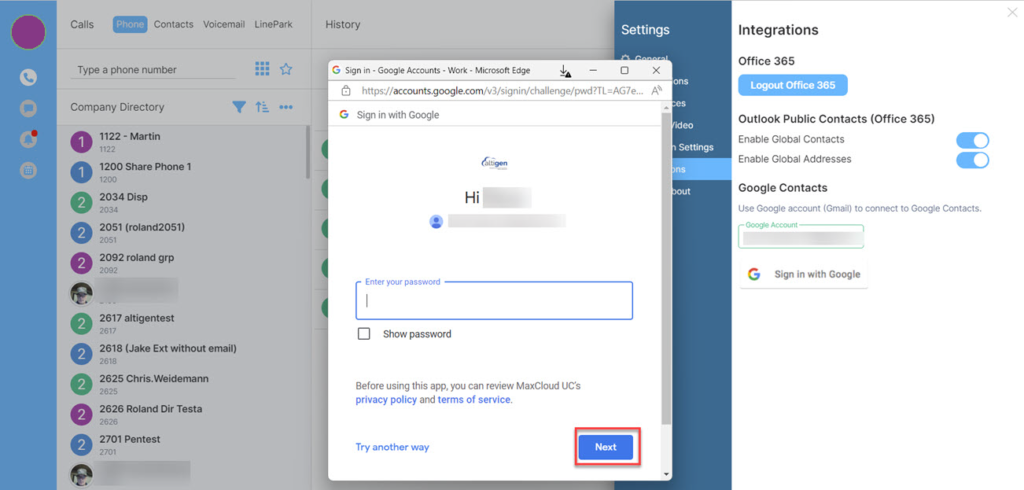
Add the password for the Google account then click next:
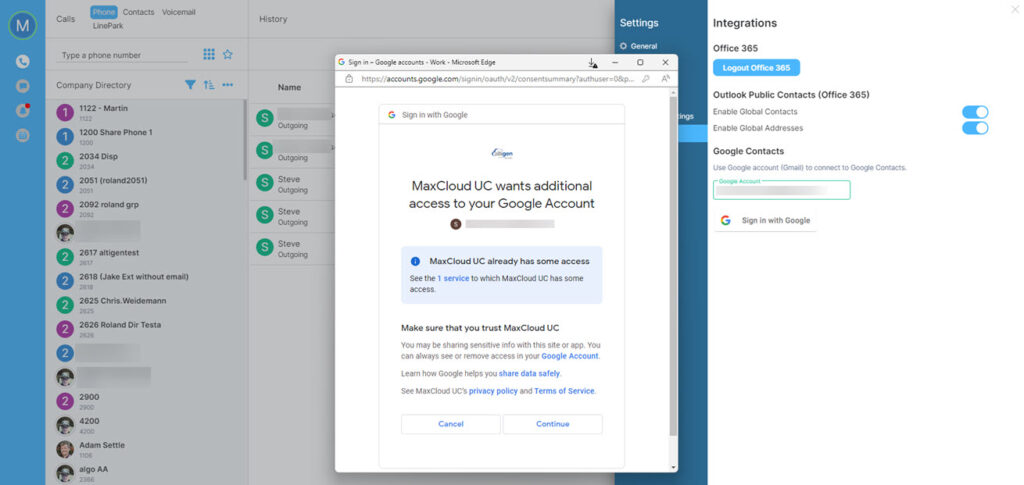
Google contacts is now connected, go back into the menu, navigate to Integrations. Now this will show “Disconnect Google Contacts” This shows the connection was successful.
NOTE: Both Office365 and Google Contacts can be connected at the same time.
Show Google Contacts
Now Google Contacts are integrated follow the below steps to add and view the Google Contacts:
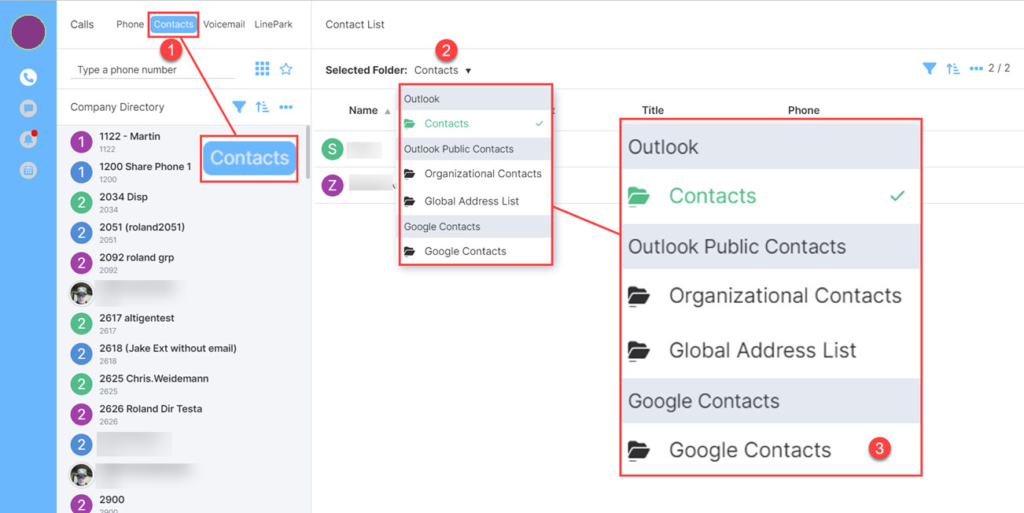
- Click on Contacts
- Click Select Folder
- Click Google Contacts
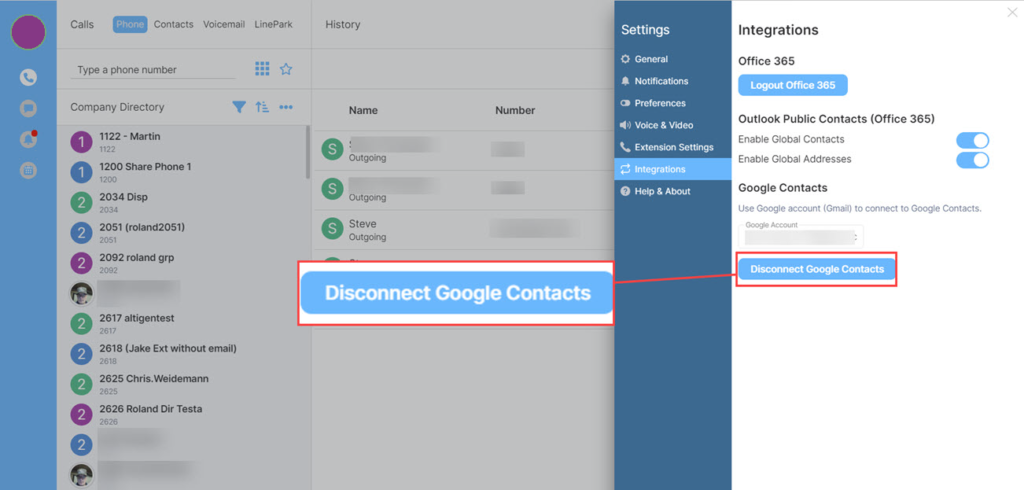
Delete Google Contacts
The integration with Google Contacts can be easily removed by clicking on the Avatar and opening the All Settings menu, click on Integrations and then click Disconnect Google Contacts.
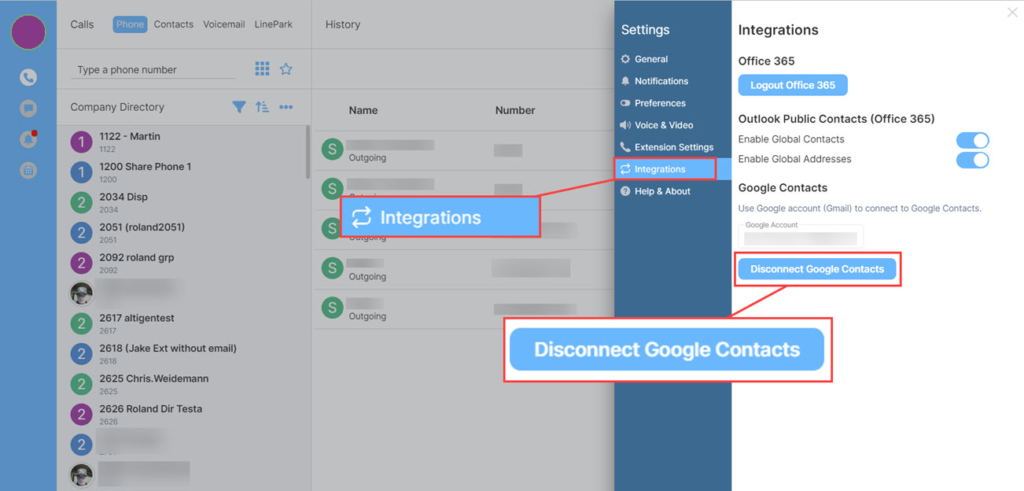
The message will go back to Sign in with Google, showing it is no longer connected.
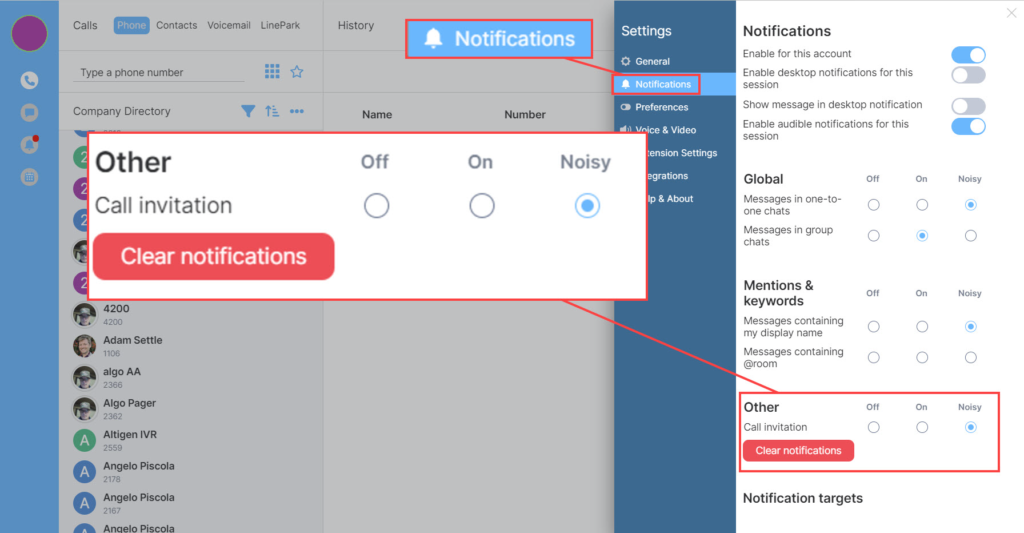
Notifications
Notifications can be personalized, starting from the top let us look at each setting:
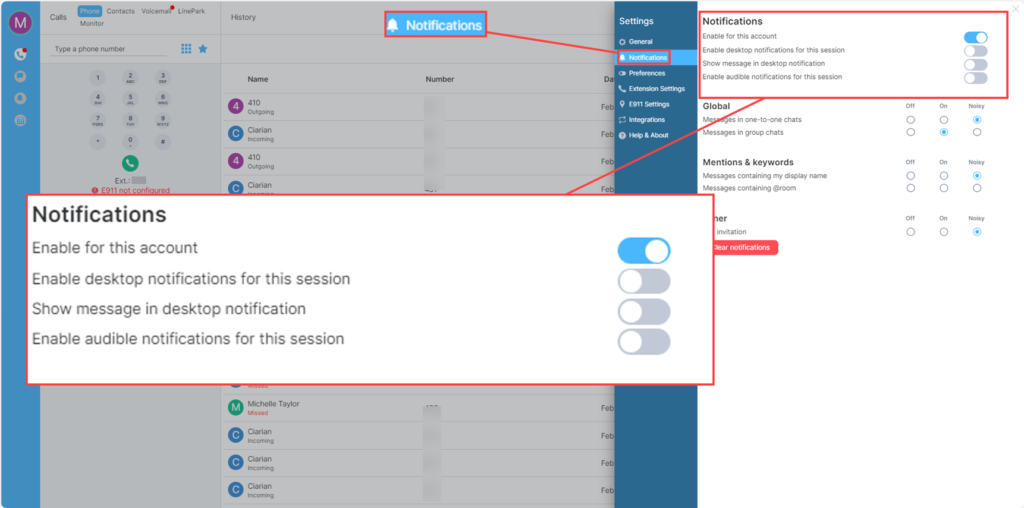
- Enable for this account – A toggle switch to either allow notifications or turn them off.
- Enable desktop notifications for this session – A toggle to either turn on or off the desktop notifications.
- Show message in desktop notification – Select or deselect the option of showing a message in the desktop notification.
- Enable audible notifications for this session – Choose if a sound should be played when a notification is received.
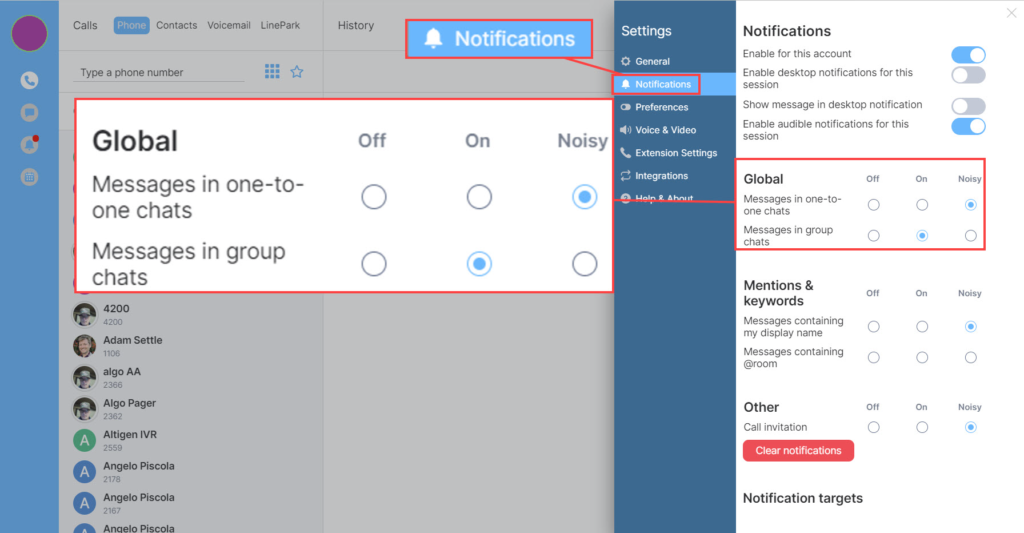
- Messages in one-to-one chats -Toggle on/off the notifications. Off (no notification), on (Notifications on) or noisy (sound to be played)
- Messages in group chats – as above.
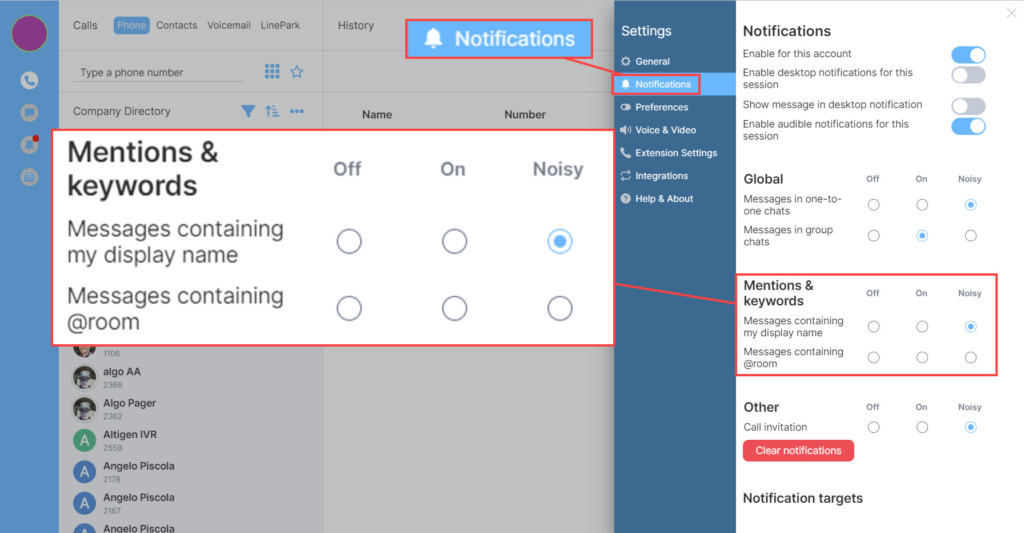
Both the above and below sections follow the same rules for settings as Global shown above.
Preferences

Within the preference menu are several items that can be turned on or off. The sections are used as follows:
- Displaying time – This section looks at the display time, by clicking on the toggle the choice of showing the timestamp of a message can be turned on/off.
- Composer – This section is for the messages. Choose if you want to be shown emoji suggestions when typing, if you would like to allow the person you are messaging to see when you are replying, allow the use of Ctrl + Enter to send a message rather than clicking on the mouse. Choice of surrounding text when using special characters
- Display time – There is one option here for the timestamp on messages. Use this to switch on/off this option.
- Composer – This section contains a menu of the following options:
- Enable Emoji suggestions while typing – If enabled when you are typing out a message the system will offer emoji suggestions as you type certain words.
- Send typing notification – Option to let the person you are messaging see that you are typing.
- Use Ctrl + Enter to send a message – Allows you to send a message without having to move and click the mouse.
- Surround selected text when typing special characters – Double click the text and a box appears above with options to make the text bold, italic, strikethrough, Code block or Quote.
- Code blocks – This section is about code and how it appears on the screen. The following options can be toggled on or off.
- Enable automatic language detection for syntax highlighting.
- Expand code blocks by default.
- Show line numbers in code blocks.
- Images, GIF’s, and Video – This section contains the following options to enable or disable as required:
- Enable inline URL previews by default.
- Auto play GIF’s and videos
- Show previews/thumbnails for images.
- Timeline – This section contains the following:
- Show typing notifications – A message will be displayed to tell you that the person is typing a message when you are in a chat.
- Show read receipts sent by other users – If enabled you will see a little picture of the persons avatar to the bottom right of the screen when they have read the message.
- Show chat effects (animation when receiving e.g. confetti) – As example.
- Show avatars in user and room mentions – When a person is mentioned their avatar will show up along with their name.
- Enable big emoji in chat. – Changes the list of emojis
- Jump to the bottom of the timeline when you send a message – If you have had to scroll up to read a message when you type it will return to the bottom of the timeline when you send the message.
Extension Settings
Within the extension settings are the options to:
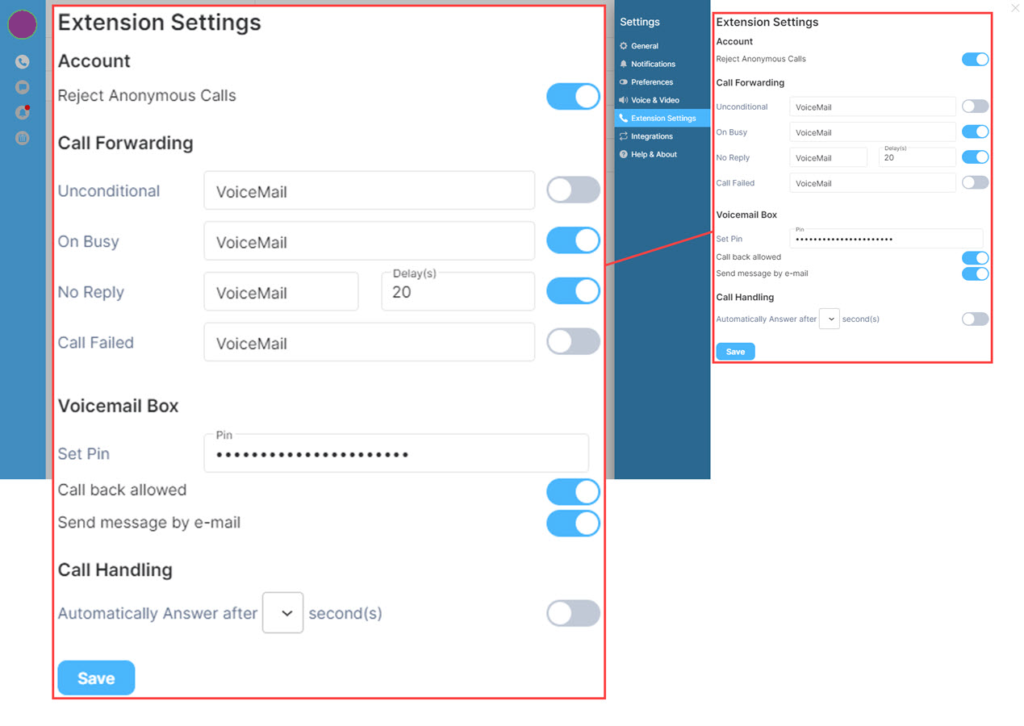
| Feature | Description |
|---|---|
| Reject Anonymous Calls | Will block a call that has no ID |
| Call Forwarding | Settings to enable call forward |
| Voicemail Box | Set the PIN, Toggle on/off call back and message by email |
| Call Handling | Automatically answer calls after so many seconds (up to 30 Seconds) |
E911 Settings
Clicking on here will show the details that have been set by the system administrator for the user. If this information is incorrect, please contact the system admin and request the information be updated.
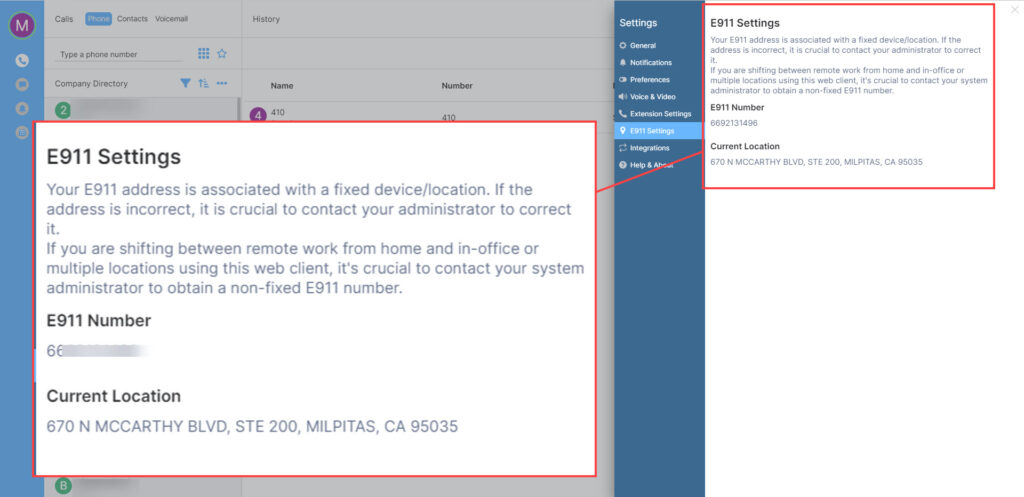
The location information can also be found on the Dial pad in the main screen.
To view this, click on the Dial Pad icon:
Help and About
This section is used if a log is needed to report a bug, to check for updates and to clear the cache.
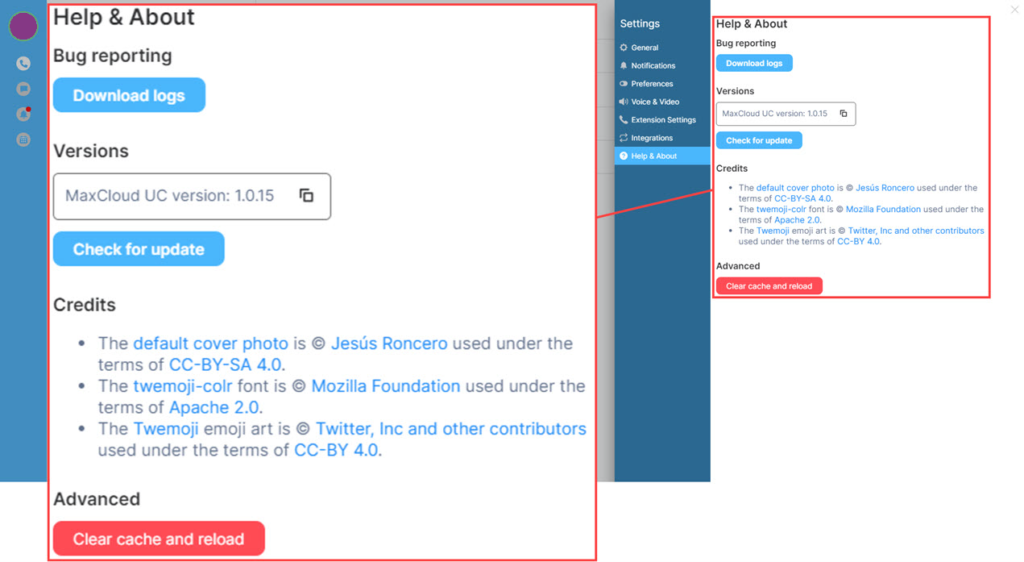
To download a report, click the link, this will start a download that can be found in files > Downloads.
Checking if the version is up to date can be done easily by clicking the check for updates button.
If there are some issues on the system the first thing to do would be to clear the cache and reload to see if this fixes the issues, this is done by clicking the Clear cache and reload button.
Calls
This section will explain the different call types, including their functions.
Important Information Around Calls
Limitation:
Consideration should always be taken before making a call, thinking about the needs of the call, for example, will screen share be needed? Will more participants be required to join?
In a voice call there is no option to switch to video or conference if you need to screen share, this will require hanging up the call and starting again using video or meeting.
* Best practice to initiate a call for screen sharing is using the conference or video call. *
Meeting will allow more than two people and Video will be limited to two participants.
Voice call
Making a Voice Call
There are multiple ways to make a voice call. These are dependent on the call being Internal or External.
| Feature | Description |
|---|---|
| 1 – Phone | Clicking on here will give call details and allow you to make a call |
| 2 – Type in Number | Type in the number to dial |
| 3 – Dial Pad | Click on this to open the dial pad |
| 4 – Company Directory | List of company numbers |
| 5 – Call history | Shows the list of incoming and outgoing calls |
Call Duration Tracker
When an agent makes or receives a call a counter will begin on the call window to track the length of the call. This will also show in the call history bar.
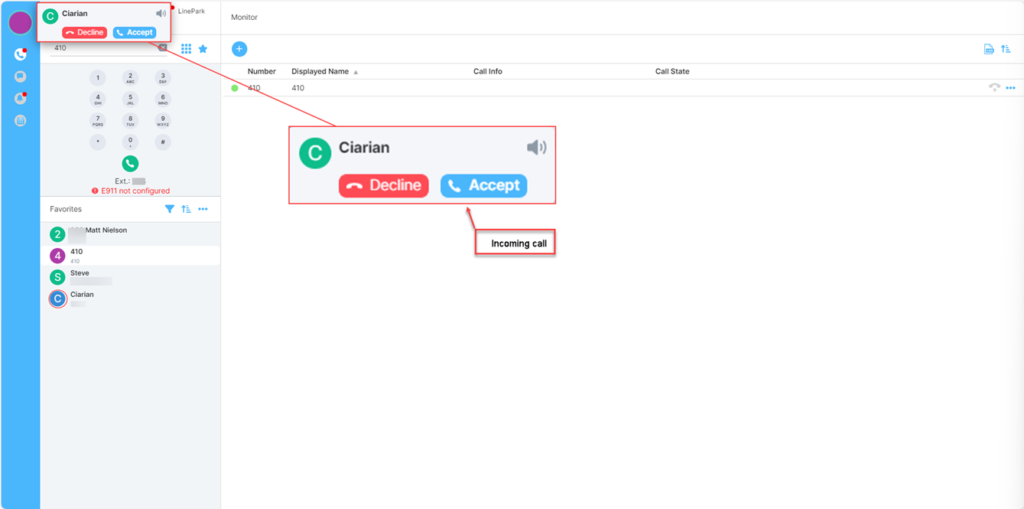
Incoming calls
An incoming call will show on the user’s screen as a pop out or toast on the screen. The toast will show the caller’s number and name if it is known in the system.
From the toast the user can either Decline or Accept the call:
Auto Answer
A user can select the Auto Answer option within the settings menu, under extension settings. This setting allows the user to set an automatic answer time between 0 and 30 seconds. If another MaxCloud UC client answers the call, a pop-up will show to tell the user the call has been answered elsewhere.
If the user is already in a call, then the auto answer will not work, this only works when the user is in an available state.
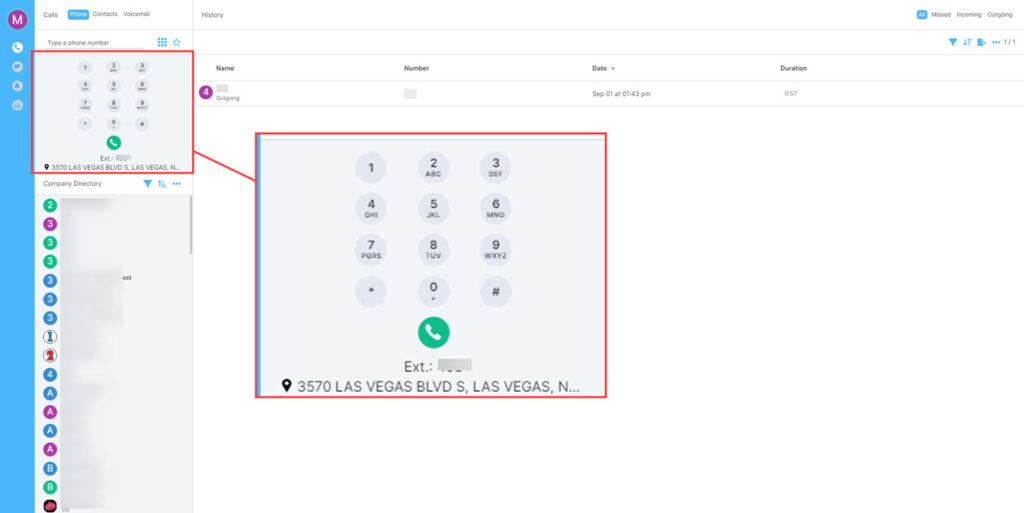
Dial Pad
The below screen shot shows the dial pad open when clicked, under the dial pad is the user’s number and extension number.
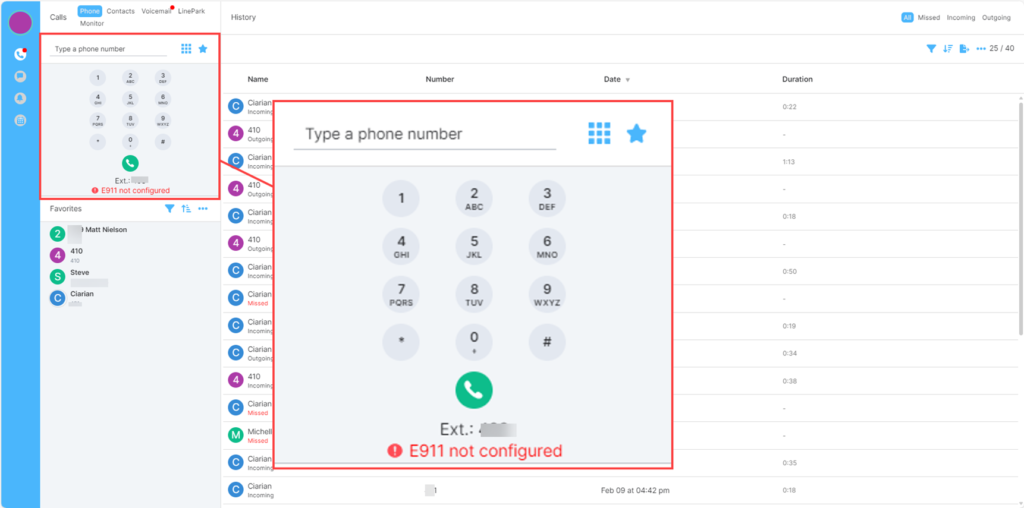
Key in the number of the person/company to call and click the green phone button. To the right of this will be a screen displaying History.
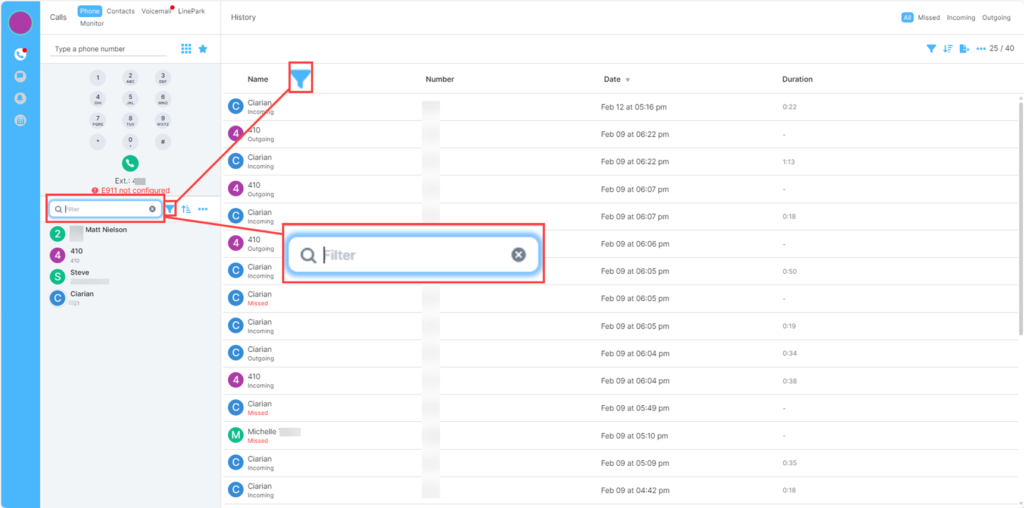
Search Contacts by Name
To search for a contact by name, click on the filter option (as shown in the image below) this will place a search bar to begin typing a name into:
Call from Message
A call can also be made by clicking on the Direct message icon, choose the person you wish to contact and click on the contact, this opens the chat screen with the options to call in the top right.
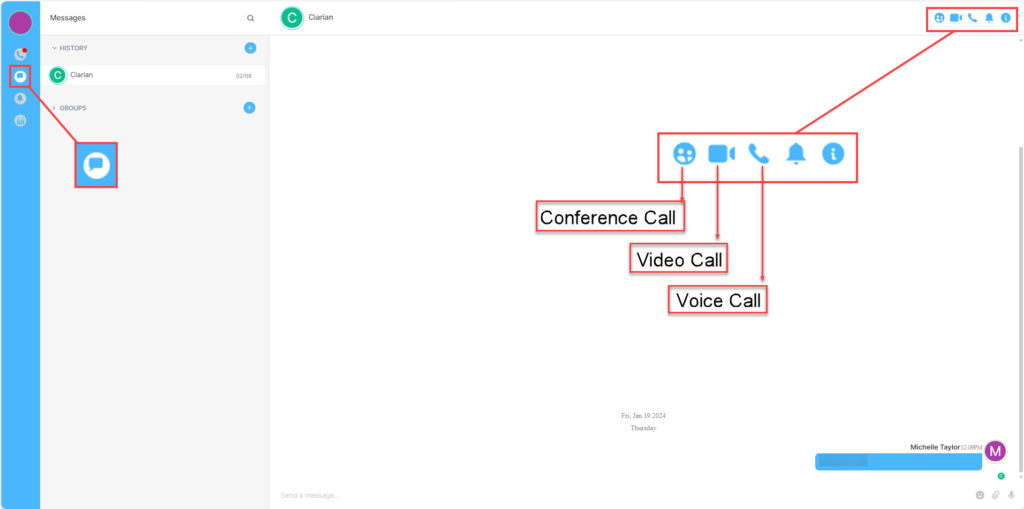
There are three call options here:
- Conference call – A video call with the option of adding in more participants and screen sharing.
- Video call – A video call between two people
- Voice call – A simple voice call between two people.
The camera can be turned off in Video and Conference call modes.
A call can be made to a group in the same way as described above.
Note: In a group to have all participants join you would have to use conference call.
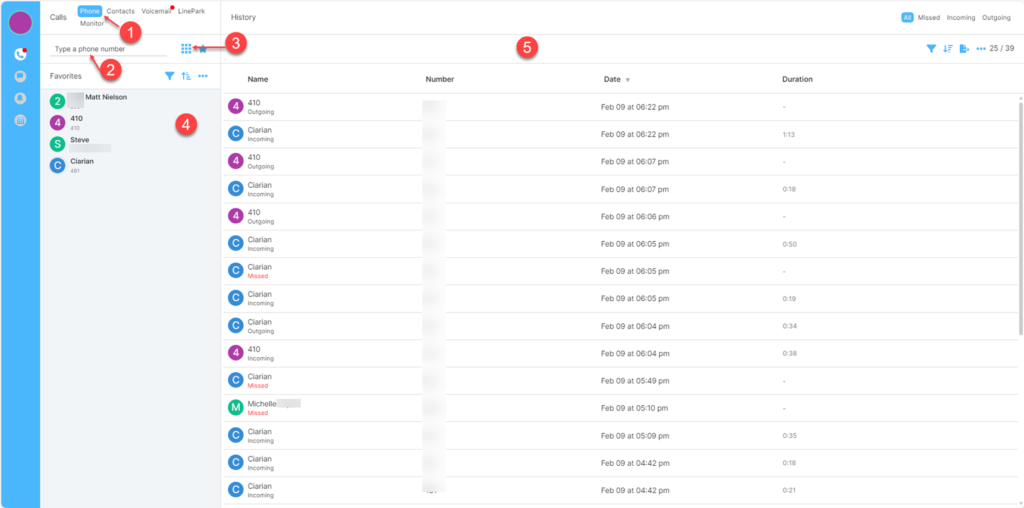
Call History
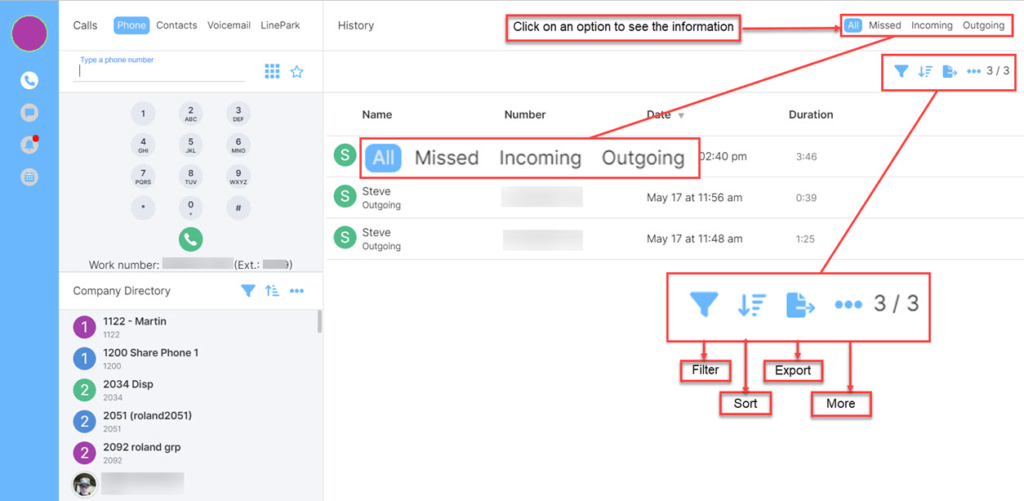
Highlighted to the right are the options for viewing the Call History. Below this are four options:
- Filter – Opens a box to type a number or name.
- Sort – Sort by Ascending, Descending, Name, Number, Date, Duration.
- Export – Opens a box with date options for downloading the call history.
- More – Refresh the list.
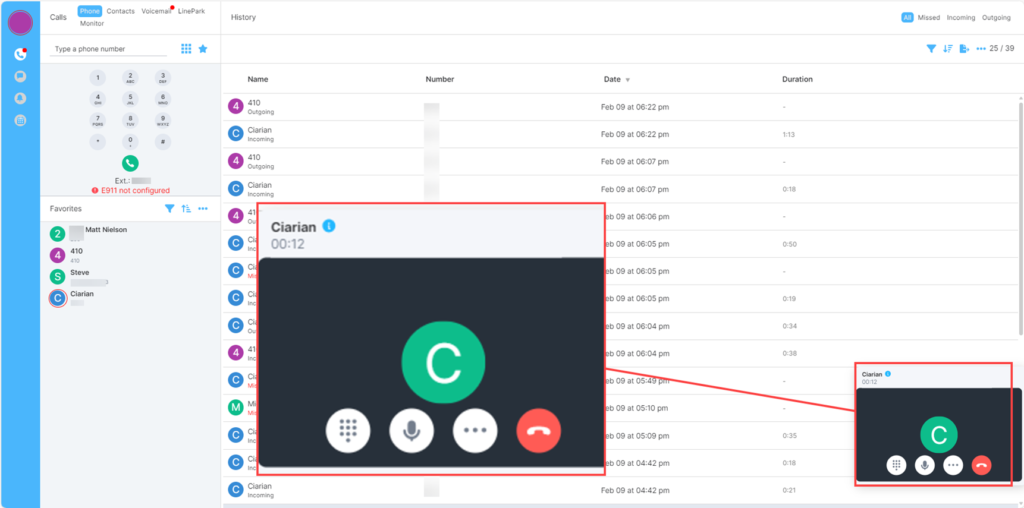
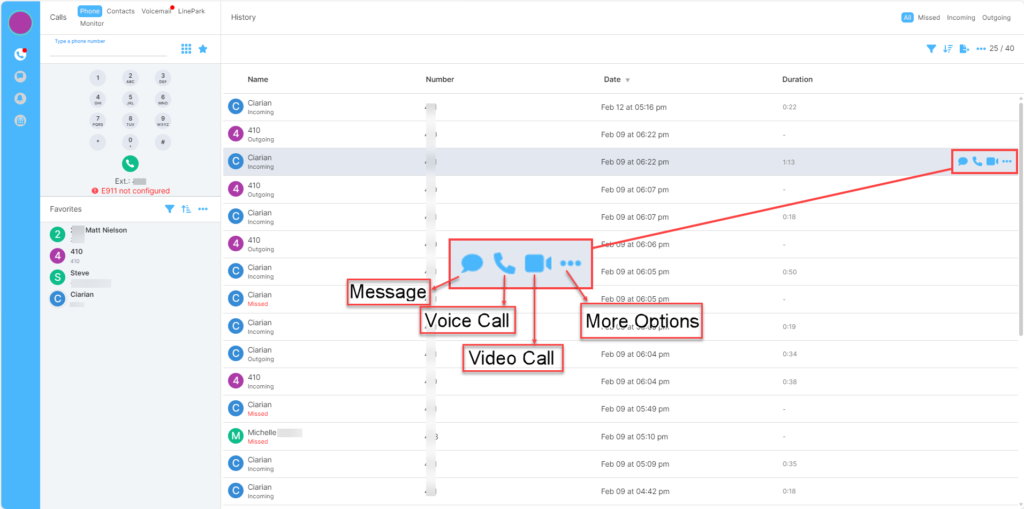
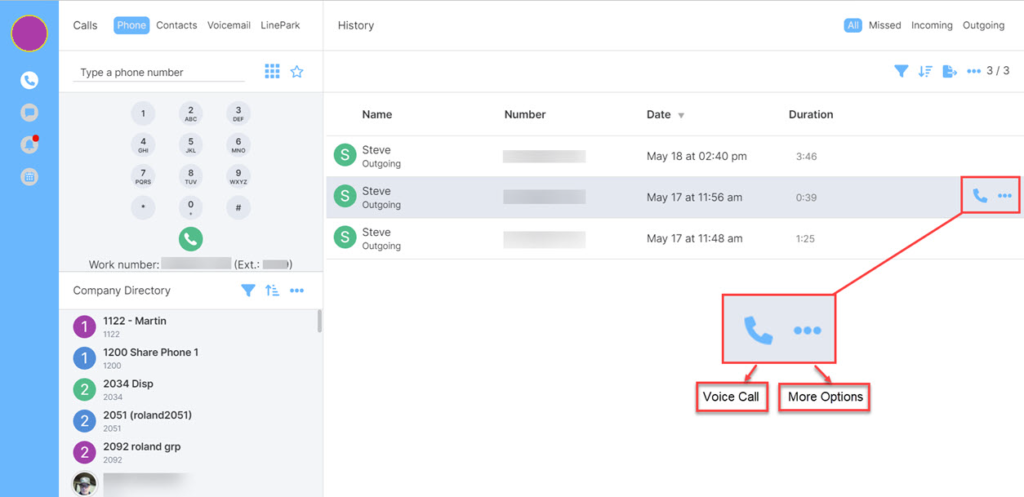
The options to the right-hand side of each call in the history will depend on the type of number. For example, below shows the options for an extension number.
In the call history there are another four icons that appear at the right of the line when you hold the mouse over the option. These are as follows:
- Message – Send a message to the person who called you.
- Voice Call – Begin a voice call with the person who called.
- Video Call – Start a video call with the person who called.
- More – This opens a pop-up with the option to add the contact to favourites or to contacts.
If the call was a cell number, then the options will be:
Contacts
In contacts there is a drop-down list of folders, these include: Organizational Contacts, Outlook Contacts and Global Address lists. If Google contacts is integrated there will also be an option in the drop-down for these.
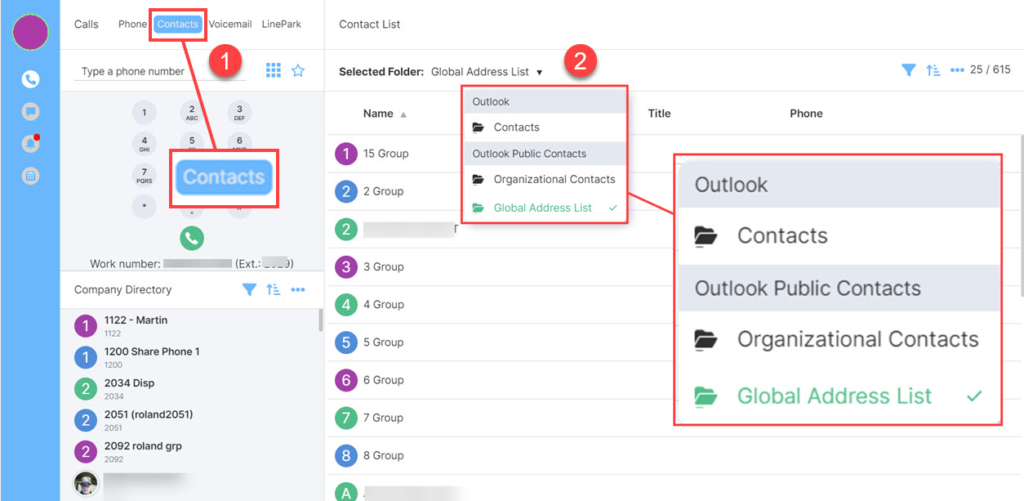
- Outlook Public Contacts – With the Office 365 enabled these are pulled from the My Contacts section in Outlook:
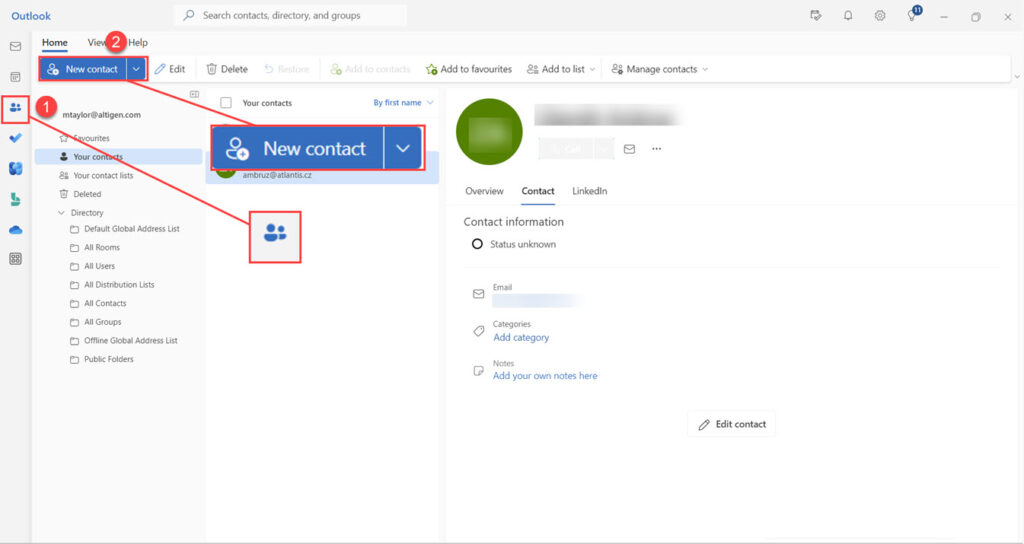
- Organizational Contacts – These are also from Outlook.
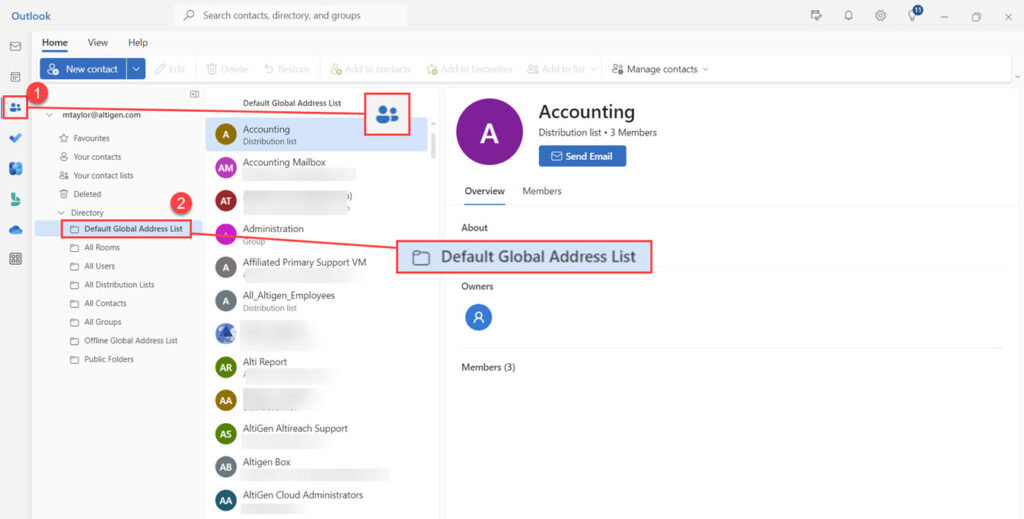
- Global Address list – Again from Outlook, under contacts Global address list is to the left under Directory. Click on the default global address list and the list of global contacts will show in the next column to the right:
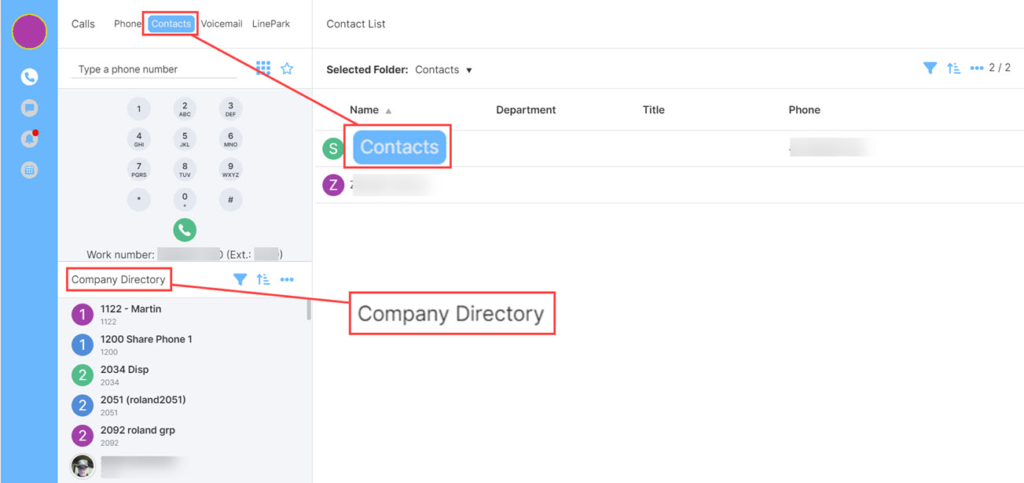
- Company Directory – This appears in the left of the screen; this is a list of contacts for the company as listed in the AS7.
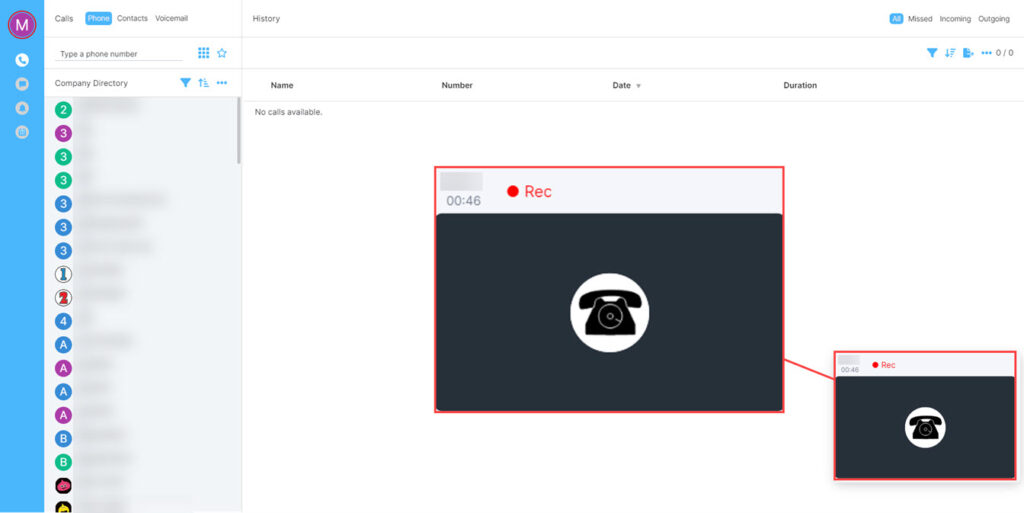
Call Recording
The ability to record calls can be turned on by an administrator in the PBX. If this is enabled a user will have an option when making a call to record that call to their Voicemail box. This is for Ad Hoc call recording only and not to be used as an enterprise call recording solution.
Recording A Call
An agent can record a call by firstly answering or making a call:

When the call is in progress click on the button with the three dots, then a pop up will show with the following options:
- Recording to VM (*0)
- Hold
- Transfer
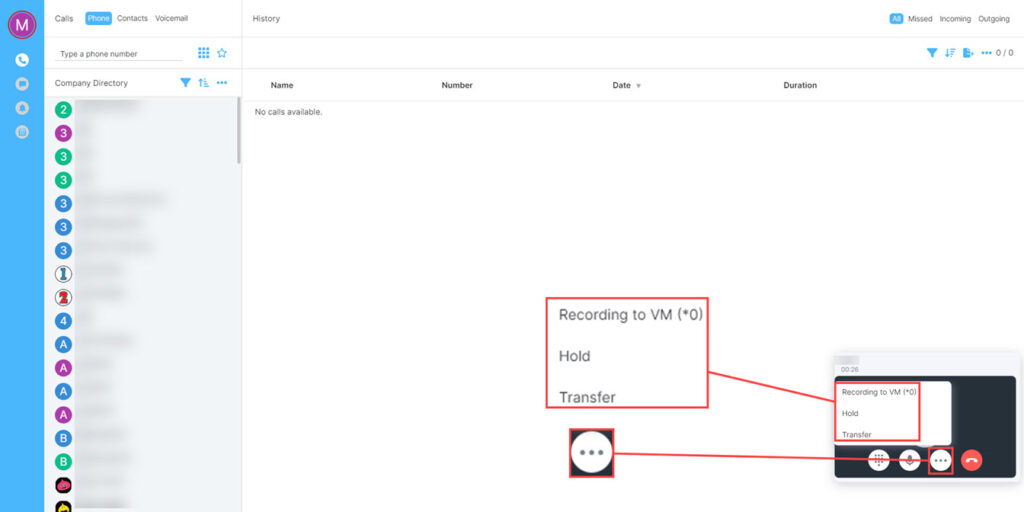
Click on the Recording to VM or if using a phone type *0 to begin the recording. The caller will hear a beep. This beep will repeat during the call. The display will also change again to show the call is being recorded:
Please Note: It is important to notify the caller that the call is being recorded.
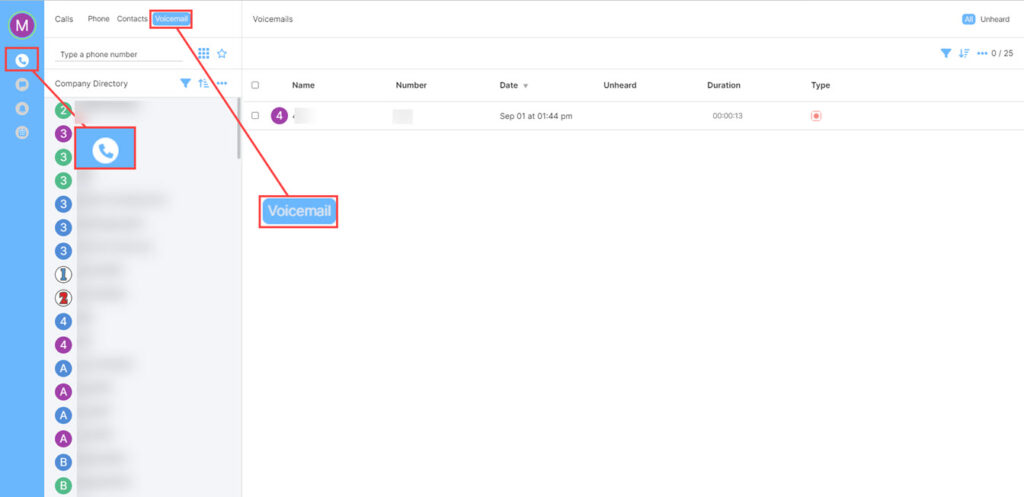
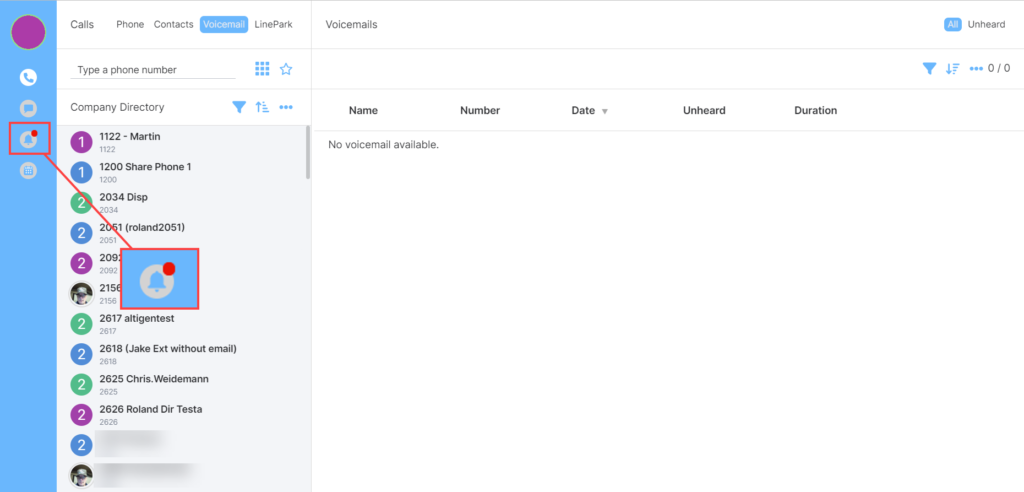
Once a recording is captured it will be shown in the user’s Voicemail Box. A red dot will appear next to Voicemail to show there is a new voicemail. When this is clicked the screen will show the list of voicemails and the type:
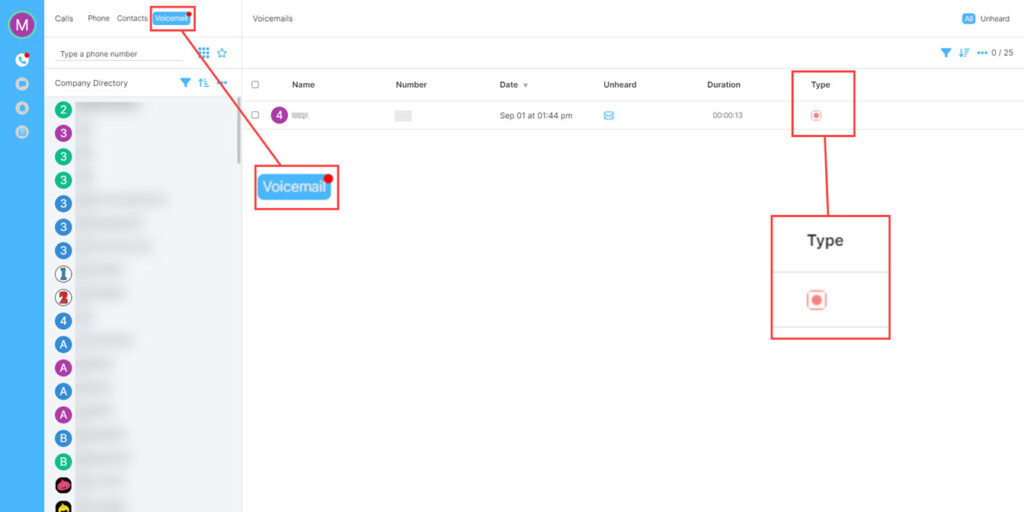
The above example it is showing as unheard and a call recording.
Click the line the voicemail is on to see a list of options:
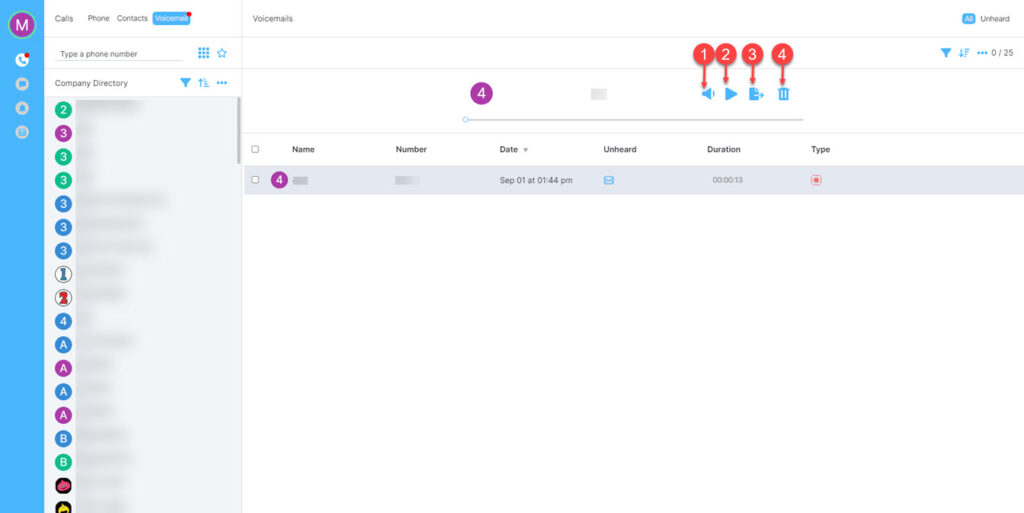
- Mute Button
- Play Button
- Export – This will open a .wav file in a download.
- Delete
These recordings should be deleted often to prevent storage becoming an issue.
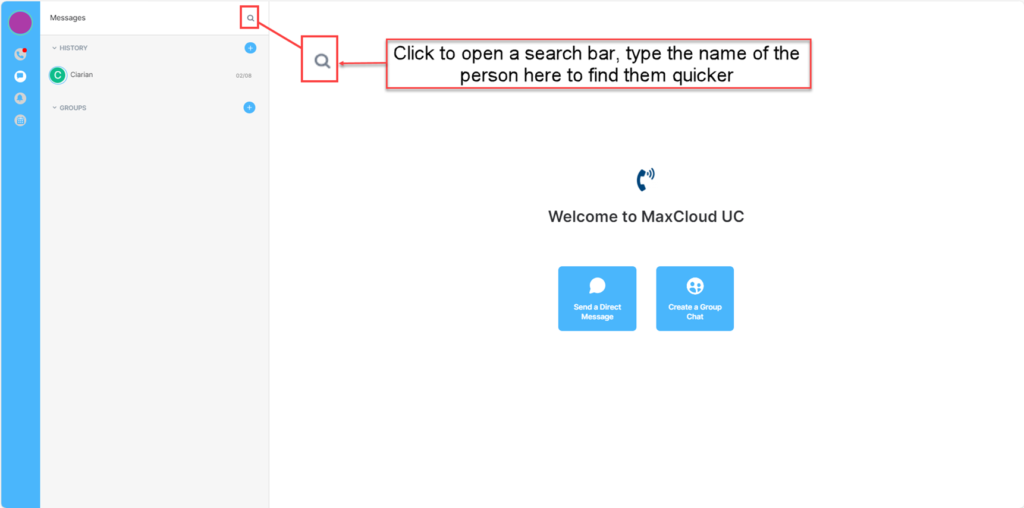
Direct Messages
Internal contacts should be available to search by username. Click the Direct Message icon, this will open a window (see image Direct Message below) allowing the user to type the name of the person they wish to call.
Click the correct contact, this will open the chat window.
On this screen are the following icons:
| Icon | Description |
|---|---|
| 1 – Conference Call | Create a conference call from your chat session, allows additional participants, screen share and Video. |
| 2 – Video Call | Create a video call from a chat session. |
| 3 – Voice Call | Call the person with which you are chatting. |
| 4 – Notifications | Opens a window to the side of the chat giving any notifications you have. |
| 5 – Information | Opens a window to the side giving the room information and settings menu for that room. |
| 6 – Emoji | Opens a list of available Emoji’s to add to chat. |
| 7 – Files | Opens files, choose file to share, double click on the file required, a box appears asking you to click upload. Once done the file will be shared in the chat. |
| 8 – Voice Message | Click this icon and record a voice message. |
Roles and Permissions
To set roles and permissions, go to the chat or conference room that need permissions setting then click on the name at the top. This opens a pop-up screen with the group settings menu:
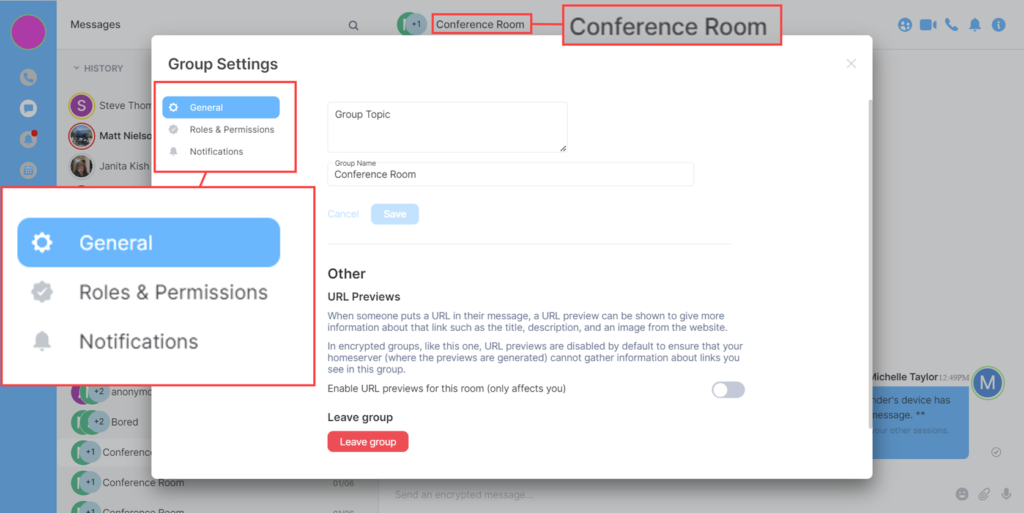
Now click on ‘Roles and Permissions:
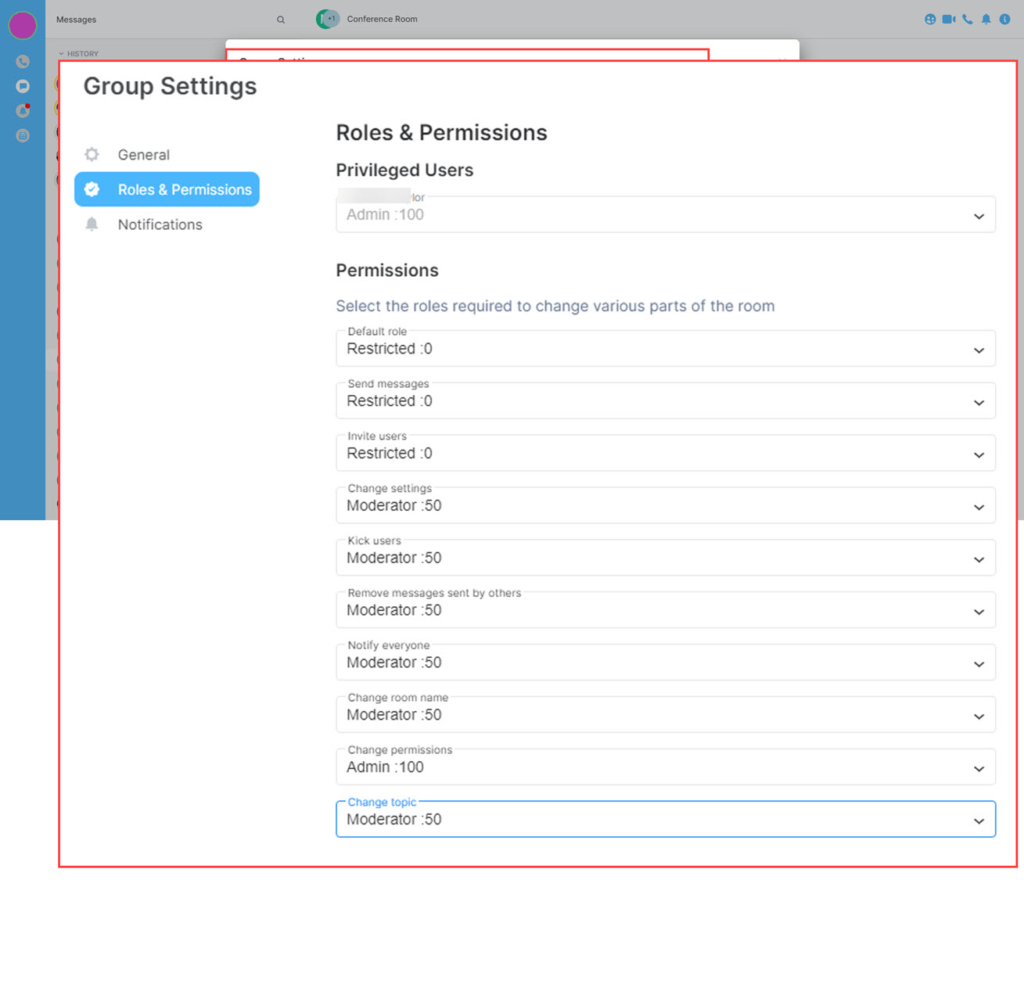
The privileged users should be the person who is setting up the group so in this first box will be a name and admin permissions are automatically given to this person.
Next is a list of roles that can be changed.
- Default role.
- Send messages.
- Invite users.
- Change settings.
- Kick users.
- Remove messages sent by others.
- Notify everyone.
- Change room name.
- Change permissions.
- Change room avatar.
- Change topic.
Each of these permissions can be set to:
- Default
- Moderator
- Admin
- Custom level
When using Custom Level, it is necessary to enter a Priority.
All users in the group with role “Custom Level” and the defined priority will have the permissions set in the Group Settings Roles & Permissions.
Conference call / Meeting
A conference call or meeting is a video call that can include two or more people, this option allows different backgrounds and screen sharing. To share documents or send a message the user will need to go back to the main window (conference call opens a new tab) and type in the group there. It cannot be done from the conference itself. A screen share can be done in a conference/meeting.
To begin a Conference call, click on the circle with two people in on your direct message screen or, from the home screen click on create a group chat. This opens a window giving a link to the meeting, an option to change the display of your username and the ability to join the meeting.
If users have a recurring meeting, they can join by going to the group (conference under Groups) select the correct meeting and then click on the conference option in that window. Or click the link that has been sent to.
NOTE:
If you try to enter the meeting before the host a message will show on the screen asking if you are the host, if yes then, click the ‘I am the host’ button and authenticate or if not then click ‘Cancel’
As mentioned above it is possible to move from a voice call to a conference if the screen share or adding more participants option is needed. This is done by clicking on the conference icon when the call is live. (The call may need to be placed on hold before creating the conference)
A link can be generated to send out for a later time/date, just create the conference then copy the link and send it out via message or email.
When joining a conference if a webcam is available, it will be on, there is an option to turn it off by just clicking on the camera icon.
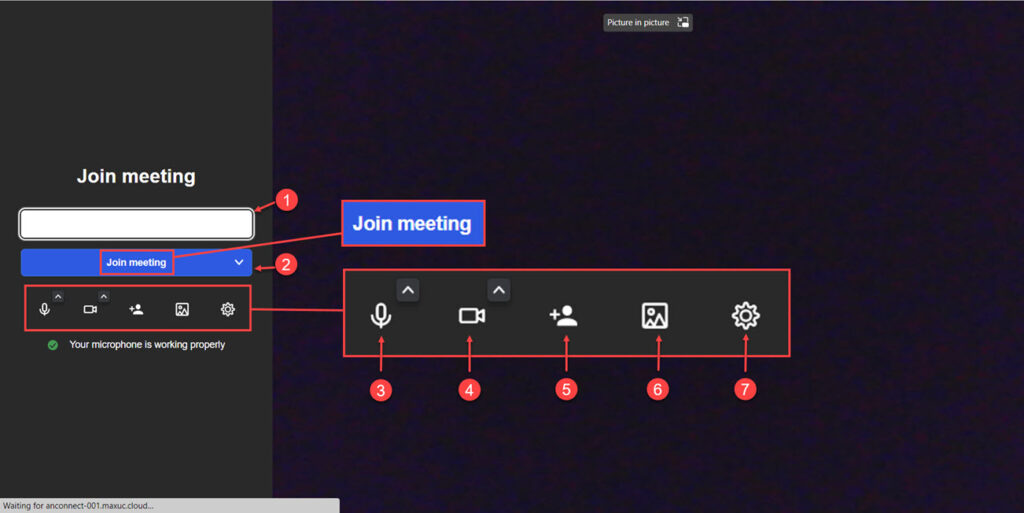
Available options here are:
- Username – This will show the name that you have set on the system.
- Join Meeting – Use this to join the meeting, you may wish to change the camera settings before you join.
- Audio settings – Clicking on the microphone icon will mute/unmute your microphone.
- Visual Settings – Clicking the video camera icon will turn on/off the webcam.
- Add people – Option to add people to the meeting.
- Background settings – Allows you to choose from a selection of backgrounds for the video.
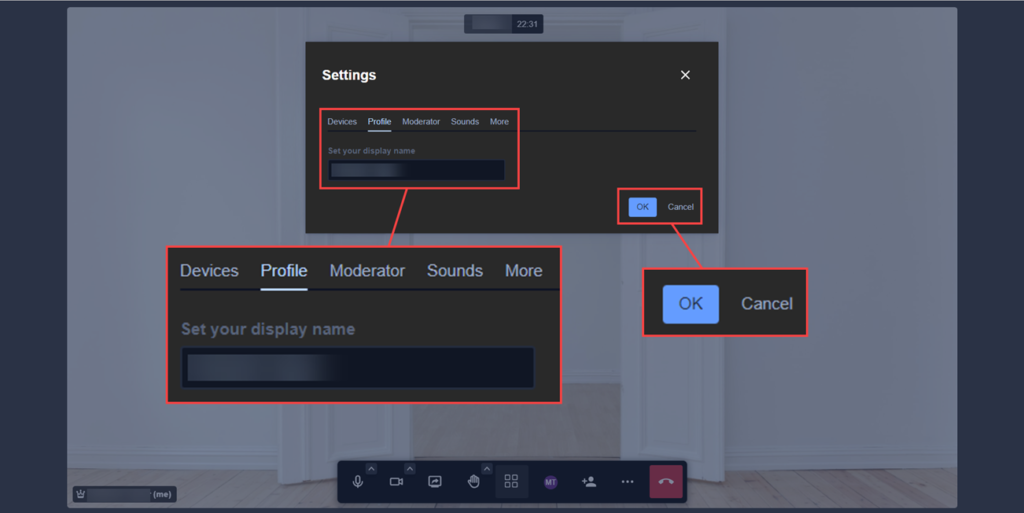
- Settings – Options for the following settings:
- Devices – audio and video settings.
- Profile – Shows your display name and allows you to change it.
- Sounds – Options for when to play sounds for notification.
- More – Option for language, desktop sharing frames per second, Self -view, Keyboard shortcuts and Pre meeting screen.
When joining the meeting the following screen will appear: (screen shown with user’s camera closed and a background enabled) The video option can be disabled before joining the call by clicking the video camera, the system will show a ‘/’ through the camera and the screen will go dark.
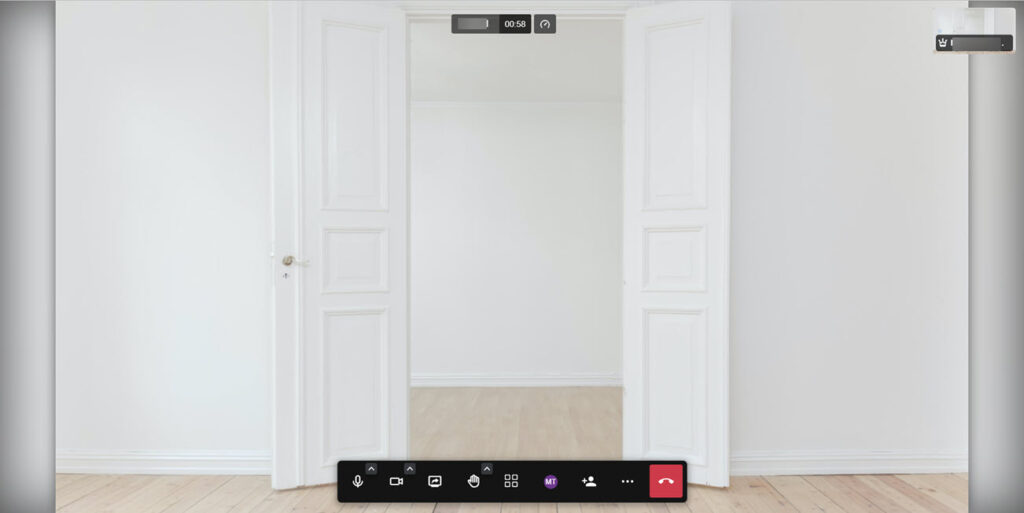
Upon joining the meeting, a menu bar is visible across the bottom of the screen, this contains the following options: (From Left to Right)
- Audio (Mute, unmute, change audio settings)
- Video (Start, stop video)
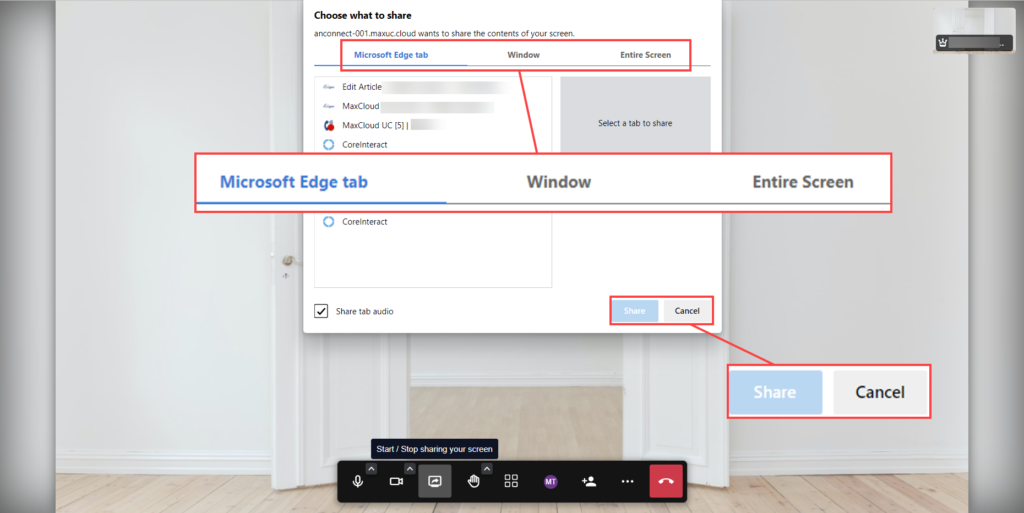
- Screen share (opens a new window, options to share – Entire screen, A window or a Tab)
Note: While sharing a meeting, MaxCloud UC client does not outline what window is being shared
Important: Mac users will not have a choice of screen to share it will be current screen only.
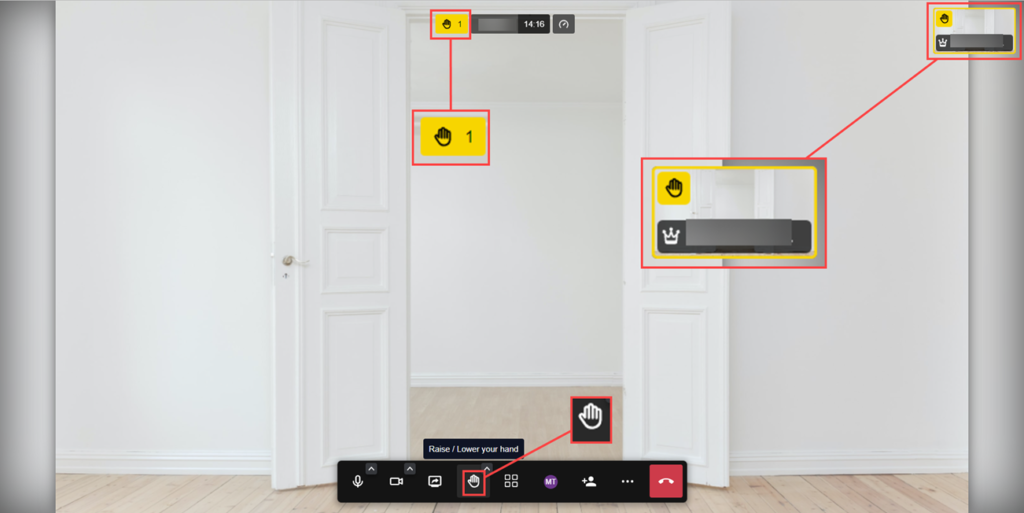
- Raise hand (Displays a hand above the username, showing that the person has a question or a comment) The arrow pointing up above the hand gives you a selection of emoji’s.
- Toggle tile view – View option for the screen.
- Initial in circle (user settings, see below image)
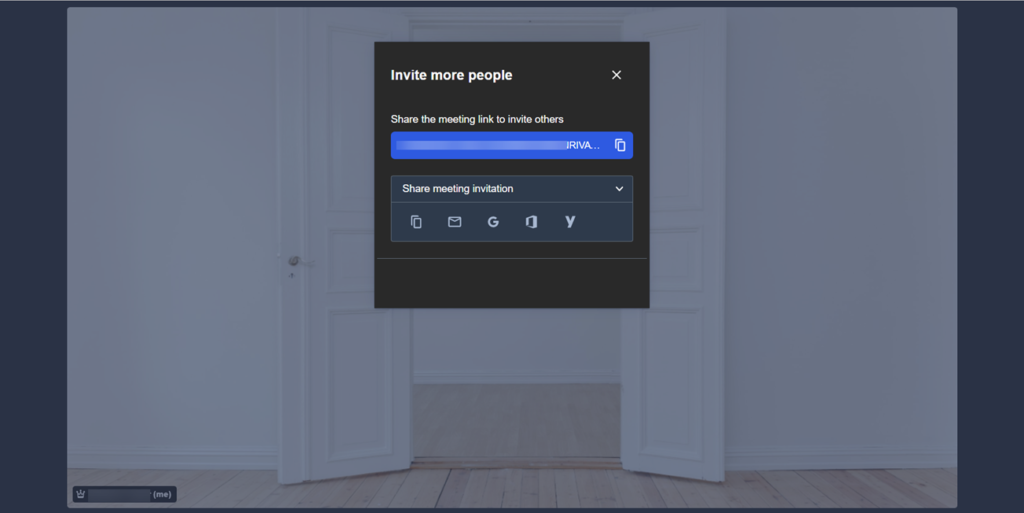
- Invite people – Click on here to open a pop up showing the link for the meeting, there is also a list of options under the drop-down tab. Either copy and paste the link or send it via email.
- More actions (A menu of settings see image below)
- Leave (click to leave the conference)
Video Call
A video call is a 1:1 call. The video opens in the direct message window. Within the onscreen menu are the following options:
- Dial pad – Brings the dial pad to the main screen.
- Audio – Mute/unmute your microphone.
- Video – Turn on/off your webcam.
- Screen share – Option to share a screen with the participants in the call.
- More –
- Hang-up – Leave the call.
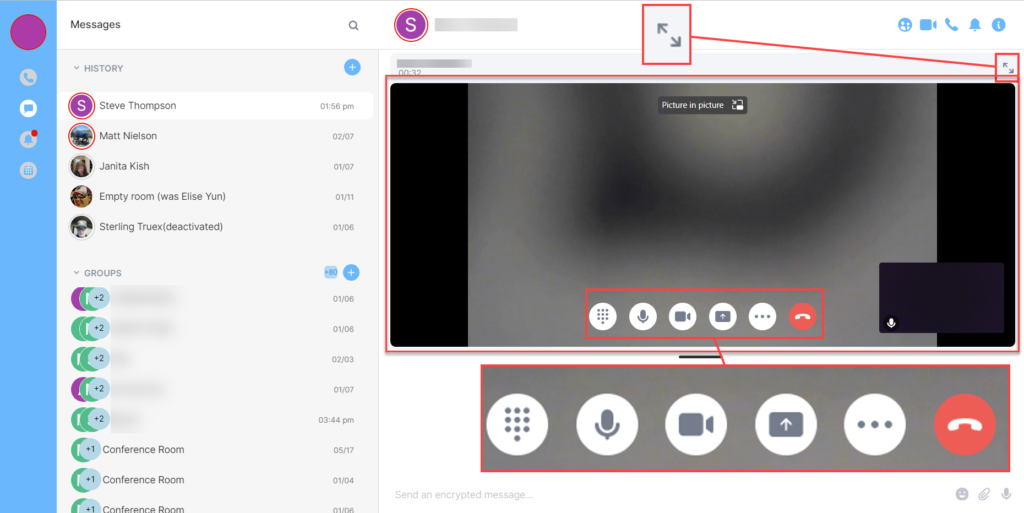
A video call can be used to share a screen with another person, users do not have to have the camera on, once in the call users have the option to turn off the camera and still share the screen. To stop the camera, click the camera icon.
A video call also rings through as an audio call to a user who has a handset and no video option.
Information
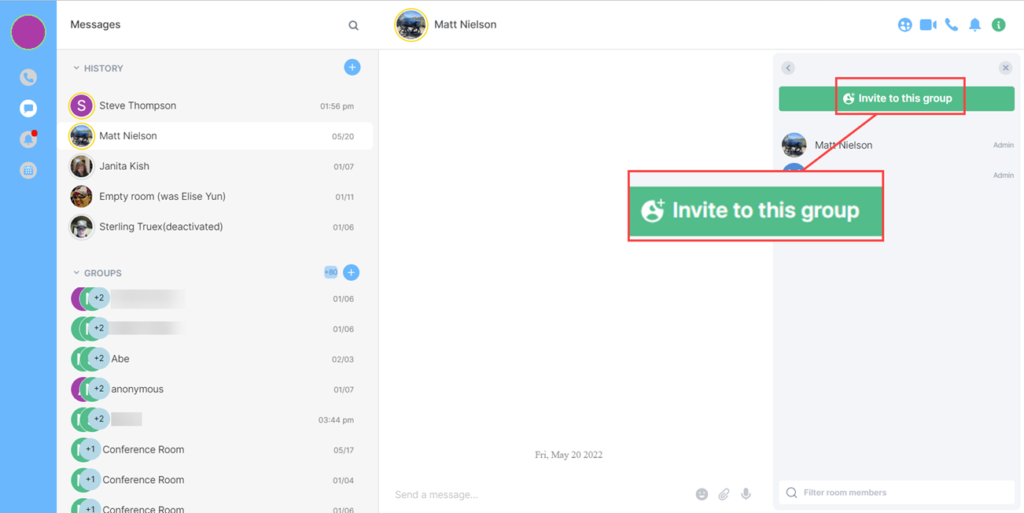
Information allows a user to invite other users to a conference or chat. Also, by clicking on the ‘<‘ a view of the room is shown. Showing who is in the group, any files that have been shared and some room settings:
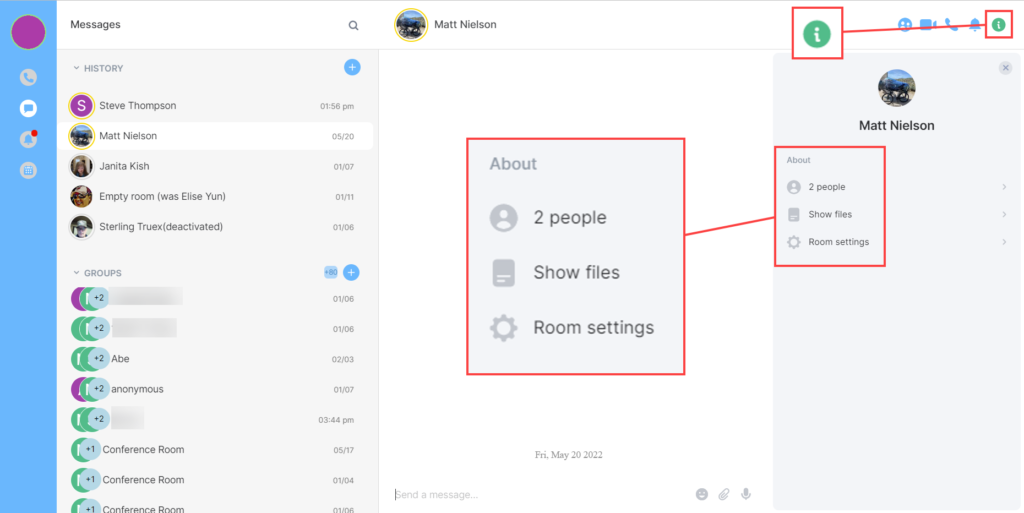
When people are added, there is an option to click on their avatar and see more information. The below image shows the options available. (When seeing this it will have the user’s avatar and information above their status)
- Direct Message – Messages the person directly.
- Jump To Read Receipt – Goes to last message read by user.
- Mention – Starts the line in the chat window with the “@username.”
Admin Tools:
- Mute – Allows the user to mute the person.
- Kick – Allows the user to kick them from the conversation.
Voicemail
Voicemail can be enabled in the settings menu.
NOTE: There is a maximum limit for emails, this is set at 50. Users will be expected to clean up their voicemail regularly to ensure this limit is not reached.

*NOTE: On the ‘No reply’ option there is a delay setting, please make sure this is set to at least eighteen. This allows for latency, if you have it set as less it could result in you not being able to answer the call. *
*If a user wished to be undisturbed but still wants voicemails then this needs to be set to ‘unconditional’*
An email will be sent if the Send Message by E-Mail (see above image) is activated. The email will show the name or number of the person who left the voicemail, an attachment with the message should also be included.
Remember to regularly delete voicemails to prevent the mailbox being full.
Voicemails can be accessed by the call icon or by calling into the voicemail using *86 and the PIN number that has been set.
Any voicemails a user has will be in the list, to hear the voicemail double click on the contact, this opens a box above with the options to listen.
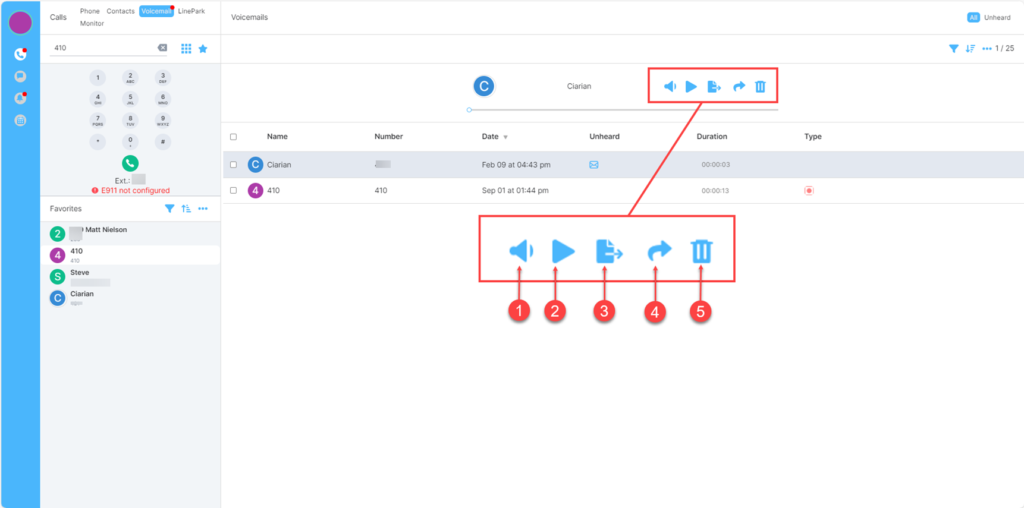
- Mute
- Play Message
- Export
- Forward
- Delete
Also ensure that a PIN number is set for the user’s voicemail.
If voicemail is set to send to email a pop-up screen will show with the following message when a voicemail is left:
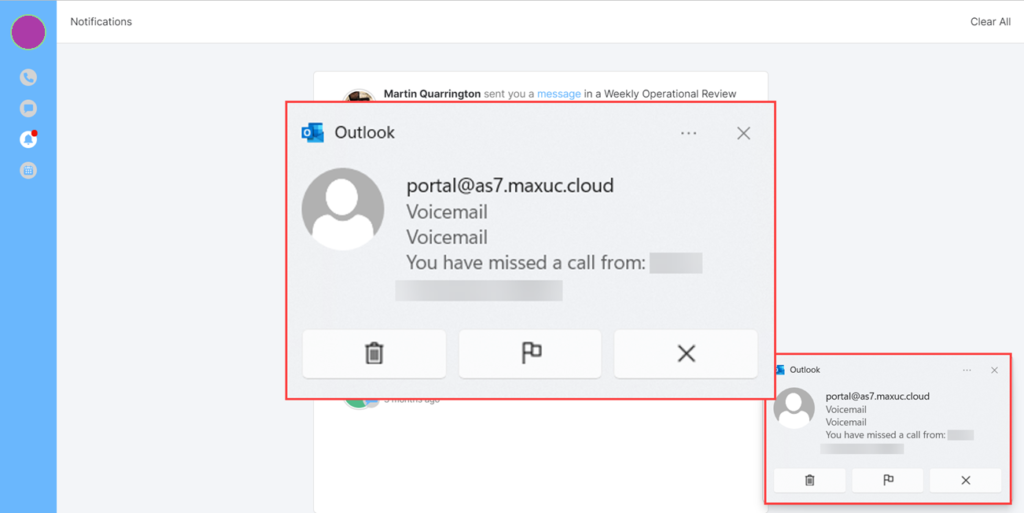
From within the email is an option to play the message:
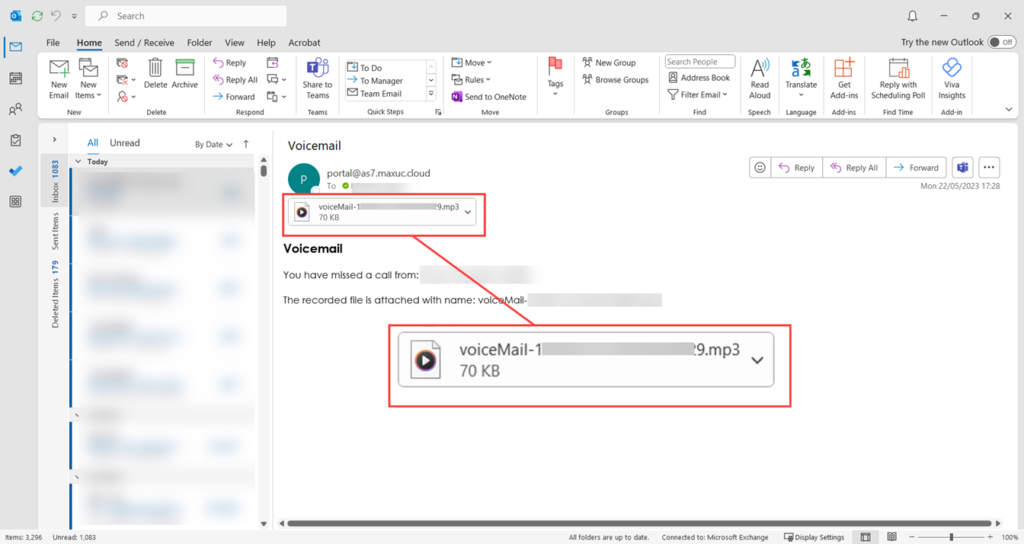
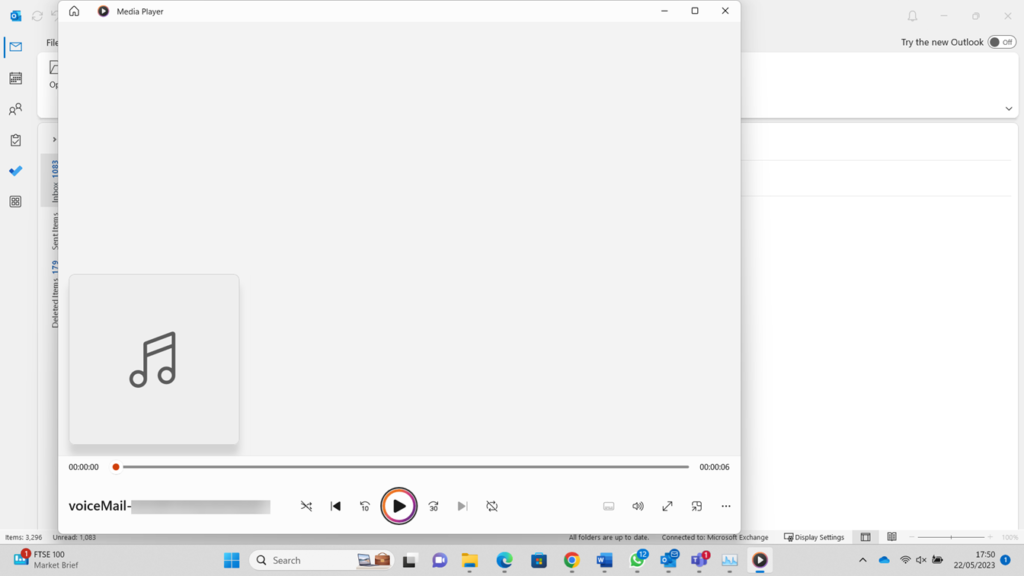
Double click on the MP3 file to open the message:
If the system is set up on the back end to delete an email once it has been listened to from the email, then it will be removed after it has been listened to.
Changing The Voicemail Message
From a phone or device, dial *86 from your extension or *86+extension number while On-Hook, then going off hook will put the user into the Voicemail menu.
Following the voice prompts, a user can Record/Modify their Greeting, listen/delete voice mails or call the caller back (provided that option is enabled for your extension)
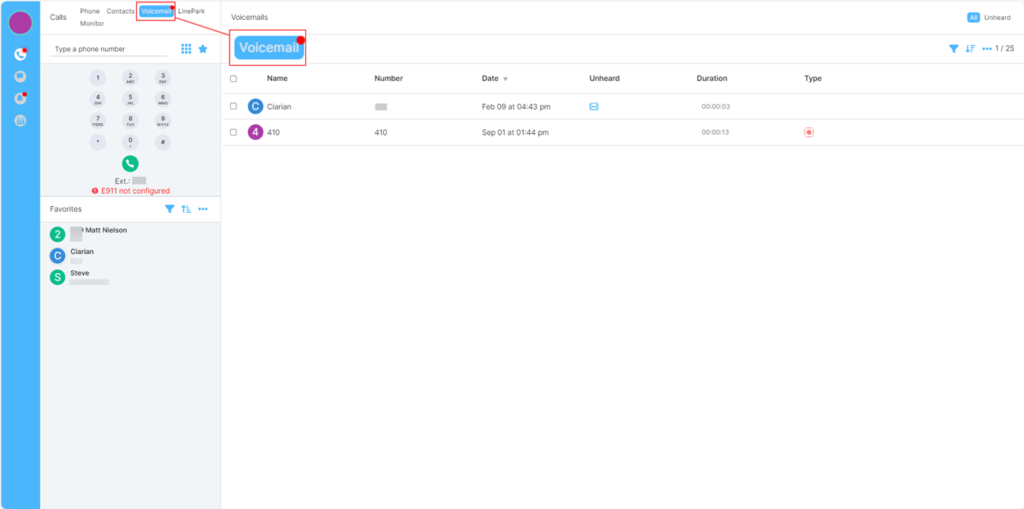
Voicemail Forwarding
Voicemails can be forwarded to another extension; at this moment only one voicemail can be forwarded at a time.
Click on the voicemail tab to see the list of voicemails:
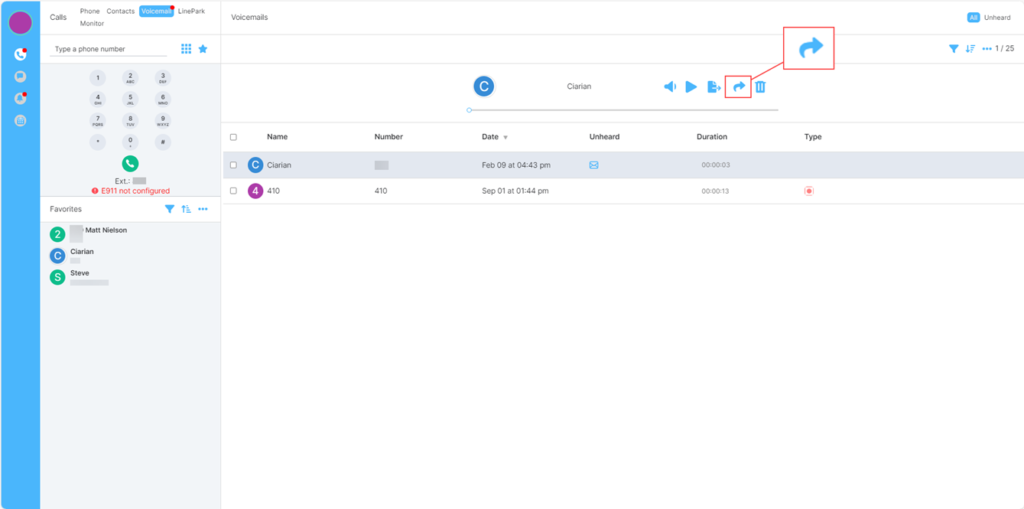
Select the voicemail to be forwarded.
A list of icons will be available above the voicemail list now, click the arrow as shown below to begin the forward:
A list of users will appear to choose from. Click to choose the user the voicemail will be forwarded to from the list then click Forward:
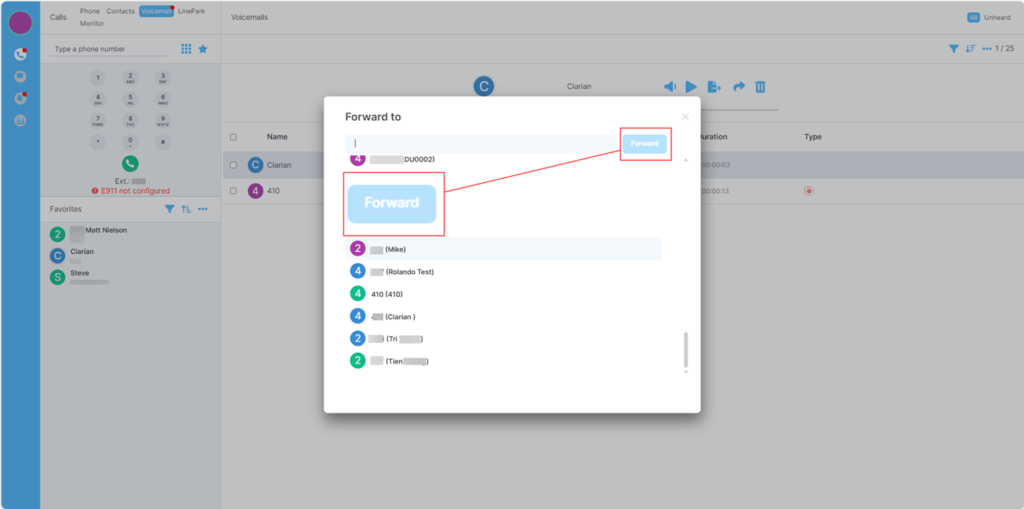
A notification will appear to say the voicemail has been forwarded:
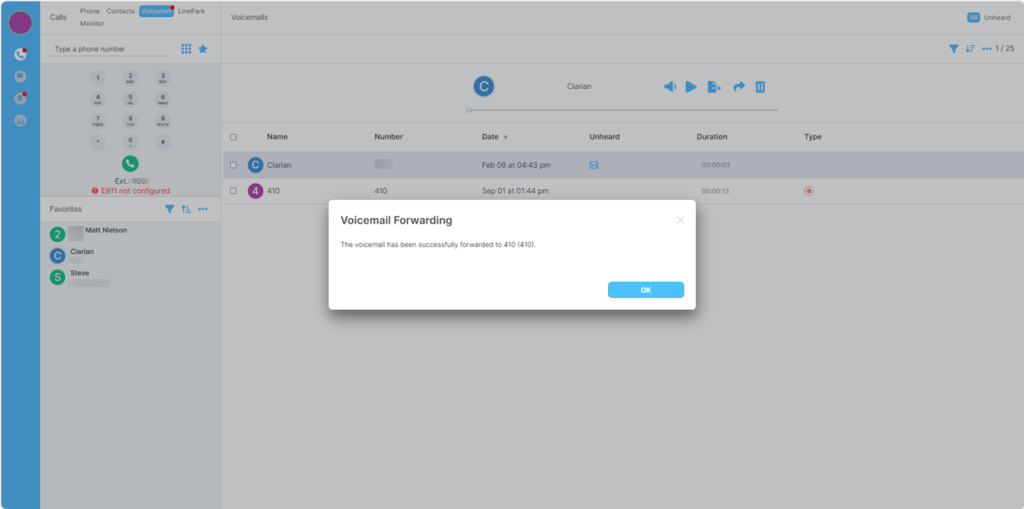
Note: This feature will only work for voicemail and not for recorded calls.
Call Transfer
Within Voice and Video call there is an option to transfer the call to another person or a voicemail.
When a call is answered a row of icons shows at the bottom of the toast:
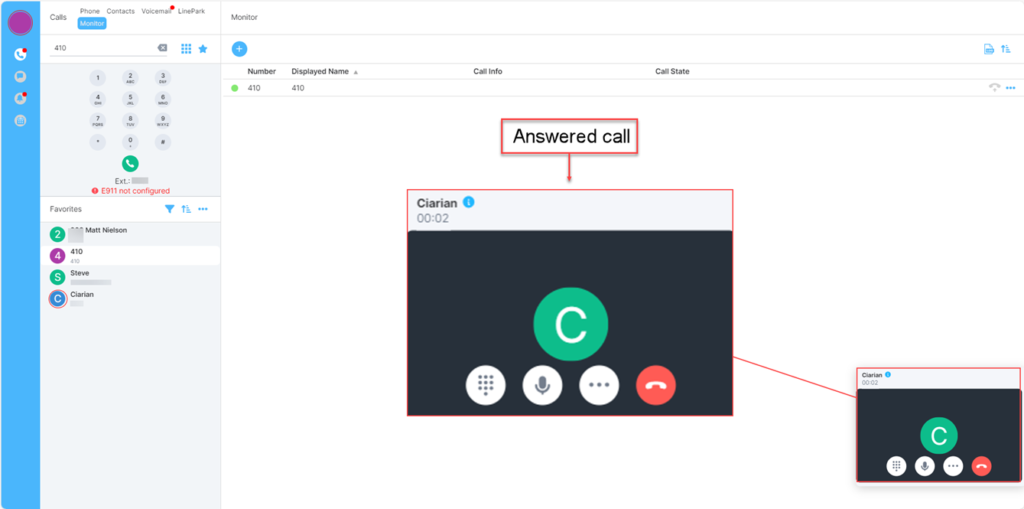
Click on the ellipsis to view the extra options:
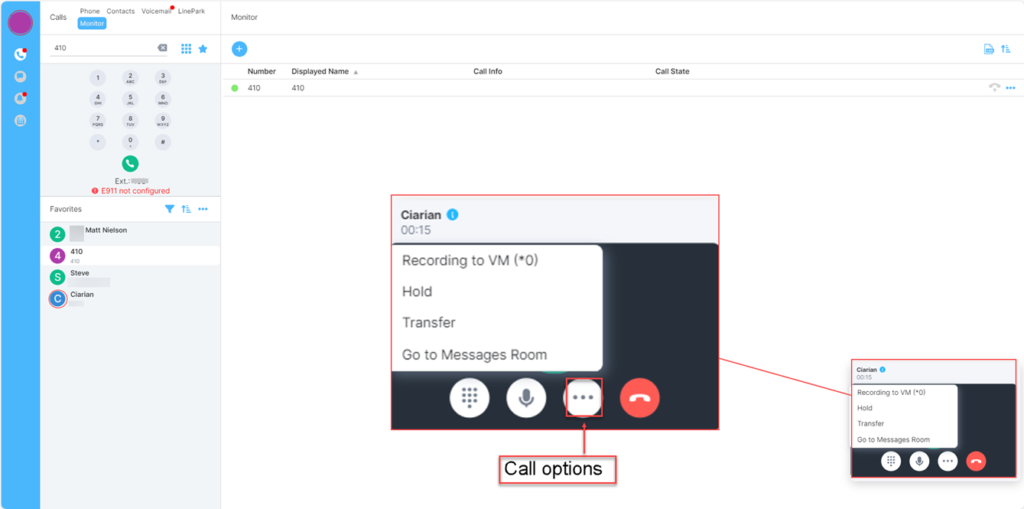
Click on Transfer from the list, this will open a window showing the transfer options:
It is possible to find a user by Favourite’s, User Directory or Dial Pad.
Direct Transfer
To send the call directly to a person just choose the name or number from the list (remember to click this to move it to the search text box)
Transfer will now become available to click in the bottom right of the window, when this is clicked the call will go directly to the person chosen and the call will be dropped from the user. It is not possible for the user to get this call back.
Consult Transfer
Using a consult first transfer will allow the user to first contact the person to whom they are transferring the call to ask if they are free, this is done as a direct transfer but before the Transfer button is clicked check the Consult First box to the bottom left of the window:
This will place the caller on hold, if the other person can take the call the user can speak to the caller again and pass them through using the transfer button that appears on the call toast:
If the person is unavailable to take the transfer the user can pick the call back up to speak to the caller.
Transfer To Voicemail
Within the transfer options there is a checkbox to send the call to Voicemail. This option is below the Consult First option:
Video calls can be transferred in the same ways as a voice call, providing that the person the call is being transferred to has a camera.
Call Monitor
It is possible to monitor another user’s extension/number. This feature will need to firstly be activated by an Administrator to allow access to this feature.
User Activation of Call Monitor
Once Admin have enabled this feature the user will need to go to the menu by clicking on the Avatar (1) then selecting All Settings (2) from the menu:
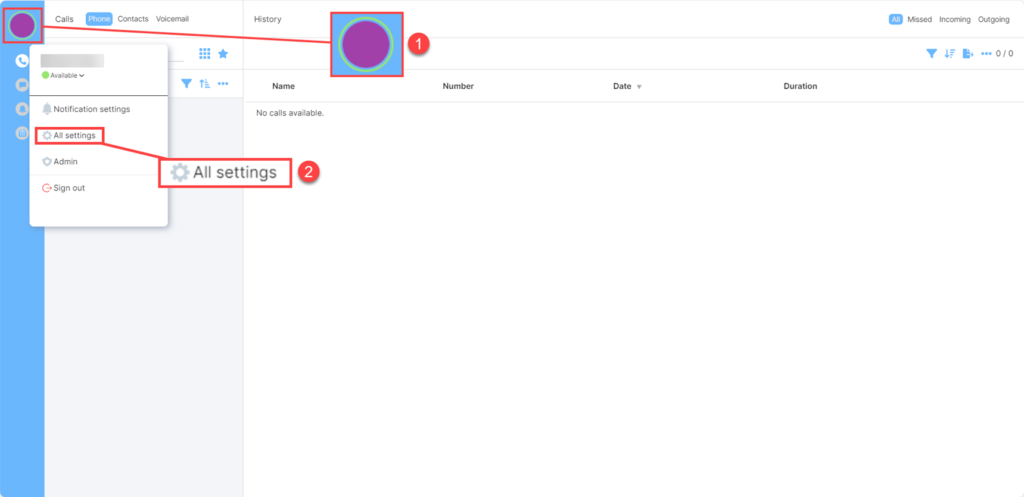
This will open a list of options to the right side of the screen. Click on the General tab.
If necessary, scroll down to the Monitor settings.
To switch on the Monitor option, click on the toggle to the right of the option:
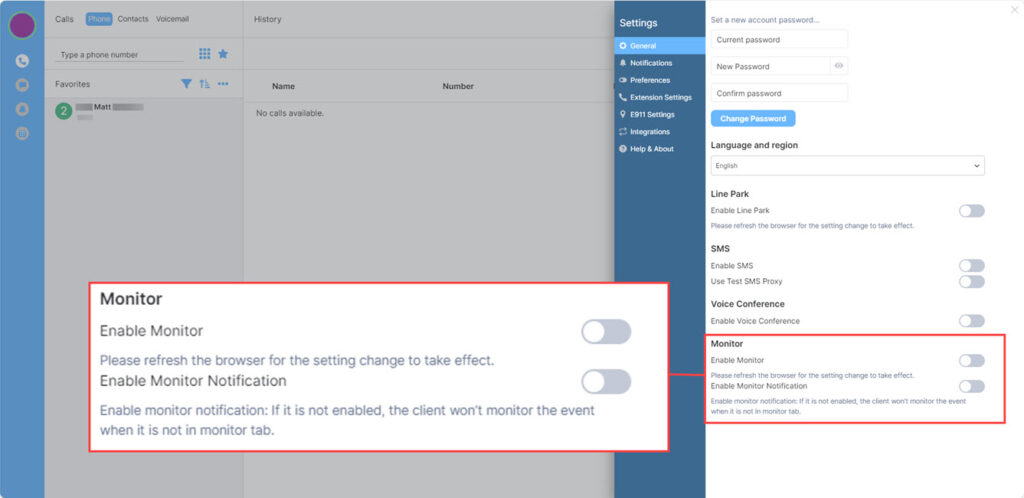
The screen will refresh once the selection is made to enable the Monitor.
If notifications are needed, go back into the menu, and enable the notifications for the setting. This option is found using the above steps.
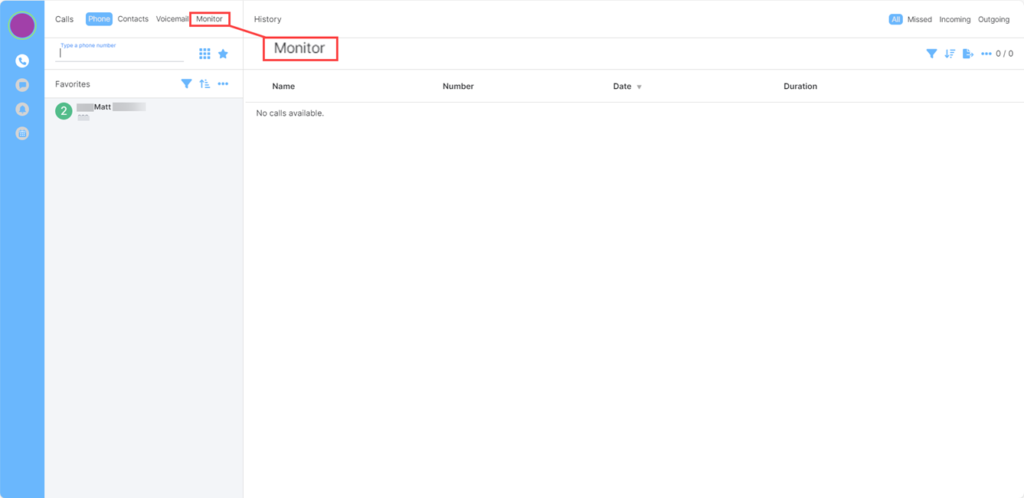
Once the screen has refreshed the Monitor tab will be visible in the top left of the screen:
Adding Lines to Monitor
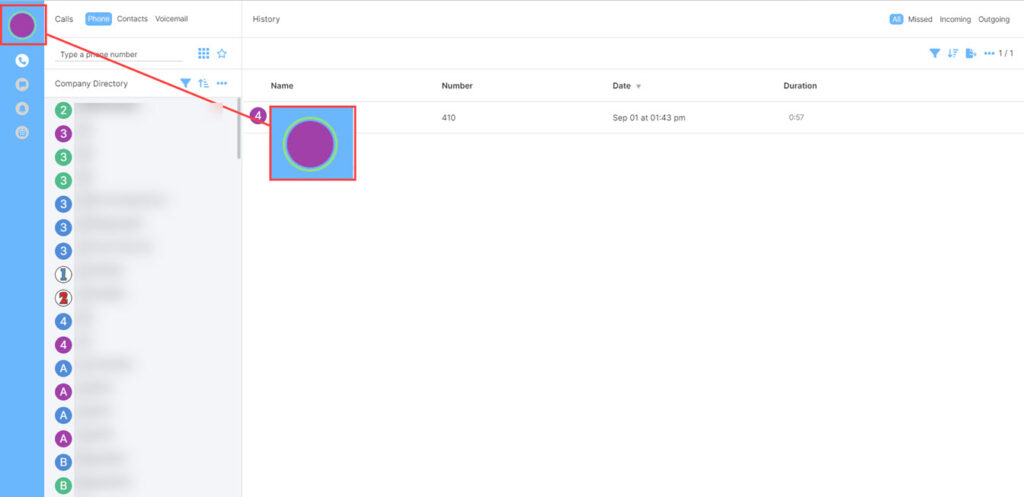
Click on the Monitor tab and click on the + in a circle as shown in the below image, this will open a list of available extensions to monitor as set by the Administrator:
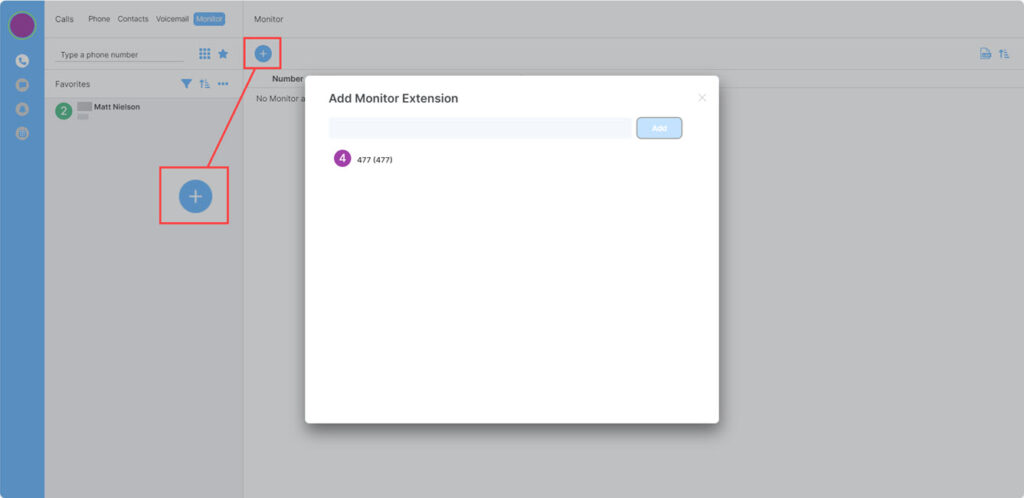
Select the number(s) to Monitor by clicking on the number to move it to the box. Once finished click on the Add button to the right of the selection box:

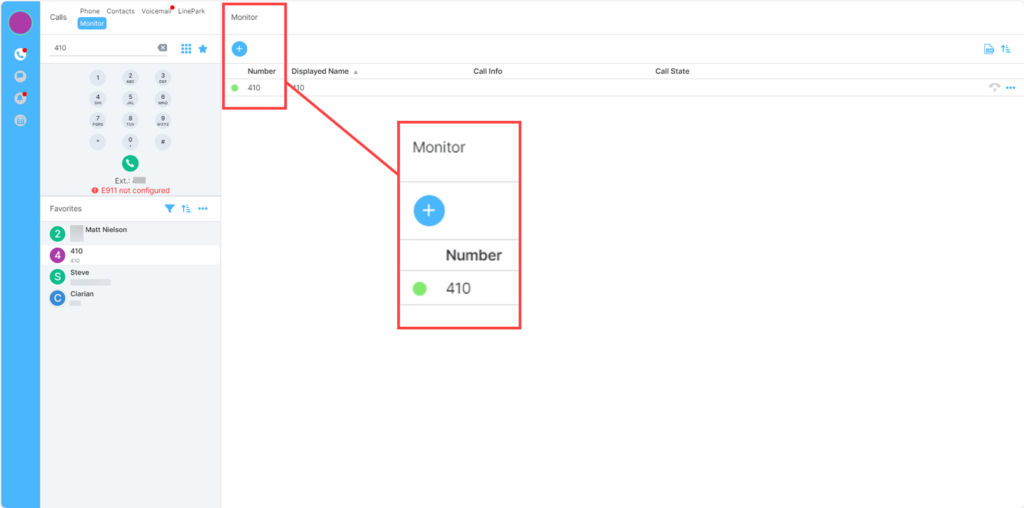
The selected numbers/extensions will now show in a list within the Monitor tab:
Note: If notification have not been enabled for Call Monitor, the user will only see the calls to that number when in the Monitor tab.
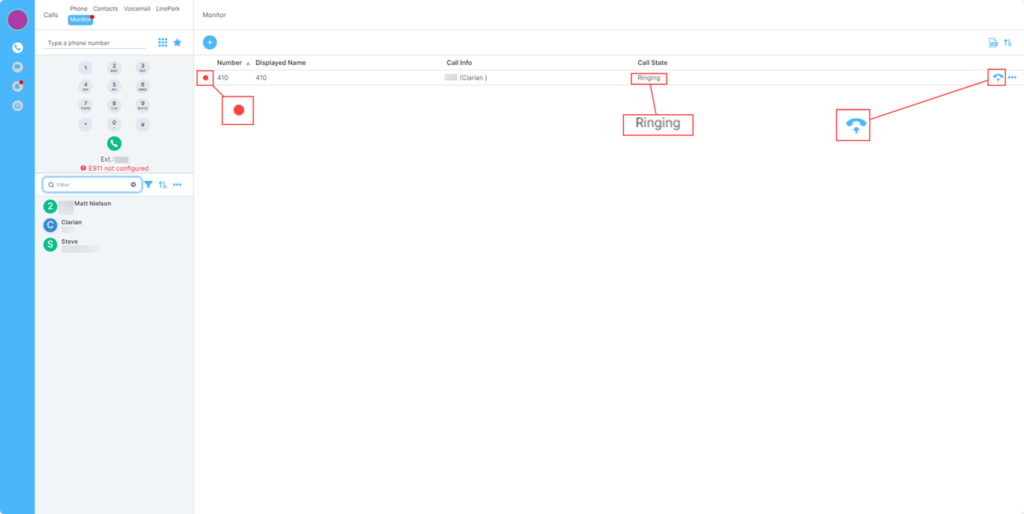
Monitored Calls
Within the Monitor tab when a call is incoming the agent will see a red dot blinking on the line of the number/extension the status will show that call is present by changing to Ringing.
To answer the call, click on the handset icon to the right of the line, this will give the option to pick up the call:
If notifications are enabled the user will have the ability to see a call from any of the screens:
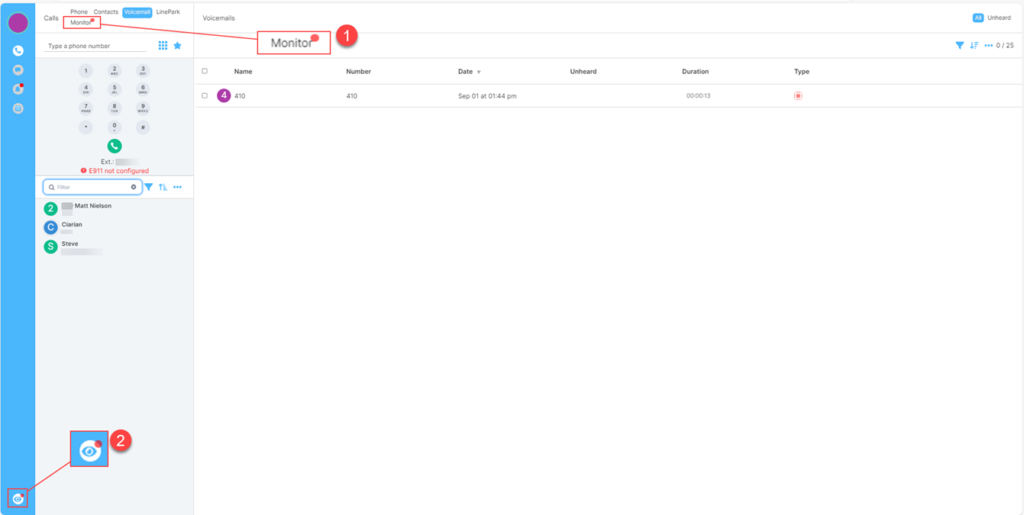
The above image shows the areas the notification can be found to show a Monitored line is ringing:
- The light blinking on the Monitor tab.
- The call notification with a red dot on an eye icon.
The user can either click the monitor tab or the eye icon to access the call Monitor list and pick up the call.
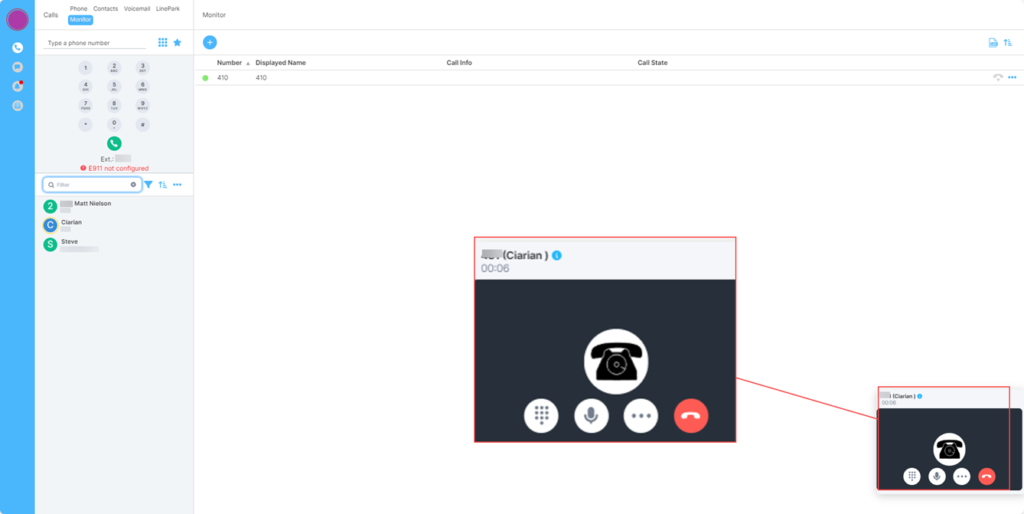
When answered the call will show in the screen in a toast (pop out) this will have the same options as a normal call:
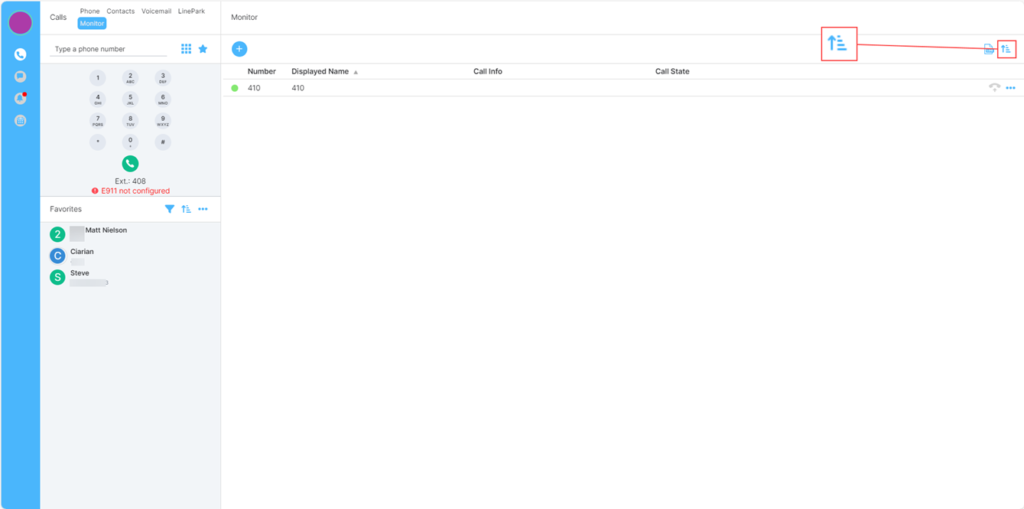
Under the monitor tab there is an option to view a log of the monitored calls. This is in the top right of the screen:
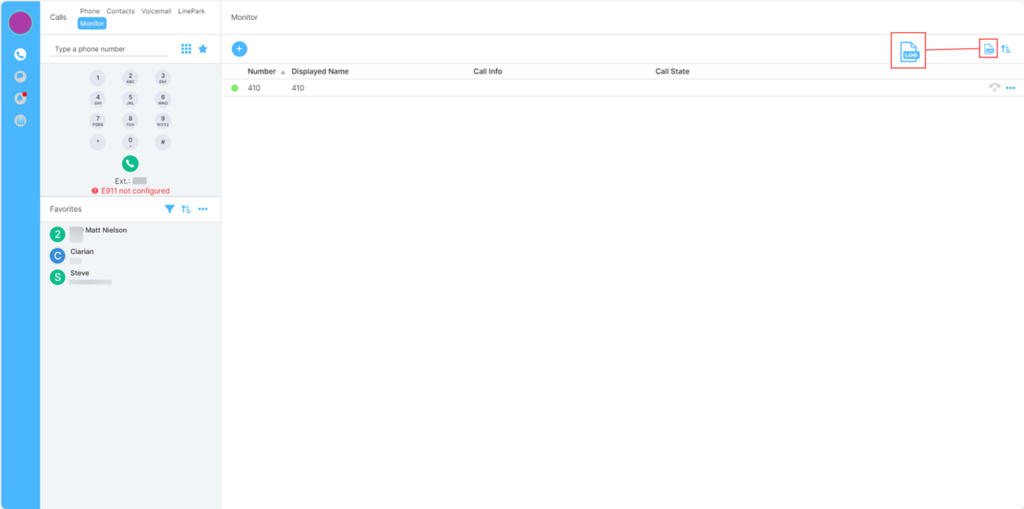
To view the logs, it is important to first click on the line the information is to be viewed before clicking on Logs.
When Logs is selected, a box will open showing the calls Monitored for that day:
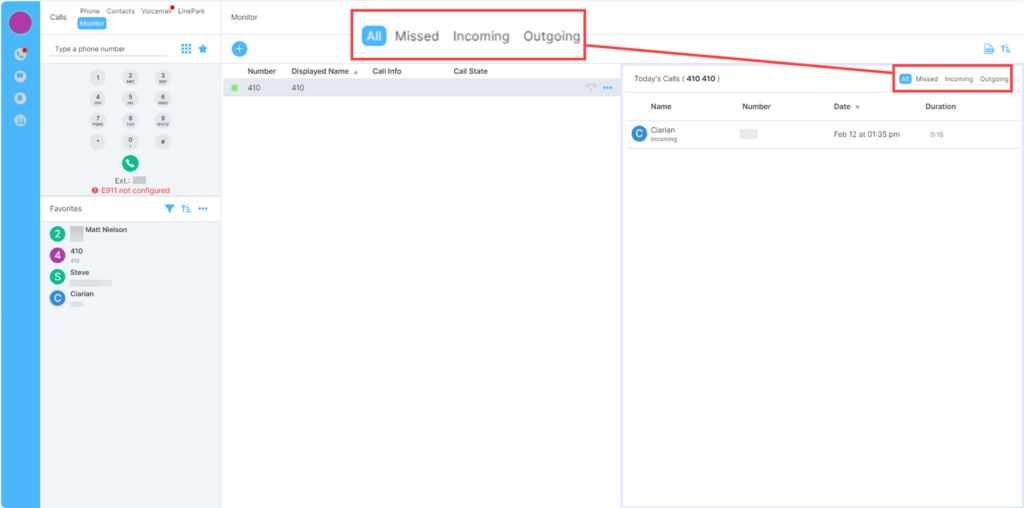
These can be filtered by All, Missed, Incoming and Outgoing.
Next to the Logs icon is a sort option:
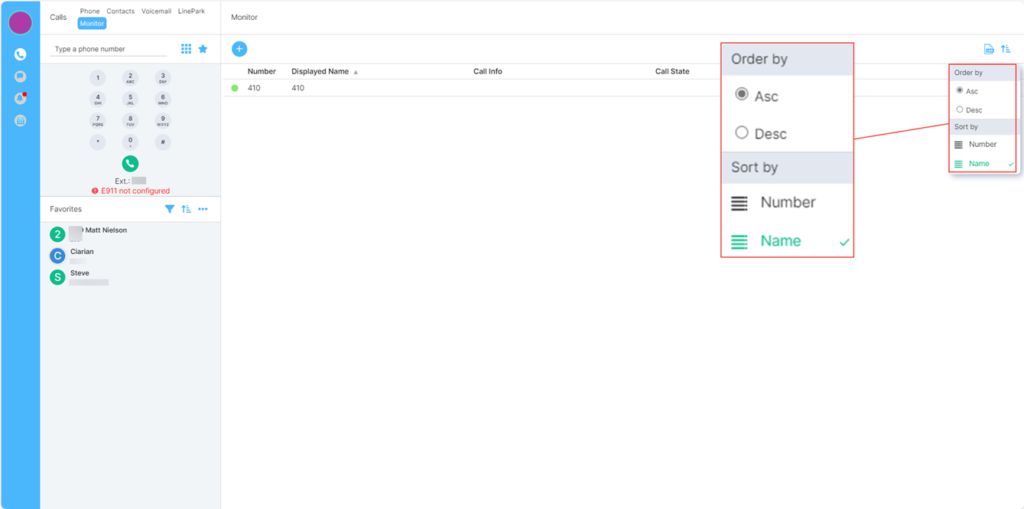
Click on here to sort the lines by either Ascending/descending or Number/name:
Deleting a Monitored Line
Numbers can be removed from the Monitor tab easily.
To do this click on the ellipsis (three dots) to the left of the line to be removed:
Click on the dots to show the option to Delete:
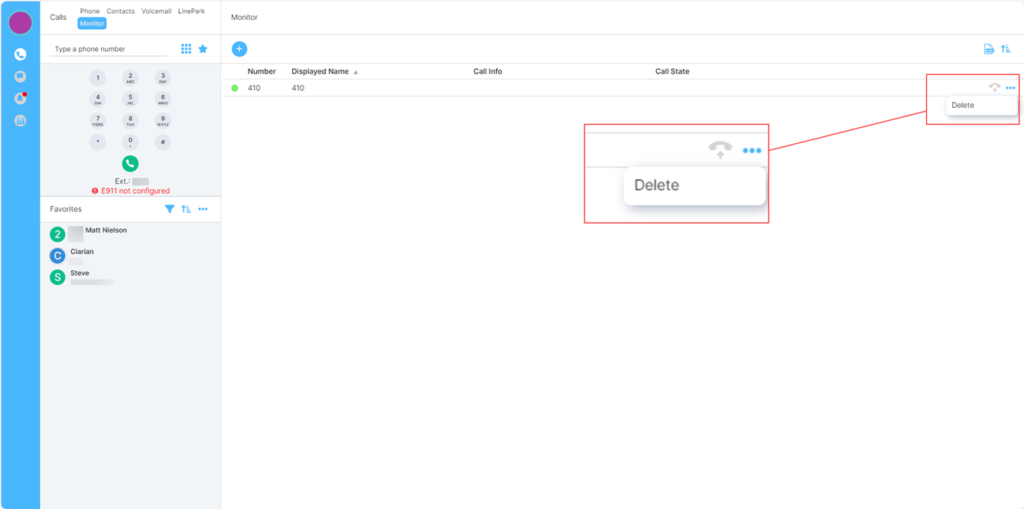
Click Delete and the line will no longer be Monitored.
The number(s) can be readded at any time by clicking on the + and adding in the numbers as described earlier.
Notifications
If Notifications are set up, when a message comes in and the user is busy with other Direct Messages or on another window, a pop up will appear briefly on the bottom right of the screen. Along with this they will also have the view as outlined below.
If no Notifications are set, then in the client a ‘dot’ should appear over the bell and a number in the address tab at the top of the window.
Clicking on the bell will open a window giving the information of missed calls and messages. To clear this list there is a button in the top right of the screen:
Calendar
Important Note:
To enable the Office365 calendar to synchronize there are a few steps for Admin Consent. These steps are detailed in the administrator document.
Once the steps have been followed the calendar should be synchronized with the users Office365 calendar, it will pull in all details from there, at present only an individual’s calendar can be viewed.
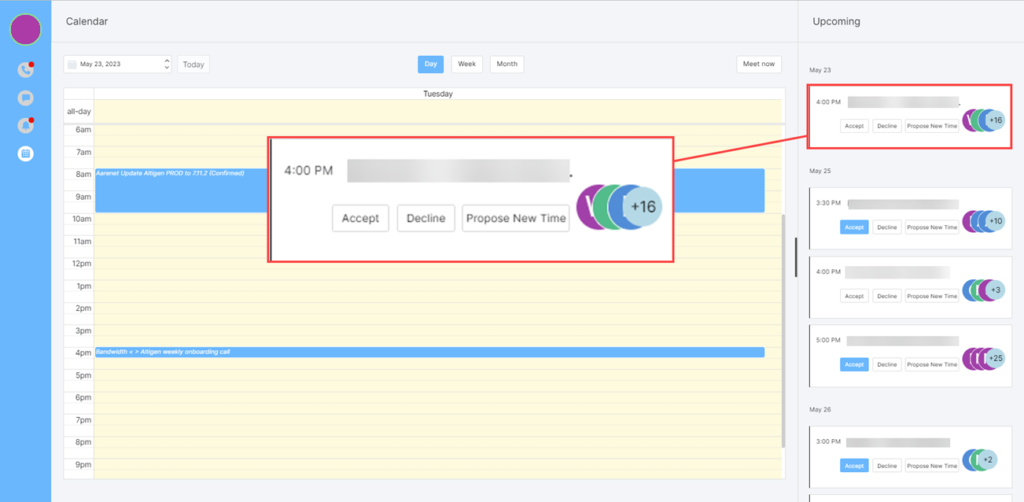
The calendar view shows the upcoming meetings for the user to the right of the screen. Under each of these will be three buttons:
- Accept
- Decline
- Propose New Time
Propose new time will open a window allowing users to choose a new time, both start and end time should be changed.
All options will trigger an email to the meeting organizer in Office365, they can choose their options for reply in the mail client, this will then update on MaxCloud.
Pickup Groups
If Pickup groups have been defined in the AS7 (administration Feature) then it is possible to pick up a call using the following options:
- *76 ExtensionNumber-> Pick up the call of this extension if ringing.
- *76 WorkGroup -> Pick up the call if this workgroup is ringing.
- *76 GroupNumber -> Pick up the call if any group members extension is ringing. Independently if this is due to a work group call or a direct extension call.