Overview
The Poly Edge E series phones are desktop phones featuring bright color (color) displays providing superior HD audio with Poly signature NoiseBlockAI.
Poly Edge E series phones supply the following features:
- A Surrounding LED lighting bar supplies notifications enabling the user to focus on what is important to them.
- They have an integrated Microban protection, reducing the growth of bacteria supporting the durability and cleanliness of the phone.
- With Poly’s commitment to accessibility the Edge series has been developed to include text to speech support and enlarged fonts. These are in addition to the accessibility features already available on Poly Phones.
- A dedicated pagination key enables the user to add up to three pages to the home screen. With the added pages the Edge E series phone can support from 16 – 50-line keys.
Please Note: Not all features may be available to a user as the system administrator will configure these phones for use.
The phones referenced in this document have been tested with the MaxCloudUC system.
Important Information
These phones come with Power Saving settings that are set as standard. If these remain unchanged there is a possibility that the user will find the phone will go to out of office (Do not disturb) mode at a set time of day or a weekend.
To view and update these follow the below steps:
- Click Home
- Select Settings
- Select Basic
- Select Power Saving
- Select Office Hours
- Select Start Hour
- Set Start Hour
- Select Duration
- Set Duration
They can also be set on the Poly Web GUI.
Poly Edge E400
View of Phone
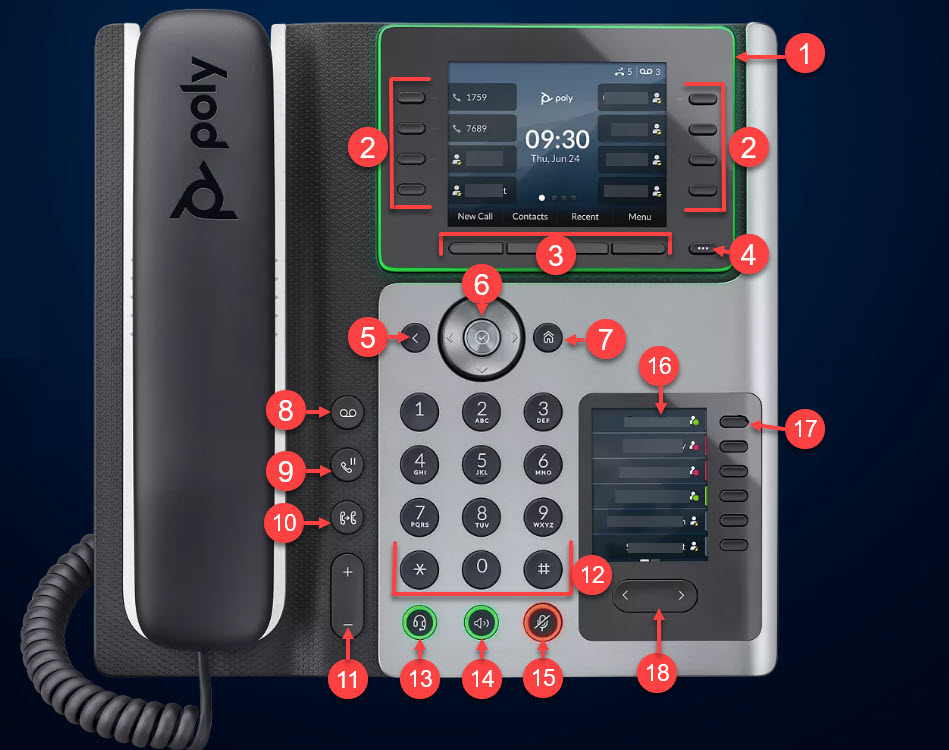
| Reference Number | Feature | Feature Description |
|---|---|---|
| 1 | Surround Lighting Bar | Provides call and phone status information. |
| 2 | Line Keys | Select a phone line, view calls on a line, or quickly call a favourite contact. |
| 3 | Softkeys | Select context-sensitive keys that display along the bottom of the screen. |
| 4 | Pagination Key | View additional line screens. |
| 5 | Back Key | Return to the previous screen. |
| 6 | Navigation Key/Select Key | Scroll through information or options displayed on the phone’s screen or select a field of displayed data. |
| 7 | Home Key | Display the Home screen from other screens or display the Lines and Calls screen from the Home screen. |
| 8 | Message Key | Access and manage instant and voice messages. |
| 9 | Hold Key | Hold an active call or resume a held call. |
| 10 | Forward/transfer Key | Forward or transfer an active call to a selected contact. |
| 11 | Volume | Adjust the volume of the handset, headset, speaker and ringer. |
| 12 | Dialpad | Enter numbers, letters and special characters. Use the Dialpad to select menu items that have index numbers. |
| 13 | Headset Key | Place and receive calls through a headset. |
| 14 | Speakerphone Key | Provides ringer and speakerphone audio output. |
| 15 | Mute Key | Mute or unmute the microphone during an active call. |
| 16 | Secondary Screen | Provides a line screen in addition to the main screen. |
| 17 | Secondary Screen Pagination Keys | View additional pages on the secondary screen. |
Back of Phone
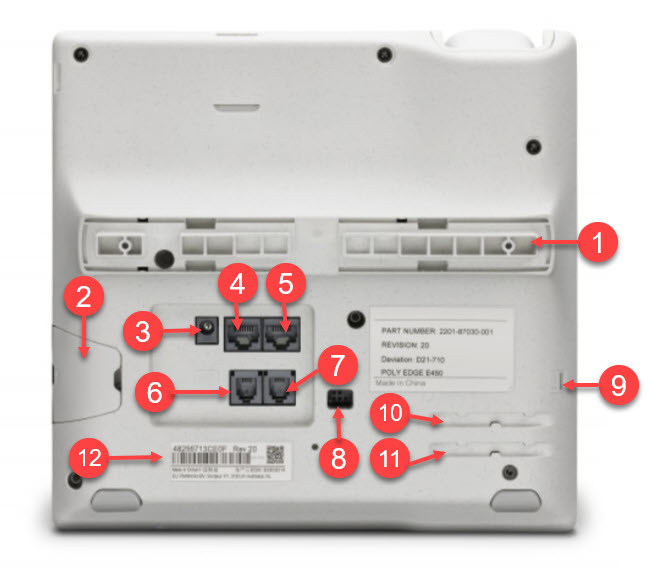
| Reference Number | FEATURE | FEATURE DESCRIPTION |
|---|---|---|
| 1 | Stand Connection Slots | Attach the stand to the phone. Enables the phone to sit at a 30- or 60-degree angle. |
| 2 | USB Port | Attach a USB flash drive, A USB headset or a compatible camera. |
| 3 | Power Port | Connect the phone to a power outlet. |
| 4-5 | Network Port | Connect the phone to a PoE supported Ethernet port. |
| 6 | Headset Port | Connect a headset to the phone. |
| 7 | Handset Port | Connect a handset to the phone. |
| 8 | Electronic Hookswitch (EHS) | Allows the use of the controls on a headset to answer or end calls. |
| 9 | Security Slot | Allows the phone to be attached to a desktop with a universal security cable lock. |
| 10 | Handset Cable Slot | Holds the cable away from the phone base. |
| 11 | Headset Cable Slot | Holds the cable away from the phone base. |
| 12 | MAC Address | Take a picture of this for reference when setting up the phone. |
Poly Edge E550
View of Phone
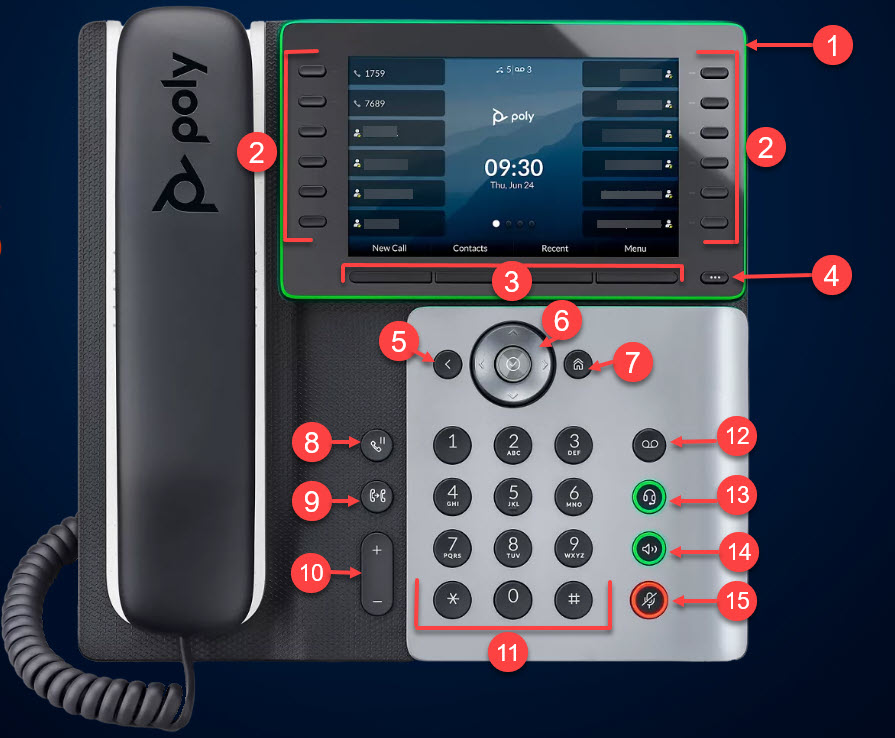
| REFERENCE NUMBER | FEATURE | FEATURE DESCRIPTION |
|---|---|---|
| 1 | Surrounding Light Bar | Provides call and phone status information. |
| 2 | Line Keys | Use to select a phone line, view calls on a line or call a favourite contact. |
| 3 | Softkeys | Select Context-sensitive keys that display along the bottom of the screen. |
| 4 | Pagination Key | View additional line screens. |
| 5 | Back Key | Return to the previous screen. |
| 6 | Navigation Keys/ Select Key | Scroll through information or options displayed on the phone’s screen or select a field of displayed data. |
| 7 | Home Key | Display the Home screen from other screens or display the lines and calls screen from the home screen. |
| 8 | Hold Key | Hold and active call or resume a held call. |
| 9 | Forward/Transfer Key | Forward or transfer an active call to a selected contact. |
| 10 | Volume Keys | Used to adjust the volume of the handset, headset, speaker and ringer. |
| 11 | Dialpad | Enter numbers, letters and special characters. Use the Dialpad keys to select menu items that have an index number. |
| 12 | Message Key | Access and manage instant and voice messages. |
| 13 | Headset Key | Place and receive calls through a headset. |
| 14 | Speakerphone Key | Provides ringer and speakerphone audio output. |
| 15 | Mute Key | Mute or unmute the microphone during an active call. |
Back of Phone
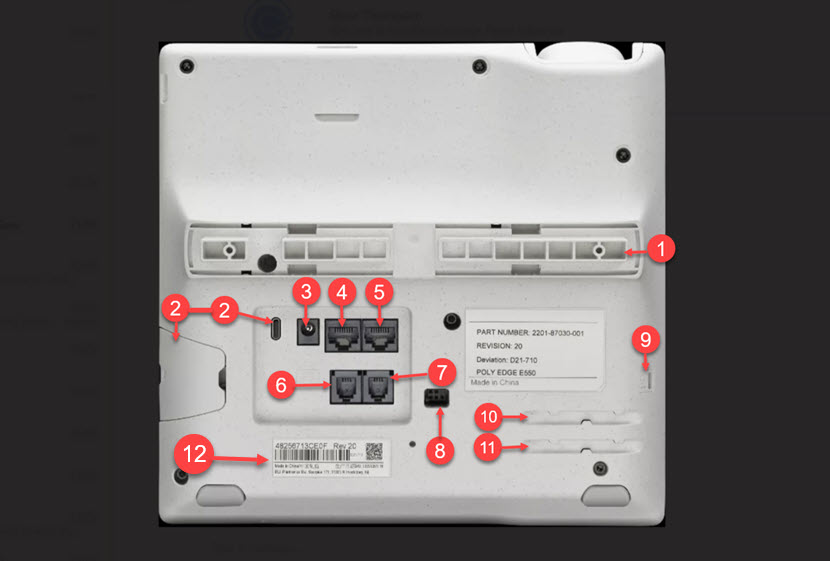
| REFERENCE NUMBER | FEATURE | FEATURE DESCRIPTION |
|---|---|---|
| 1 | Stand Connection Slots | Attach the stand to the phone, enables the phone to sit at a 30- or 60-degree angle. |
| 2 | USB Ports (USB C) | Attach a USB flash drive, a USB headset or a compatible camera. |
| 3 | Power Port | Connect the phone to a power supply. |
| 4 | Network Port | Connect the phone to a PoE supported Ethernet port. |
| 5 | Computer Connection Network Port | Connect a computer through your phone for network access. |
| 6 | Headset Port | Connect a headset to the phone. |
| 7 | Handset Port | Connect a handset to the phone. |
| 8 | Electronic Hookswitch (EHS) | Enables the user to use the controls on their headset to answer and end calls. |
| 9 | Security Slot | Attach a universal security cable lock to the phone to secure it to a desktop. |
| 10 | Handset Cable Slot | Holds the handset cable away from the phone base. |
| 11 | Headset Cable Slot | Holds the headset cable away from the phone base. |
| 12 | MAC Address | Take a picture of this for reference when setting up the phone. |
Surround LED Light Bar
The lighting bar around the display of the phone indicates various phone states.
| STATE | Surrounding LED Light Status |
|---|---|
| Incoming Call | Breathing Green Light |
| Active Call | Solid Green Light |
| Held Call | Breathing Red Light |
| Bluetooth Discovery In Progress | Edge E100 & E220: Breathing Red Light Edge E300, E400 and E500: Bottom LED’s Breathing Red. |
| Off Hours Mode | Breathing Yellow |
Poly Edge E Series Phone Screens
The home screen displays information about calls, line keys and phone status. A user can also make a call and access phone features, settings and information from the home screen. The display has helpful icons, status indicators and screens to aid navigation and understanding of information.
Depending on the way the user’s phone has been set up, it could be possible to access the following from the home screen:
- Place, answer, manage and view information about calls.
- View information about assigned features and line keys.
- View status indicators such as missed calls, voicemail and error messages in the status bar.
- Access phone features, settings and information using the softkeys.
- Add, navigate to and manage pages using the pagination key.
Home Screen Softkeys
The softkeys can be used to make calls and access phone features and information. The function of these can vary depending on the setup by the administrator or service provider.
Call Screens
The status of incoming, outgoing and active calls is shown on the home screen. When a call is made the system will show options to answer/reject the call, forward or more options. Once a call is answered the option will change to: Hold, End Call, Transfer, Conference.
Phone Icons
Busy Lamp Field Icons
The phone displays icons indicating the line status to the user.
BLF Icons
Getting Started
Before using the phone, familiarize yourself with its features and user interface.
Logging into the Poly Edge E Series Phone
If the system administrator has set up the user credentials, they will be able to log into the phone and access contacts, favorites, settings and calendar (if enabled)
If after installing the phone the user is not correctly assigned or the phone is not connecting, contact the system administrator for assistance.
Adding a Poly Edge E Series Phone to MaxCloudUC
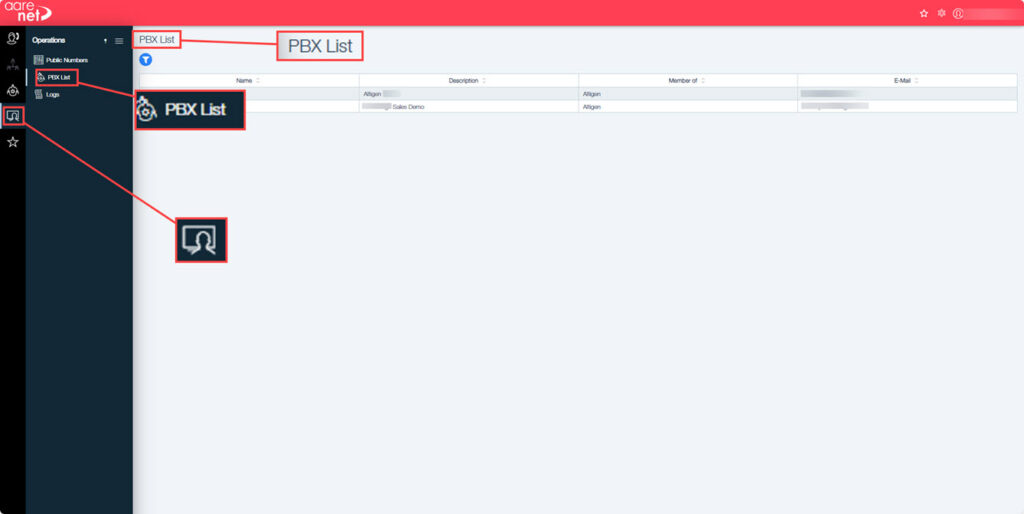
To add a phone to the MaxCloud UC the system administrator will need to log into the PBX and navigate to the extension of the user.
This is done by selecting the correct PBX from the list:
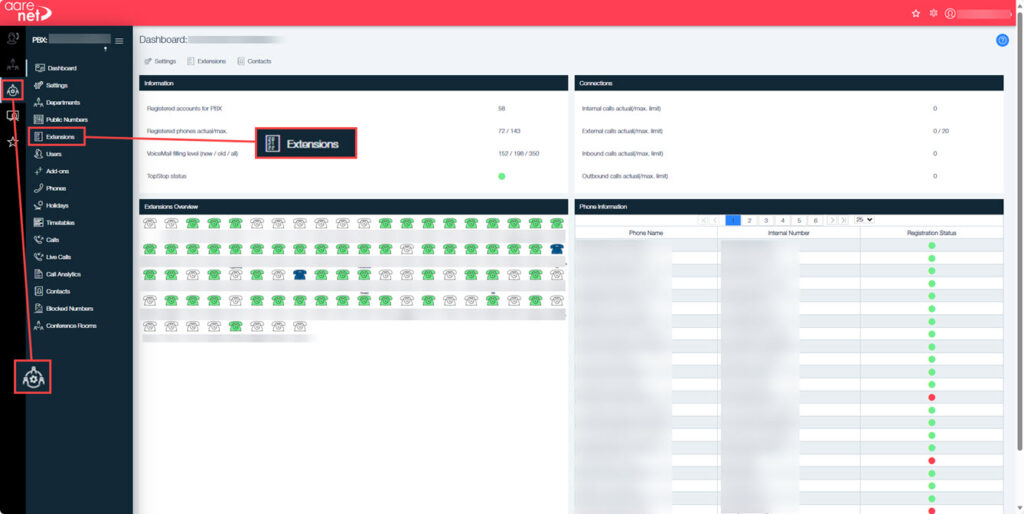
Select the PBX required. This will open the dashboard view for the selected PBX, then in the left-hand menu click on Extensions:
From the list of extensions, select the user the phone will be registered to:
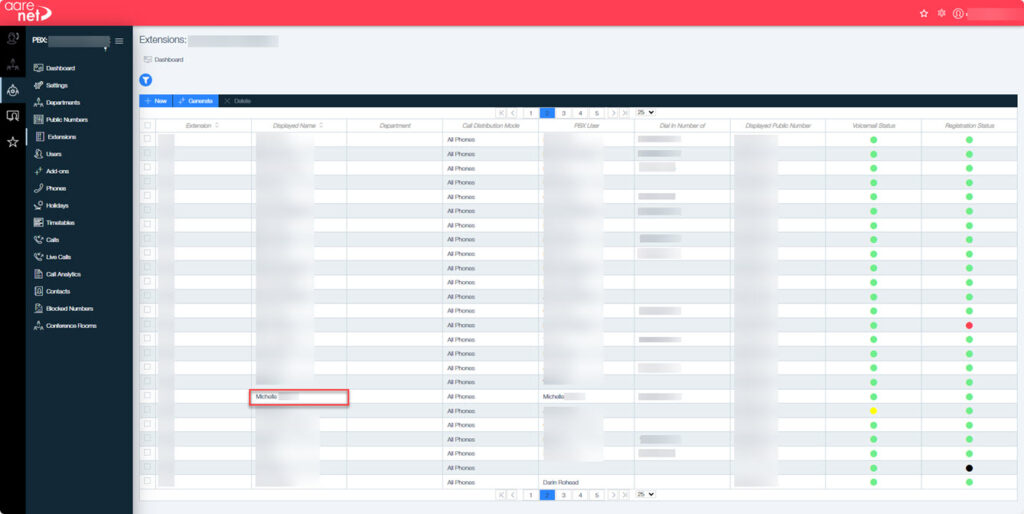
Click on the line of the extension to be used. This will open the extension related features for this user:
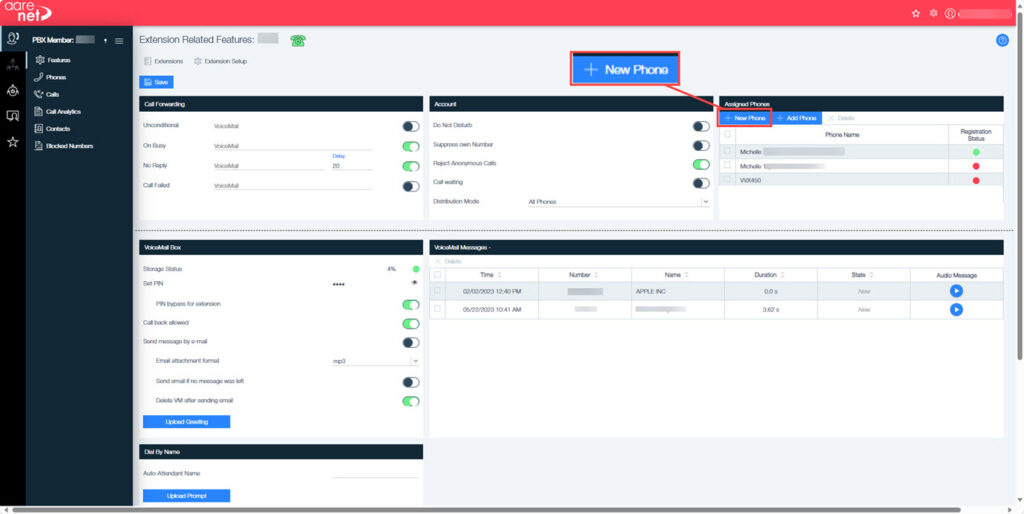
Click on +New Phone. This will open the pop-up for the configuration of the phone:
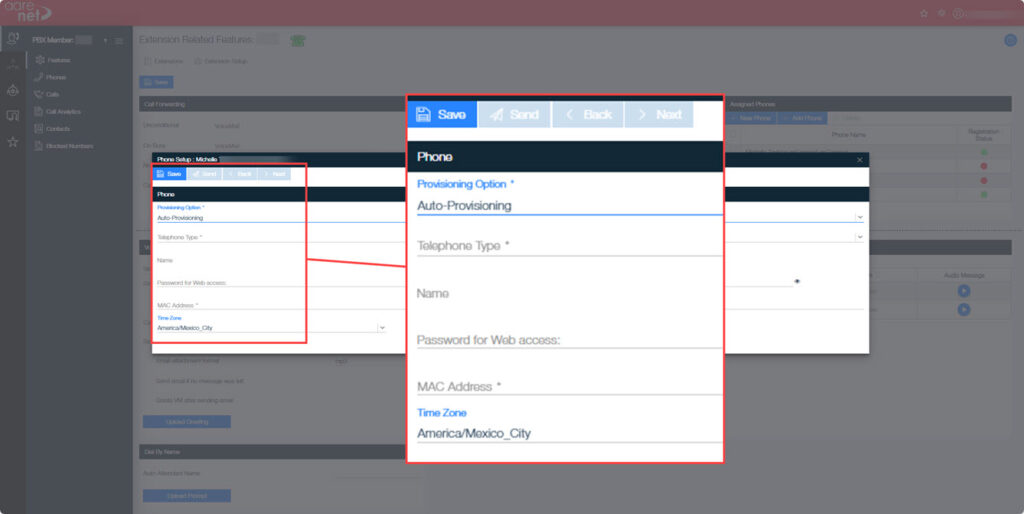
The phone can be added using auto provisioning.
In Telephone Type, type in VVX500.
Add the password for web access (this is the password on the phone normally set to 456.)
Add the MAC address, this can be found in the phone by following the steps below:
- Click the Home button on the phone.
- Click on Settings (10) Select using the middle button.
- Now click on Status (4) select using the middle button.
- Then Network (3) Select using the middle button or press the number 3.
- Go to Ethernet (2) using the middle button or pressing 2.
- The MAC address is at the top of the screen now.
- Add the MAC address to the PBX extension.
Now set the time zone and click save then save again on the PBX pop-up.
The phone should now display in the PBX assigned phones list:
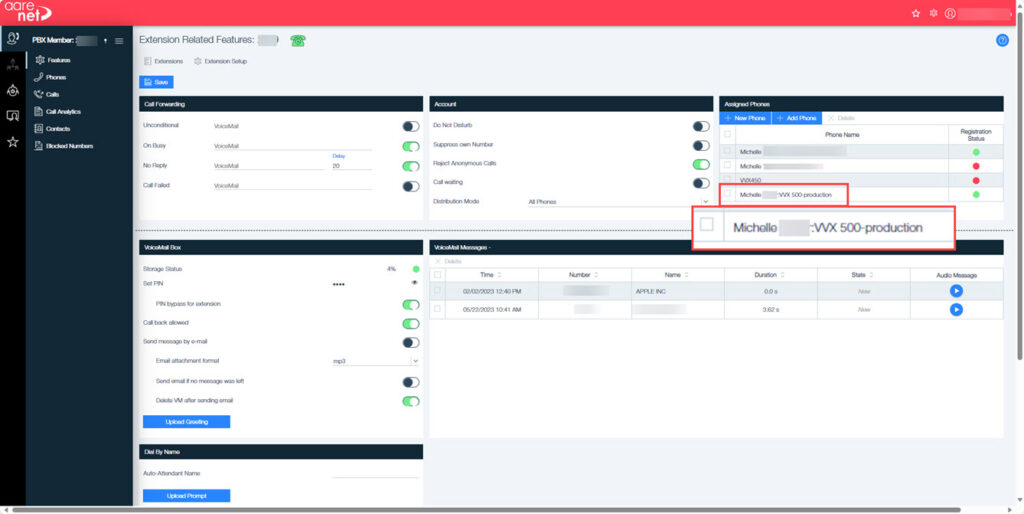
If it does not appear in this list with a green dot first, try reloading the page for the PBX. If this does not change then the phone may need a reset. This can be done by following the below steps on the Poly Edge Phone:
- Click on Home
- Click Settings (10)
- Choose Basic (1)
- Reboot Phone (7)
- It will ask for confirmation.
The phone will now reset, it may require the password on reboot. Once this is completed it should appear with the Green dot on the PBX extension.
Poly Edge Series E Phone Features
Finding Phone Information
Under the menu options there are various preferences that a user can set, some of these may require a password. The system administrator will have this.
By pressing the home key, the menu can be activated.
In the settings menu under basic settings the user can change:
Preferences
- Language
- Time and Date
- Headset
- Background
- Picture Frame
- Screen Saver
- Audible Ringer
- Auto Answer
- Call waiting
- Default Transfer Type
- Number Formatting
Backlight Intensity
- Backlight On Intensity
- Low
- Medium
- High
- Backlight Idle Intensity
- Low
- Medium
- High
- Maximum Intensity – Option to select the intensity using the softkeys.
Backlight Timeout
- Options Between 5 – 660 Seconds
Ring Type
- Option to Change the Ringtone.
Power Saving
- Office Hours
- Start Hour – Select the day of the week and the start hour.
- Duration – Input the duration of the working day.
- Timeouts
- Office Hours Idle Timeout – Input the number of seconds in the field.
- Off Hours Idle Timeout – As above
- User Input Idle Timeout – As Above
Update Configuration
This will ask if you wish to proceed.
Reboot Phone
As above
Bluetooth Settings
- Bluetooth – Either on or off.
- Device Name – Name of the device.
- Manage Devices – Option to scan.
Clear Browser Data
Will ask if you wish to proceed.
Wi-Fi Menu
Toggle switch to choose between on or off.
Clear Uploaded Calls/Directory
Will prompt to ask if it should proceed.
Finding the Phone Information
To find the information of the phone including, the serial number and model go to the menu and select Help and Support (9) then About (3).
Under the Help and Support option the user can also run a diagnostic test (1) and click on Help (2) where there is a QR code linking to how to videos.
Entering the Information on the Phone
The Dialpad on the phone can be used to input information. It is possible to enter numbers or English text as well as foreign language characters.
Before entering information into fields choose how to enter using the following softkeys:
- Mode – Enables the user to enter numbers or text in title case, lowercase or uppercase characters.
- Encoding – Enables the user to enter characters from foreign languages.
The table below lists the Mode and Encoding options for the Dialpad and the onscreen keyboard:
| MODE OPTIONS | ENCODING OPTIONS |
|---|---|
| Abc (capitalize the first letter only and use lowercase for additional text) | Abc |
| ABC (Enter uppercase only) | ABC |
| Abc (Lower case only) | abc |
| 123 (Use numbers only) | 123 |
| ASCII (for regular text) | |
| Latin (To enter accented characters) | |
| Katakana (For Japanese characters) | |
| Unicode (To store characters as double bytes) | |
| Cyrillic (For Russian characters) |
Entering Information Using the Dial Pad
The Dialpad keys can be used to edit or update field information.
The below table describes how to enter different types of data on your phone using the dial pad:
| TASK | ACTION |
|---|---|
| Enter numbers of characters in uppercase, lowercase or title case mode | Select Encoding or Mode, select ABC, abc or Abc. |
| Enter only numbers | Select Encoding or Mode, select 123. |
| Enter text in another language | Select Encoding the choose a language from the options. |
| Enter a character | Press a dial pad key repeatedly to view the character options, stop when the required is found. Wait one second before entering the next character. |
| Enter a number | Select Encoding or Mode, Select 123 or press a dial pad key repeatedly to enter the number that displays on that key. |
| Enter a special character | Select Encoding or Mode, select Abc, ABC or abc. Press either 1,0 asterisk or pound key one or more times to enter one of the following special characters: 1 key: !|’^\@:1 *Key: *-&%+;( ) 0Key: /,_$=?0 #Key:#><{}[]”’ These can not be accessed if in numerical mode (123) |
| Enter a space | Select Encoding, then choose one of the alphabetical options Abc, ABC or abc and press the 0 key. This can not be accessed in numerical mode (123) |
| Delete one or more characters | Use the arrow keys to position the cursor to the right of the character or drag a finger over the characters until the cursor is positioned to the right of the character(s) to be deleted. Press the delete key or press the << softkey. |
Changing the Audio Settings
Certain controls can be controlled from the phone. This includes the ringtone for incoming calls from all or specific contacts. The option of where notifications are played and the volume of the ringtone or the call audio can also be changed from the phone.
Changing the Audible Ringer Settings
The default settings enable the user to play sounds via the speaker, it is possible to set these to ring on a headset, handset, speaker or the active audio device the user sets.
To change the settings, follow the below steps:
- Click on Home (menu)
- Select Settings (10)
- Basic (1)
- Preferences (1)
- Audible Ringer (7)
- Speaker
- Handset
- Headset
- Active
Choose one of the options under the audible ringer selection, to hear the differences click on an option.
Setting A Ringtone for Incoming Calls
The phone is set up with a default ringtone (Low Trill) this can be changed using the menu.
- Click the home button (menu)
- Select Settings (10)
- Basic (1)
- Select Ring Type (4)
- Select A Ring Tone (click on an option then click Play to hear the ringtone)
- Press The Select Softkey
If the select softkey is not pressed the ringtone will revert to the earlier selection.
Changing The Volume
Changing the volume is easy, simply press either the volume up or down key on the phone for the ringtone volume or in a call to change the audio volume.
Troubleshooting
Forgotten Admin Password
If the admin password has been forgotten, the phone will need to be rebooted.
To do this power off the phone by unplugging the network cable. Then hold down keys 1, 3 and 5 on the phone’s keypad whilst plugging it back into the network. Now the screen should ask for an admin password.
Enter the MAC address as the password (this can be found on the back of the phone above the barcode. If this requires letters remember to change the mode accordingly once this is done continue and the phone will reboot.
If connected to a PBX the phone may need to be deleted and readded for it to reconfigure.
Home Key Not Working
It has been noted that updating a provisioned phone to the latest firmware version can affect the home key. If this happens press home till the menu appears then select option 10 (settings) the option 2 (advanced), enter the admin password then select option 1 (administration settings. Now click option 5 (reset to Defaults) then option 6 (reset To Factory)
When the phone reboots the home button should be working.