Requirements
- ALGO 8180(G2)
- Tested with Firmware: 1.7.6, base r1.7
- Hardware Information: 8180g2 v4
- Available port on P.O.E. Capable switch for power
- Support contract and services with Altigen Communications
- IT Support personnel or designated Representative to communicate needs to Altigen TSO team
- Helpful to download locally www.algosolutions.com/locator for ease of locating your Algo devices that may have pulled DHCP
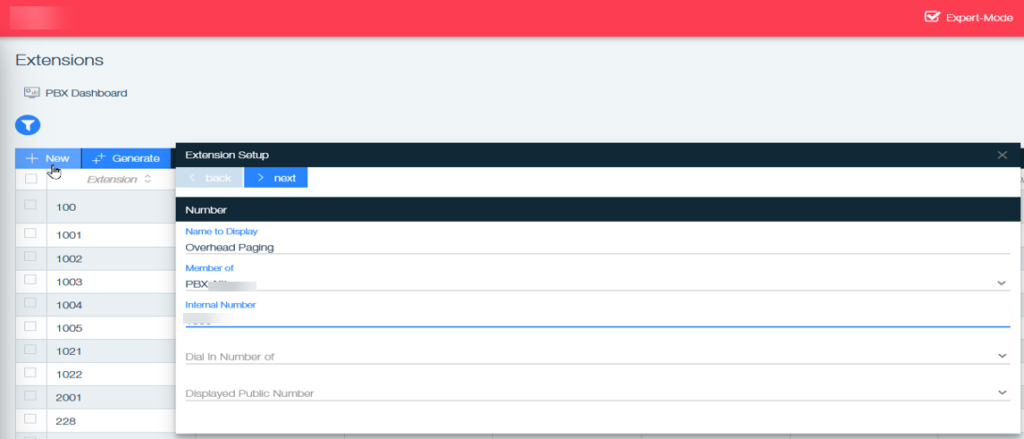
Setting up MaxCloud Extension
- Log into your MaxCloud, and go to the PBX Dashboard page
- Select the “Extensions” button near the top left of the screen
- Click on the “New” button
- Enter a Name in the Name to Display Field (e.g. Overhead Paging)
- Select system Name in Member of field
- Add an extension number in the Internal Number Field
- If no access to outside world, keep Dial in Number and displayed Public number blank
- Click on ” Next” button at the top of the screen
- Click on “Next” button through next screen as paging should not use outbound
- Enter the intended user’s email address in the Email Field. (This will send config from upcoming steps)
- Click on “Save” Close the sub-screen
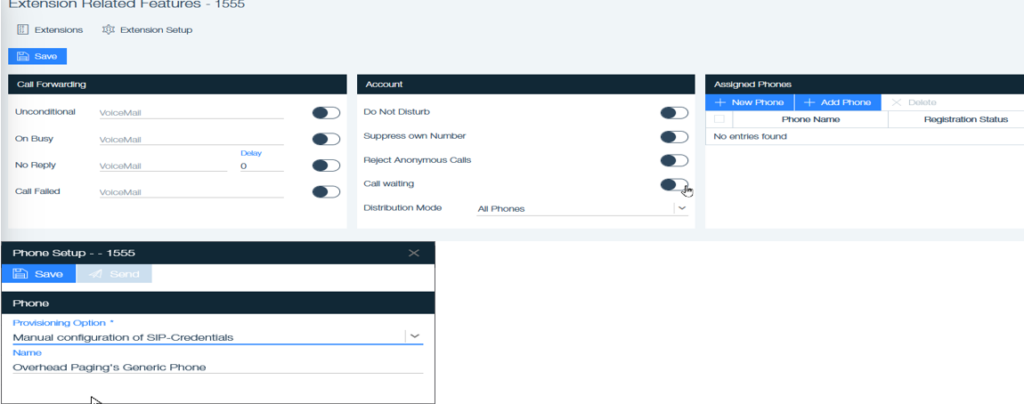
Setting up MaxCloud Extension (continued)
- Double Click on the newly created extension to get to configuration page
- In the Top right portion, click on “+New Phone”
- Select Manual Configuration of SIP-Credentials in Provisioning Option
- Either keep the name as it is or, change the Name in the field to a preferred option
- Click on “Save”
- Click on “Send”
- Click on “Next”, you will be presented with a configuration screen
Configuring the Algo
This section is intended for use with a stand alone ALGO 8180. Although you may setup other settings within your ALGO to conduct other paging services or features, this particular setup is the recommended and supported version by Altigen while used for Teams in conjunction with MaxCloud. Any derivation from this may result in the support engineer requesting that you Factory Reset the device and follow these steps for trouble-shooting purposes to get basic functionality working. Further configurations or modifications are on the owners discretion and may require support from ALGO.
Preparing the Algo
Be prepared to need a PC locally connected to the same subnet as the Algo once reset. ALGO default IP is 192.168.10111
1a. Soft Reset
A soft reset will restore all device settings back to the original factory default conditions. To perform a soft reset, disconnect and connect the network cable, ensuring that there is power to the device. Once the LED starts to flash, hold down the IP Addr (Reset) button until the LED light flickers at a faster rate, then release. When the speaker plays a tone, the reset is complete.
Once complete, launch the locator program to find your device, or push the button on the back-side of the device labeled IP Addr (Reset) once again to have IP read. Repeat, press to stop
Start configuration using locator tool
Start config using locator tool
- launch the locator tool
- Wait to see if it locates devices (Mac beginning with 00:22:ee)
- If found, click on the configuration button in the window

- If not located, ensure that the PC you are using is on the same network and that VPN to other structures is disabled. If this does not work, press IP button on the back of the device to locate
Changing the Password
- Once logged in, click on the Advanced Settings tab
- Click on the sub-tab labeled Admin
- Change your Password
- Scroll to the bottom of the page and click on “Save”
- Save your password, preferably with a password locker program
- The Algo will have a banner at the top requiring reboot to save
Setting up SIP
- Locate the email or file with your extension information that was sent from the Algo
- In the Algo, click on Advanced Settings Tab>Advanced SIP sub-tab
- Add the IP and Port information from your email to the outbound proxy field (e.g. 22.55.77.123:5060)
- Enable the Server Redundancy feature
- Within this block, Enable poll Active Server and SIP options
- Scroll to the bottom of the screen and click “Save”

Important: Set the Register period (seconds) to 90.
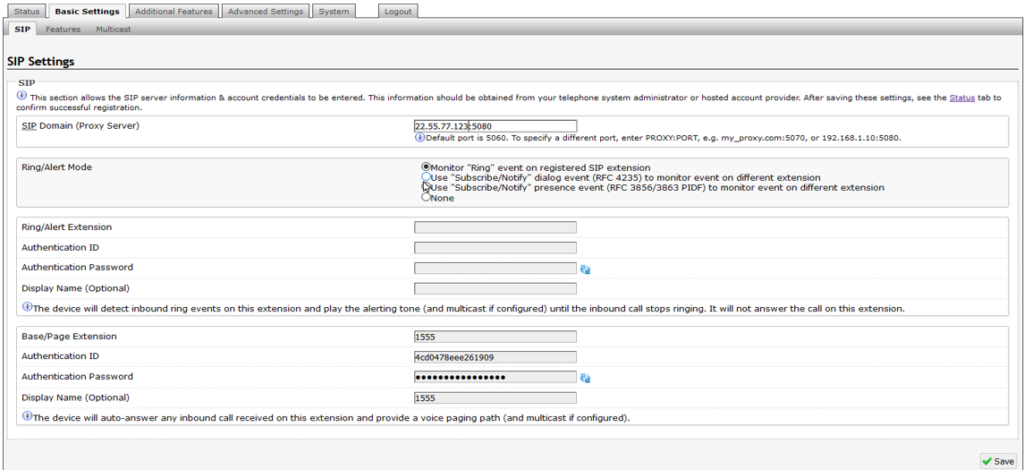
Configuring the Algo (cont.)
- Click on the Basic Settings Tab>SIP sub-tab
- Enter the IP information from your email in the SIP Domain with your preffered port. (e.g. 22.55.77.123:5080)
- Leave the Ring/Alert mode set to Monitor “Ring” event on registered SIP Extension
- Leave the next section blank. This section is used if utilizing a paging protocol with Multicast
- Enter extension from the “User name/Number” field of your email
- Enter Auth ID from the “Register Name/Auth ID” field of your email
- Enter your Password from the “(Auth) Password” field of your email
- Click on “Save”